✨ How To Pack A Gift
📋 The Event Planner's Essential Toolkit
Whether you're throwing a massive birthday bash or an intimate baby shower, the right tools make execution effortless. These are the 5 essential items that professional event coordinators and DIY party hosts consistently rely on to pull off flawless celebrations without the stress.
🎈 Electric Dual-Nozzle Balloon Pump
The absolute lifeline for creating those trending balloon arches and garlands that everyone loves. This dual-nozzle pump lets you inflate hundreds of balloons in a fraction of the time, saving your lungs and transforming hours of prep work into minutes.
🛡️ Command Clear Party Hooks & Strips
The secret to magazine-worthy venue decorations without losing your security deposit. Professional planners stock up on these clear, damage-free hooks to hang banners, string lights, and paper lanterns securely on walls and ceilings, removing cleanly when the party is over.
🧁 Wilton Tiered Cupcake & Dessert Stand
The easiest way to make a simple dessert table look professionally catered. This customizable, multi-tier display stand gives crucial height and dimension to your treats, effortlessly elevating the presentation of cupcakes, cookies, or appetizers at any gathering.
🚂 Heavy-Duty Collapsible Utility Wagon
The unsung hero of off-site parties, park birthdays, and trunk-or-treats. This rugged folding wagon hauls folding chairs, coolers, and mountains of decor from your car to the venue in one trip, completely eliminating the exhausting pre-party back-and-forth hauling.
📓 Clever Fox Event Planner Organizer
The ultimate command center for keeping your sanity intact while hosting. Dedicated sections for guest lists, budget tracking, vendor contacts, and day-of timelines ensure that not a single crucial detail falls through the cracks before the big day.
There’s a unique magic in giving a gift, but the journey from choosing the perfect present to presenting it beautifully is an art form in itself. A thoughtfully wrapped gift isn’t just about concealing what’s inside; it’s an extension of your care, a promise of joy, and a visual whisper of the celebration to come. Imagine the sparkle in their eyes even before they tear open the paper, or the “oohs” and “aahs” as they admire the intricate details you’ve lovingly put together. This guide isn’t just about folding paper; it’s about transforming a simple gift into an unforgettable moment, a Pinterest-worthy masterpiece that speaks volumes before a single word is exchanged. Let’s make every gift you give a memorable celebration!

Quick Overview
In this guide, you’ll learn the secrets to transforming a simple present into a stunning, personalized package that truly celebrates the recipient and the occasion. From crisp edges to enchanting embellishments, you’ll master the art of gift wrapping that leaves a lasting impression.
- Time needed: 15-45 minutes per gift (depending on complexity)
- Difficulty: Beginner to Intermediate
- What you’ll need: Wrapping paper, scissors, tape, ribbon, gift tag, and optional decorative elements.
Step-by-Step Instructions
Step 1: Gather Your Creative Arsenal
Before you embark on your wrapping adventure, assemble all your tools and decorative elements. Think of this as preparing your artist’s palette. The right supplies can elevate a simple gift into a showstopper. Don’t be afraid to mix textures, patterns, and colors to create a truly unique presentation.
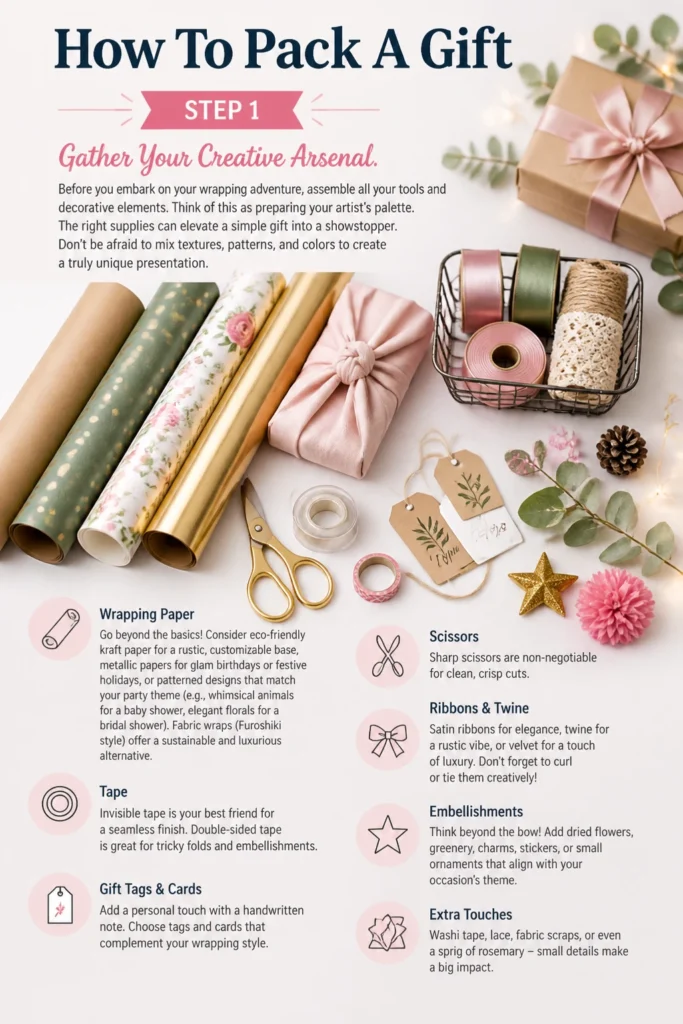
- Wrapping Paper: Go beyond the basics! Consider eco-friendly kraft paper for a rustic, customizable base, metallic papers for glam birthdays or festive holidays, or patterned designs that match your party theme (e.g., whimsical animals for a baby shower, elegant florals for a bridal shower). Fabric wraps (Furoshiki style) offer a sustainable and luxurious alternative.
- Scissors: Sharp scissors are non-negotiable for clean, crisp cuts.
- Tape: Invisible tape is your best friend for a seamless finish. Double-sided tape is fantastic for securing edges without any visible tape lines.
- Ribbons & Twine: This is where the magic truly happens! Stock up on a variety: luxurious satin, rustic twine, velvety ribbon, sheer organza, or even patterned grosgrain. Choose colors that complement or contrast beautifully with your wrapping paper.
- Gift Tags: Handmade tags add a personal touch. Use cardstock, small kraft tags, or even cut-out shapes.
- Embellishments (Optional but highly recommended!):
- Natural Elements: Dried flowers (lavender, eucalyptus, baby’s breath), small pinecones (holidays), sprigs of rosemary or berries.
- Charms & Ornaments: Small key charms, miniature ornaments (for holiday gifts), or even personalized initials.
- Photos: A small printed photo of you and the recipient for a sentimental touch.
- Stickers & Stamps: Themed stickers (e.g., “It’s a Boy!” for baby showers, “Happy Birthday!” for celebrations) or rubber stamps.
- Bells & Whistles: Mini jingle bells, glitter, pom-poms, small toys (for kids’ gifts).
Pro tip: Create a “gift wrap station” in your home with all your supplies organized. This makes the process enjoyable and efficient, especially during busy holiday seasons or when planning multiple party gifts.
Step 2: Prepare the Gift for its Grand Entrance
Before any paper touches the gift, ensure it’s ready for wrapping. This step is about protecting the gift and providing a stable, uniform shape for easier wrapping.
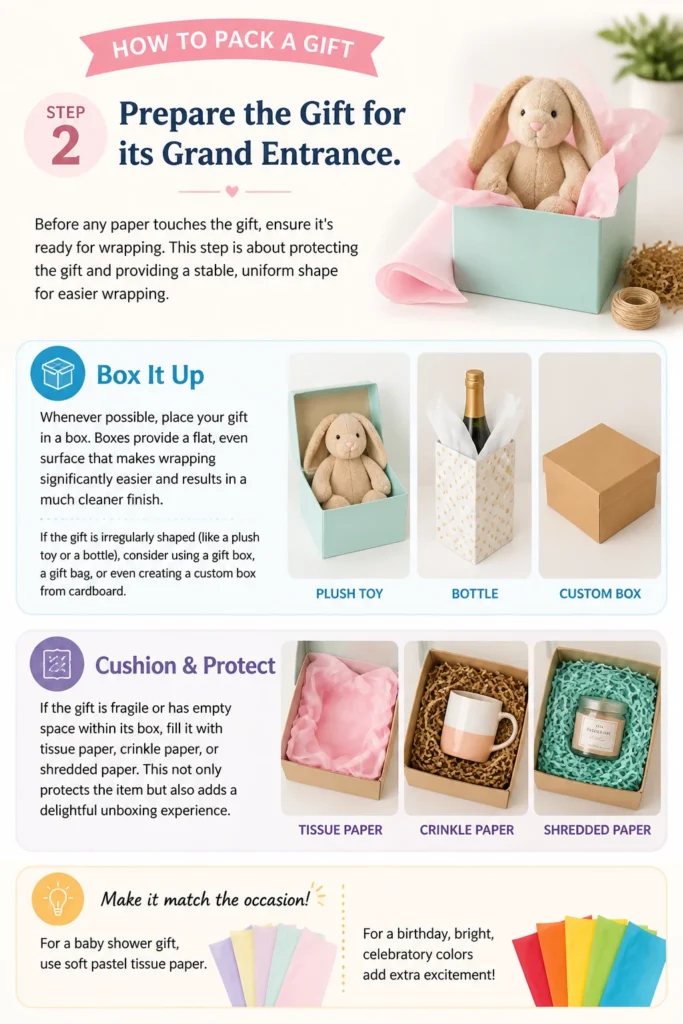
- Box It Up: Whenever possible, place your gift in a box. Boxes provide a flat, even surface that makes wrapping significantly easier and results in a much cleaner finish. If the gift is irregularly shaped (like a plush toy or a bottle), consider using a gift box, a gift bag, or even creating a custom box from cardboard.
- Cushion & Protect: If the gift is fragile or has empty space within its box, fill it with tissue paper, crinkle paper, or shredded paper. This not only protects the item but also adds a delightful “unboxing” experience. For a baby shower gift, use soft pastel tissue paper. For a birthday, bright, celebratory colors.
- Remove Price Tags: Double-check that all price tags are removed or cleanly covered. This is a small detail that makes a big difference in presentation.
Pro tip: For extra luxury, wrap the gift itself in a layer of tissue paper before placing it in the box. This adds an extra step of anticipation and makes the gift feel more substantial.
Step 3: Measure and Cut with Precision
This is where many go wrong, leading to too much or too little paper. A precise cut ensures a neat, professional look.
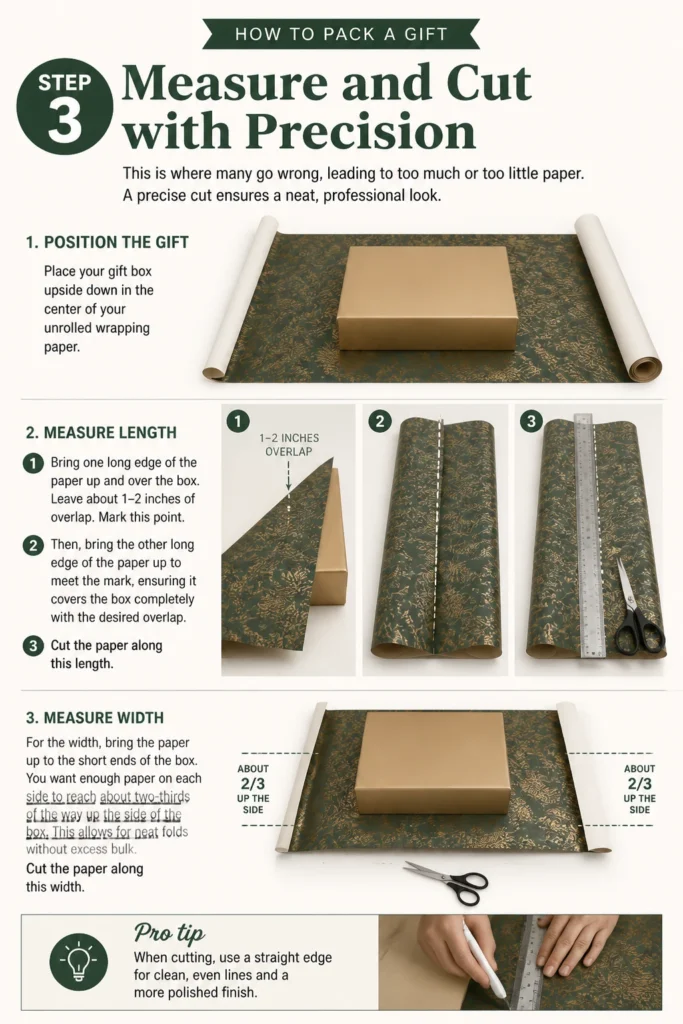
- Position the Gift: Place your gift box upside down in the center of your unrolled wrapping paper.
- Measure Length: Bring one long edge of the paper up and over the box. Leave about 1-2 inches of overlap. Mark this point. Then, bring the other long edge of the paper up to meet the mark, ensuring it covers the box completely with the desired overlap. Cut the paper along this length.
- Measure Width: For the width, bring the paper up to the short ends of the box. You want enough paper on each side to reach about two-thirds of the way up the side of the box. This allows for neat folds without excess bulk. Cut the paper along this width.
Pro tip: When cutting, use a straight edge or the lines on the back of the wrapping paper (if available) to ensure a perfectly straight line. This makes for crisp, clean folds later on.
Step 4: Execute the Base Wrap with Finesse
The foundation of a beautifully wrapped gift lies in the smooth, taut base wrap. This technique works best for rectangular or square boxes.
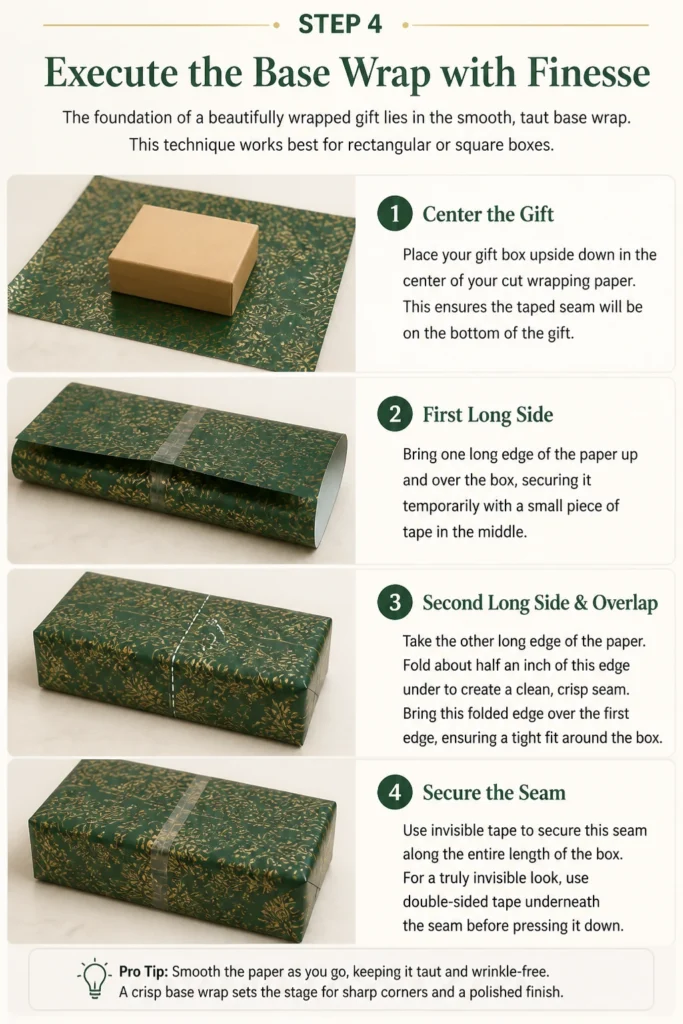
- Center the Gift: Place your gift box upside down in the center of your cut wrapping paper. This ensures the taped seam will be on the bottom of the gift.
- First Long Side: Bring one long edge of the paper up and over the box, securing it temporarily with a small piece of tape in the middle.
- Second Long Side & Overlap: Take the other long edge of the paper. Fold about half an inch of this edge under to create a clean, crisp seam. Bring this folded edge over the first edge, ensuring a tight fit around the box.
- Secure the Seam: Use invisible tape to secure this seam along the entire length of the box. For a truly invisible look, use double-sided tape underneath the folded edge.
Pro tip: Keep the paper taut as you wrap. Any slack will lead to wrinkles and a less polished finish. Use your hands to smooth out any air bubbles as you go.
Step 5: Master the End Folds
The ends of the gift are where neatness truly shines. This technique creates sharp, professional-looking corners.
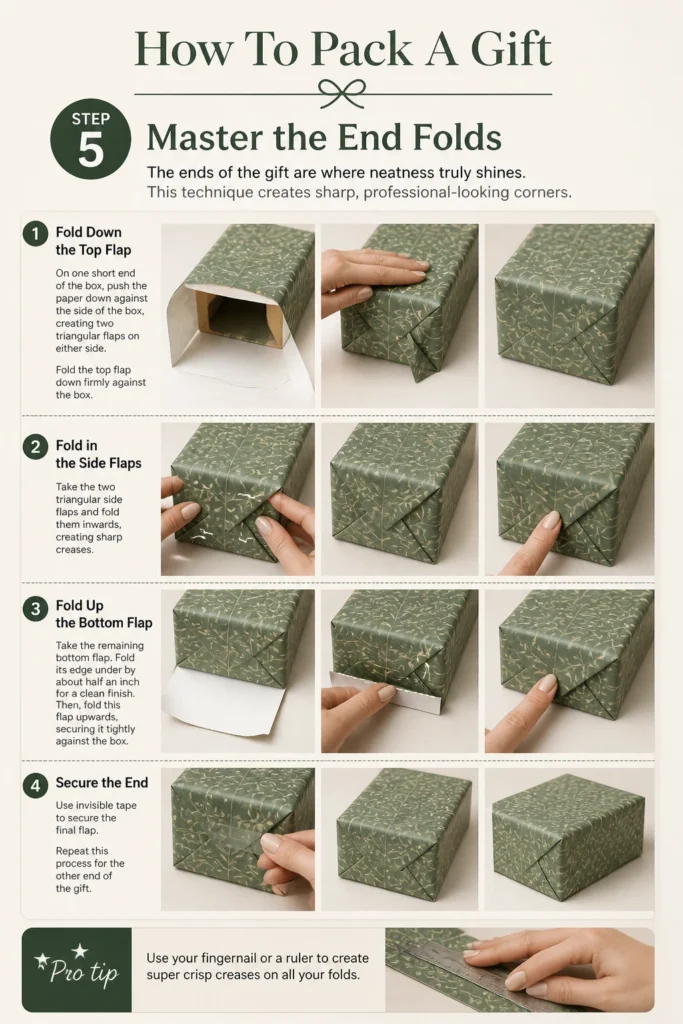
- Fold Down the Top Flap: On one short end of the box, push the paper down against the side of the box, creating two triangular flaps on either side. Fold the top flap down firmly against the box.
- Fold in the Side Flaps: Take the two triangular side flaps and fold them inwards, creating sharp creases.
- Fold Up the Bottom Flap: Take the remaining bottom flap. Fold its edge under by about half an inch for a clean finish. Then, fold this flap upwards, securing it tightly against the box.
- Secure the End: Use invisible tape to secure the final flap. Repeat this process for the other end of the gift.
Pro tip: Use your fingernail or a ruler to create super crisp creases on all your folds. This attention to detail makes a significant difference in the final appearance, giving it that “boutique wrapped” look.
Step 6: Add Ribbon Magic
Ribbons are like the jewelry of a gift – they add sparkle, texture, and a touch of elegance or whimsy. This is where your gift truly starts to come alive!
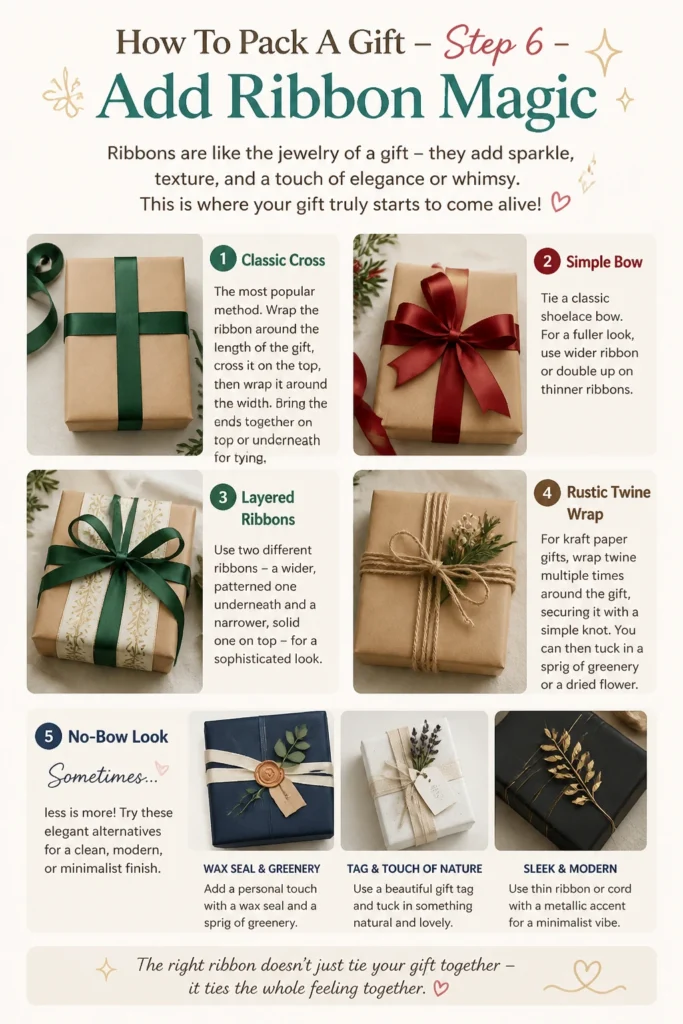
- Classic Cross: The most popular method. Wrap the ribbon around the length of the gift, cross it on the top, then wrap it around the width. Bring the ends together on top or underneath for tying.
- Simple Bow: Tie a classic shoelace bow. For a fuller look, use wider ribbon or double up on thinner ribbons.
- Layered Ribbons: Use two different ribbons – a wider, patterned one underneath and a narrower, solid one on top – for a sophisticated look.
- Rustic Twine Wrap: For kraft paper gifts, wrap twine multiple times around the gift, securing it with a simple knot. You can then tuck in a sprig of greenery or a dried flower.
- No-Bow Look: Sometimes, less is more. Wrap a beautiful satin ribbon around the gift horizontally or vertically and secure it with a chic knot or a wax seal, foregoing a traditional bow.
Pro tip: For voluminous bows, use wired ribbon. It holds its shape beautifully. To make ribbon ends curl elegantly, gently run them along the dull side of a scissor blade.
Step 7: Embellish with Flair and Personality
This is your opportunity to infuse the gift with personality, theme, and a touch of Pinterest-worthy charm. Think beyond the ordinary!
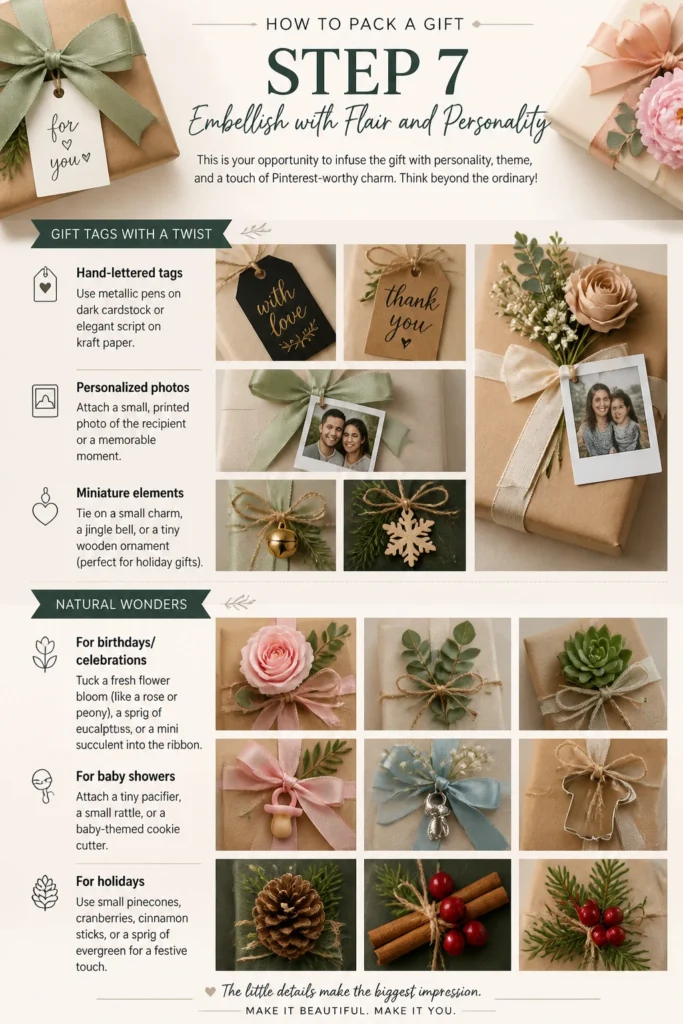
- Gift Tags with a Twist: Instead of a plain tag, consider:
- Hand-lettered tags: Use metallic pens on dark cardstock or elegant script on kraft paper.
- Personalized photos: Attach a small, printed photo of the recipient or a memorable moment.
- Miniature elements: Tie on a small charm, a jingle bell, or a tiny wooden ornament (perfect for holiday gifts).
- Natural Wonders:
- For birthdays/celebrations: Tuck a fresh flower bloom (like a rose or peony), a sprig of eucalyptus, or a mini succulent into the ribbon.
- For baby showers: Attach a tiny pacifier, a small rattle, or a baby-themed cookie cutter.
- For holidays: Use small pinecones, cranberries, cinnamon sticks, or a sprig of holly.
- DIY Touches:
- Stamped paper: Use rubber stamps to create your own patterned paper or add festive messages.
- Hand-drawn designs: Draw intricate patterns or fun doodles directly onto kraft paper with markers.
- Glitter & Confetti: A subtle sprinkle of glitter or a few pieces of metallic confetti can add instant sparkle.
- Layered Elements: Combine a gift tag with a sprig of greenery and a small charm for a multi-dimensional look.
Pro tip: Think about the recipient’s personality and the occasion. A minimalist friend might appreciate a single, elegant ribbon and a simple tag, while a maximalist might adore layers of texture and sparkle. For a child’s birthday, tie on a small toy or a lollipop!
Step 8: The Grand Presentation & Beyond
The final touches ensure your gift is not just wrapped, but beautifully presented and ready to delight.
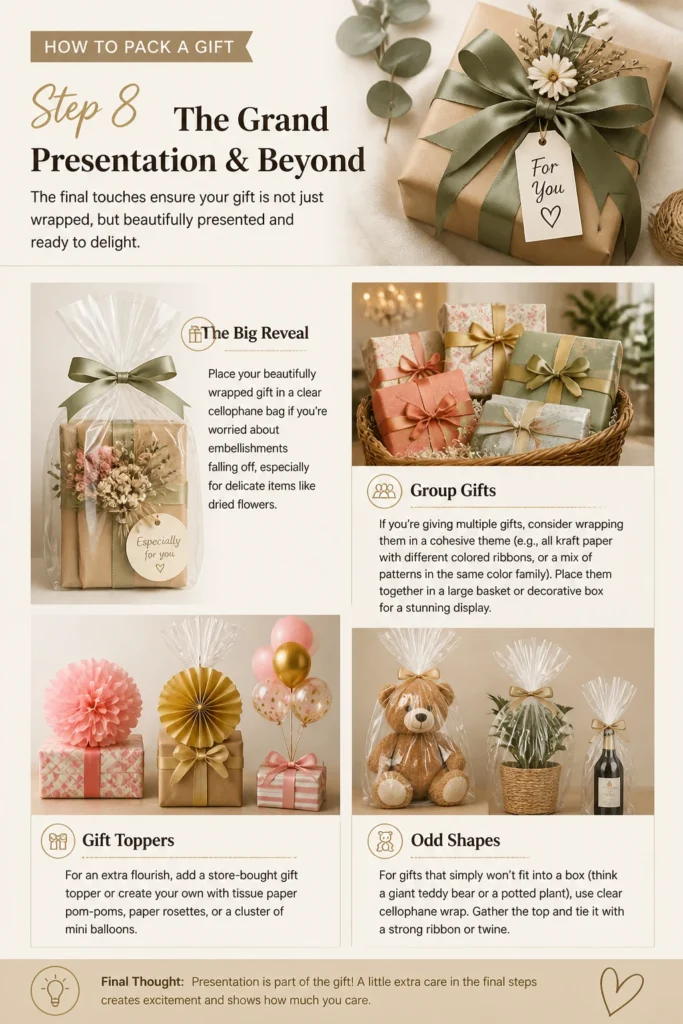
- The Big Reveal: Place your beautifully wrapped gift in a clear cellophane bag if you’re worried about embellishments falling off, especially for delicate items like dried flowers.
- Group Gifts: If you’re giving multiple gifts, consider wrapping them in a cohesive theme (e.g., all kraft paper with different colored ribbons, or a mix of patterns in the same color family). Place them together in a large basket or decorative box for a stunning display.
- Gift Toppers: For an extra flourish, add a store-bought gift topper or create your own with tissue paper pom-poms, paper rosettes, or a cluster of mini balloons.
- Odd Shapes: For gifts that simply won’t fit into a box (think a giant teddy bear or a bicycle), consider a large gift bag, fabric wrap, or a creative “unveiling” where the item is simply adorned with a giant bow.
- Handwritten Note: Always include a heartfelt, handwritten note. It’s the ultimate personal touch that truly completes the gift-giving experience.
Pro tip: Practice makes perfect! Don’t be discouraged if your first few attempts aren’t flawless. Each gift you wrap is an opportunity to refine your skills and explore new creative avenues. Enjoy the process!
Common Mistakes to Avoid
Even seasoned gift-wrappers can fall into these traps. Being aware of them will help you achieve a professional finish every time.
- Using Too Much or Too Little Paper:
- Problem: Too much paper leads to bulky, messy folds and wasted material. Too little results in gaps or a stretched, unprofessional look.
- Correct Approach: Always measure carefully as described in Step 3. Aim for just enough overlap on the long side (1-2 inches) and enough to cover two-thirds of the short sides.
- Dull Scissors and Visible Tape:
- Problem: Dull scissors create jagged, uneven edges. Visible tape detracts from the aesthetic, making the gift look less polished.
- Correct Approach: Invest in a good pair of sharp scissors specifically for wrapping paper. Use invisible tape for seams, or better yet, double-sided tape for an utterly seamless finish. Place tape on the underside of folds whenever possible.
- Ignoring the Gift’s Shape:
- Problem: Trying to wrap an oddly shaped item directly with paper often leads to frustration, tears, and a lumpy result.
- Correct Approach: For irregular items, always place them in a box or a gift bag. If a box isn’t an option, consider using fabric wrap (Furoshiki) or a creative presentation that doesn’t involve traditional wrapping paper.
- Over-Embellishing or Mismatched Themes:
- Problem: Too many different ribbons, charms, and colors can make a gift look cluttered rather than curated. Mismatched themes (e.g., Christmas ribbon on a baby shower gift) can be jarring.
- Correct Approach: Choose a cohesive theme or color palette. Select 2-3 complementary embellishments rather than trying to use everything. Let one element be the star, and others support it.
Troubleshooting
Even with the best intentions, things can go awry. Here are quick fixes for common wrapping woes.
- Problem: Paper is too short to meet on one side.
- Solution: Don’t panic! Cut a strip of contrasting or complementary wrapping paper, about 2-3 inches wide. Tape this strip to one edge of your main paper, then overlap it with the other side of the main paper and secure. This creates a stylish “band” effect and saves the wrap. Alternatively, hide the gap with a wide ribbon or a large gift tag.
- Problem: Wrinkles and bubbles appear after wrapping.
- Solution: This usually happens if the paper wasn’t pulled taut enough. Gently lift the paper where the wrinkle is, smooth it out with your hand or a flat tool (like a ruler), and re-tape. For minor wrinkles, you can sometimes gently rub them out, but prevention is key by keeping the paper tight during wrapping.
- Problem: My bow looks flimsy or flat.
- Solution: If using non-wired ribbon, try doubling it up for more volume. For a more structured bow, use wired ribbon, which allows you to shape the loops and tails. You can also create a “pom-pom” style bow by layering multiple loops of ribbon and securing them in the center, then fluffing them out.
Key Takeaways
- Preparation is key: Gather all supplies and box your gift for best results.
- Measure precisely: Avoid excess paper for a clean, professional finish.
- Keep it taut: Smooth, crisp folds are the hallmark of a well-wrapped gift.
- Ribbons and embellishments add personality and Pinterest-worthy charm.
- Personal touches, like handwritten tags, elevate the entire experience.
- Practice makes perfect, and every gift is an opportunity to express your creativity!
Frequently Asked Questions
Here are some common questions gift-givers often ask:
Q1: How do I wrap a gift that’s not a perfect square or rectangle, like a bottle or a sphere?
A1: For bottles, consider a “fringe” or “cracker” wrap: wrap the paper around the bottle, then gather and tie the ends with ribbon above and below the bottle’s top and bottom. For spheres, try gathering the paper around the item and tying it at the top like a “candy” or “pouch” style. However, the easiest and often most elegant solution for both is to place them in a suitable gift box or a decorative gift bag with tissue paper.
Q2: What are some sustainable or eco-friendly wrapping ideas?
A2: Embrace fabric wraps (Furoshiki is a Japanese technique using cloth squares), reusable gift bags, or wrapping with recycled materials like old maps, newspaper comics, or brown kraft paper decorated with natural elements. You can also use twine instead of plastic ribbon and dried botanicals instead of plastic embellishments. Encourage recipients to reuse your beautiful wrapping too!
Q3: How can I make my gift look truly luxurious without spending a fortune?
A3: Focus on texture and details. Use simple kraft paper as a base, then add a wide velvet ribbon or a thin metallic ribbon. Incorporate natural elements like a sprig of fresh rosemary or a dried orange slice. A beautifully handwritten tag on quality cardstock can make a huge difference. Double-sided tape for invisible seams also elevates the look significantly. It’s about thoughtful touches, not expensive materials.
Q4: How far in advance can I wrap gifts, especially around holidays?
A4: Most gifts can be wrapped weeks in advance, as long as they are stored in a cool, dry place away from direct sunlight to prevent paper fading. If you’re using fresh flowers or delicate natural elements, add those just a day or two before gifting to ensure they look their best. For food gifts, wrap them immediately before presenting to maintain freshness.
What’s Next?
Now that you’ve mastered the art of “How To Pack A Gift,” your celebrations are destined to be even more memorable! Why not explore different wrapping styles for specific occasions? Try your hand at creating custom gift tags, or delve deeper into DIY embellishments like handmade paper flowers or personalized wax seals. The joy of giving is amplified by the beauty of the presentation. Don’t wait for the next special occasion; gather your supplies today and start practicing your newfound skills. Your future recipients (and your inner creative spirit) will thank you!