🎁 How To Make A Gift Basket Look Full
📋 The Event Planner's Essential Toolkit
Whether you're throwing a massive birthday bash or an intimate baby shower, the right tools make execution effortless. These are the 5 essential items that professional event coordinators and DIY party hosts consistently rely on to pull off flawless celebrations without the stress.
🎈 Electric Dual-Nozzle Balloon Pump
The absolute lifeline for creating those trending balloon arches and garlands that everyone loves. This dual-nozzle pump lets you inflate hundreds of balloons in a fraction of the time, saving your lungs and transforming hours of prep work into minutes.
🛡️ Command Clear Party Hooks & Strips
The secret to magazine-worthy venue decorations without losing your security deposit. Professional planners stock up on these clear, damage-free hooks to hang banners, string lights, and paper lanterns securely on walls and ceilings, removing cleanly when the party is over.
🧁 Wilton Tiered Cupcake & Dessert Stand
The easiest way to make a simple dessert table look professionally catered. This customizable, multi-tier display stand gives crucial height and dimension to your treats, effortlessly elevating the presentation of cupcakes, cookies, or appetizers at any gathering.
🚂 Heavy-Duty Collapsible Utility Wagon
The unsung hero of off-site parties, park birthdays, and trunk-or-treats. This rugged folding wagon hauls folding chairs, coolers, and mountains of decor from your car to the venue in one trip, completely eliminating the exhausting pre-party back-and-forth hauling.
📓 Clever Fox Event Planner Organizer
The ultimate command center for keeping your sanity intact while hosting. Dedicated sections for guest lists, budget tracking, vendor contacts, and day-of timelines ensure that not a single crucial detail falls through the cracks before the big day.
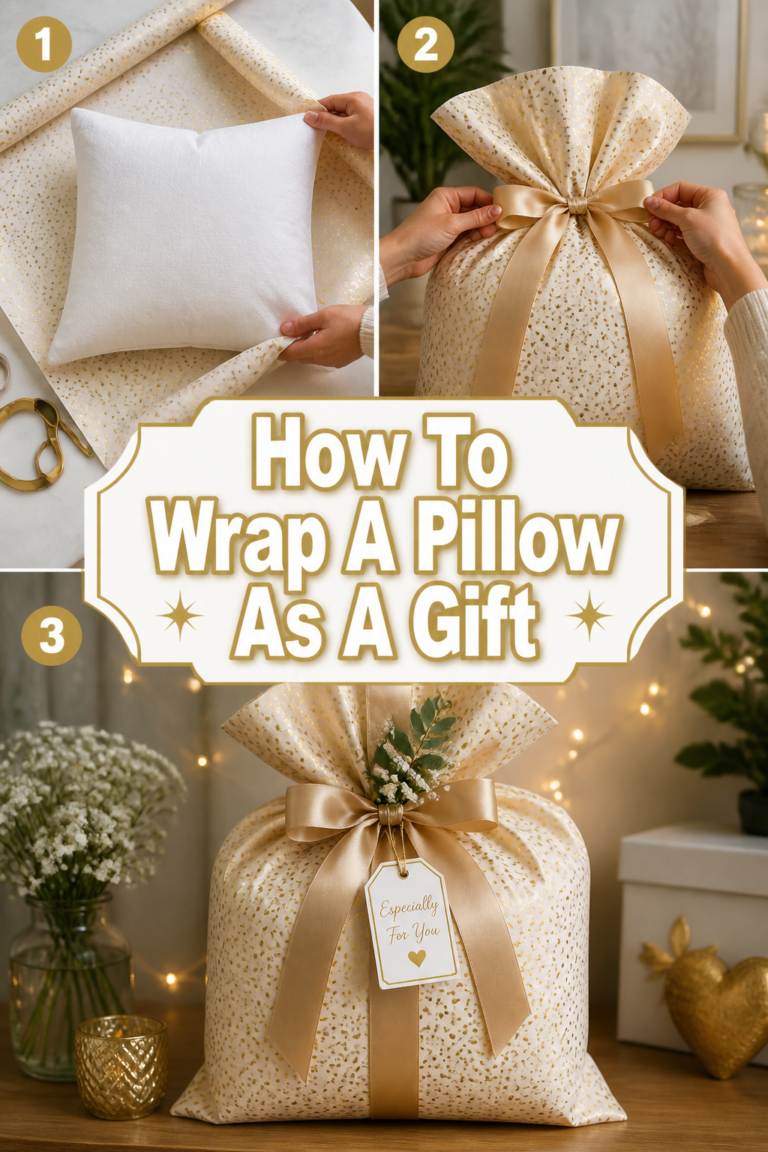
There’s nothing quite like the joy of giving a beautifully presented gift, especially a thoughtfully curated basket.
I remember my first attempt at a baby shower basket; it looked so sparse, like half its contents had mysteriously vanished.
Through many celebratory occasions since, I’ve discovered the secrets to making every basket overflow with charm and generosity, and I’m thrilled to share them with you.
Quick Overview
You’re about to transform your gift-giving game, creating stunning, overflowing baskets that look professionally styled and feel incredibly personal.
Get ready to delight your loved ones with gifts that truly make an impression.
- Time needed: 1-2 hours (depending on item selection and complexity)
- Difficulty: Beginner
- What you’ll need: A basket or container, filler material, cellophane, ribbon, and your chosen gifts.
Step-by-Step Instructions
Step 1: Choose Your Foundation Wisely
The container you select is more than just a holder; it sets the entire tone for your gift basket.
Think beyond traditional wicker baskets for a moment. Consider stylish wire bins for a modern birthday theme, a cute fabric storage bin for a baby shower, or even a decorative planter for a housewarming gift.
A container with a smaller footprint but good depth can often look fuller with fewer items than a wide, shallow one.
Pro Tip: For a truly Pinterest-worthy touch, match the container to the recipient’s home decor style or the event’s theme. A rustic wooden crate works beautifully for a gourmet food basket, while a chic ceramic bowl could hold spa essentials.
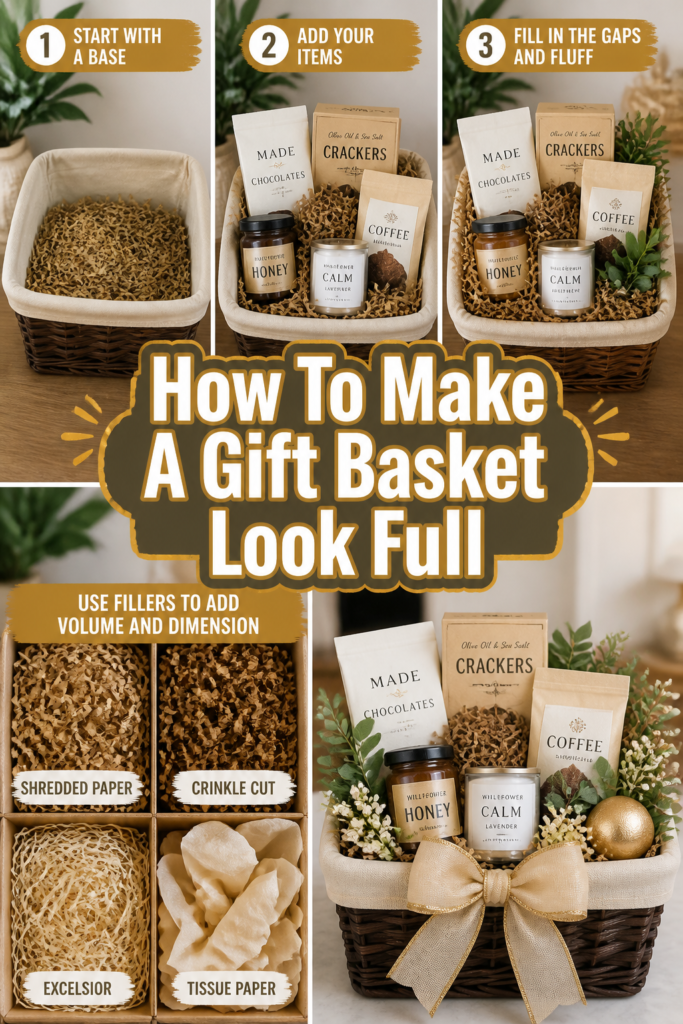
Step 2: Build a Sturdy, Secret Base
This is where the magic truly begins to happen, yet it’s the most overlooked step. You need to elevate your gifts, making them appear more abundant.
Crushed tissue paper, shredded paper filler, or even old newspapers work perfectly for this.
Place a layer of this material at the bottom of your basket, pressing it down firmly to create a stable, elevated platform.
Step 3: Introduce Your Primary Filler
Once your secret base is in place, it’s time to add the beautiful, visible filler that peeks out from beneath your gifts.
Shredded crinkle paper in complementary colors is a classic choice, instantly adding texture and volume. You can also use soft tissue paper, folded and fluffed.
For a unique touch, consider natural elements like dried moss for a garden theme, or even colorful candies for a children’s birthday basket.
Step 4: Anchor Your Largest Items First
Start placing your biggest, heaviest gifts towards the back and center of the basket.
These items act as the structural anchors, providing a backdrop for everything else.
Angle them slightly so they are visible but don’t overwhelm the space.
Step 5: Layer and Elevate with Smaller Treasures
Now, build forward and upward with your medium-sized gifts. Think about varying heights and textures.
You can use small boxes or even crumpled tissue paper tucked beneath items to give them a lift, ensuring every gift is seen and celebrated.
For a baby shower, stack smaller onesies or soft toys on top of larger blankets.
Pro Tip: Imagine a pyramid shape as you layer. Taller items at the back, gradually getting shorter towards the front, with lighter items on top. This creates an inviting visual flow.
Step 6: Fill Gaps with Delightful Details
This is where your basket truly starts to look abundant and thoughtfully curated. Small, inexpensive items are perfect for tucking into any remaining spaces.
Consider mini chocolates, decorative soaps, small candles, or even cute stationery items.
For a holiday basket, use festive ornaments or candy canes to fill those little nooks.
Step 7: Add Height and Dimension with Sticks and Skewers
To give your basket that impressive, overflowing look, incorporate items that stand tall.
You can hot glue smaller items like gift cards, small sachets, or even decorative picks onto wooden skewers or craft sticks.
Then, simply insert these into your filler, creating dynamic height and visual interest.
Step 8: Introduce Softness and Flow with Fabric or Ribbons
Drape a beautiful tea towel, a soft scarf, or a small blanket over the edge of the basket, allowing it to spill out slightly.
This adds a luxurious, inviting touch and helps soften any hard edges of your gifts.
Long, flowing ribbons tied in loose bows can also achieve a similar effect, adding a touch of elegance.
Step 9: The Grand Finale: Cellophane and Bows
Once every item is perfectly placed, gently gather your cellophane around the basket.
Pull it upwards, then secure it tightly at the top with a twist tie or rubber band.
Finish with a magnificent, oversized bow, using wide, luxurious ribbon that complements your basket’s theme and colors.
Step 10: Personalize with a Handwritten Touch
The final, essential step is to add a heartfelt, handwritten tag or card.
This personalizes your gift and makes the recipient feel truly special.
It’s the perfect way to convey your warm wishes and complete your beautifully full creation.
Common Mistakes to Avoid
Overstuffing with Unrelated Items
It’s tempting to cram in as many items as possible to achieve fullness, but this can lead to a chaotic and less thoughtful presentation.
Focus on a cohesive theme or color palette, even if it means fewer items. Quality and relevance always trump sheer quantity.
Neglecting the Base
Many people skip the crucial step of building an elevated base, resulting in gifts sinking to the bottom of the basket.
This makes the basket look half-empty and can hide your beautiful selections. Always start with a solid foundation.
Ignoring Scale and Proportion
Placing all large items together or all small items together can create an unbalanced look.
Mix and match sizes, using larger items as anchors and smaller ones as delightful accents. This creates visual interest and makes the basket appear more dynamic.
Using Flimsy Wrapping
After all your hard work, using cheap, thin cellophane or a small, sad bow can diminish the overall impact.
Invest in good quality, clear cellophane and a generous amount of beautiful ribbon. These finishing touches elevate the entire presentation.
Troubleshooting
My Basket Still Looks Empty in the Middle!
This often happens when you’ve placed all your items around the perimeter, leaving a void in the center.
Go back to Step 5 and consider adding a medium-sized item directly in the middle, or use extra crinkle paper to build up the center space, then nestle smaller items on top.
Items Keep Falling Over
This is a sign that your base might not be stable enough or your items aren’t properly anchored.
Ensure your secret base (Step 2) is firmly packed. For taller items, use a dab of hot glue to secure them to a smaller item below, or gently wedge them between other gifts for support.
The Cellophane Isn’t Smooth and Wrinkles Excessively
Wrinkling usually occurs from trying to pull the cellophane too tightly in one spot, or not gathering it evenly.
Gently gather the cellophane all around the basket’s perimeter at the same time, pulling it upwards slowly and evenly. A larger sheet of cellophane than you think you need can also help prevent this.
Key Takeaways
- Choose a container that complements the theme and enhances the overall aesthetic.
- Always build a sturdy, elevated base to give your gifts a lift and prevent them from sinking.
- Layer items strategically, placing larger ones at the back and building forward with varying heights.
- Utilize filler materials and small accent items to fill gaps and add texture, creating an abundant look.
- Finish with quality cellophane, a generous bow, and a personal note to complete your thoughtful creation.
- Remember that balance and a cohesive theme are key to a truly stunning and full gift basket.
Frequently Asked Questions
How much filler do I really need?
It’s always better to have too much filler than too little. You can always remove excess, but running out mid-assembly is frustrating. A good rule of thumb is to have enough to fill the basket halfway before adding any gifts, then more for tucking around items.
Can I use food items in a non-food-themed basket?
Absolutely! Small, individually wrapped candies, gourmet chocolates, or a beautiful cookie can be wonderful gap-fillers and delightful surprises in almost any themed basket, from a spa gift to a birthday celebration.
What if my basket has a handle? Should I wrap the cellophane around it?
For baskets with handles, you can either gather the cellophane above the handle and tie your bow there, or leave the handle exposed for easy carrying. If you leave it exposed, ensure your cellophane is neatly tucked and secured around the base of the handle.
How do I make my bow look really big and impressive?
The secret to an impressive bow is using wide ribbon (2-3 inches wide is ideal) and making multiple loops. For a truly voluminous bow, buy a pre-made pull-bow, or learn a simple technique online for creating a multi-loop bow by hand, using floral wire to secure it.
Our Top Recommended Finds
- Crinkle Cut Paper Shred Filler: Essential for adding volume and a professional finish, available in countless colors to match any theme.
- Clear Cellophane Wrap Roll: A generous roll ensures you have enough for multiple projects, providing a clean, polished presentation.
- Assorted Wide Satin Ribbon: Having a variety of widths and colors on hand means you’re always ready to create a stunning, complementary bow.
Unleash Your Inner Gift-Giving Artist!
Now that you’re armed with these simple yet effective techniques, you’re ready to create gift baskets that truly sparkle and delight.
Imagine the smiles on faces as they receive a beautifully full, thoughtfully curated gift, perfect for any celebration.
Why not start planning your next special event or holiday gift right now? Your loved ones will adore the effort and creativity you pour into their unique, overflowing treasures.