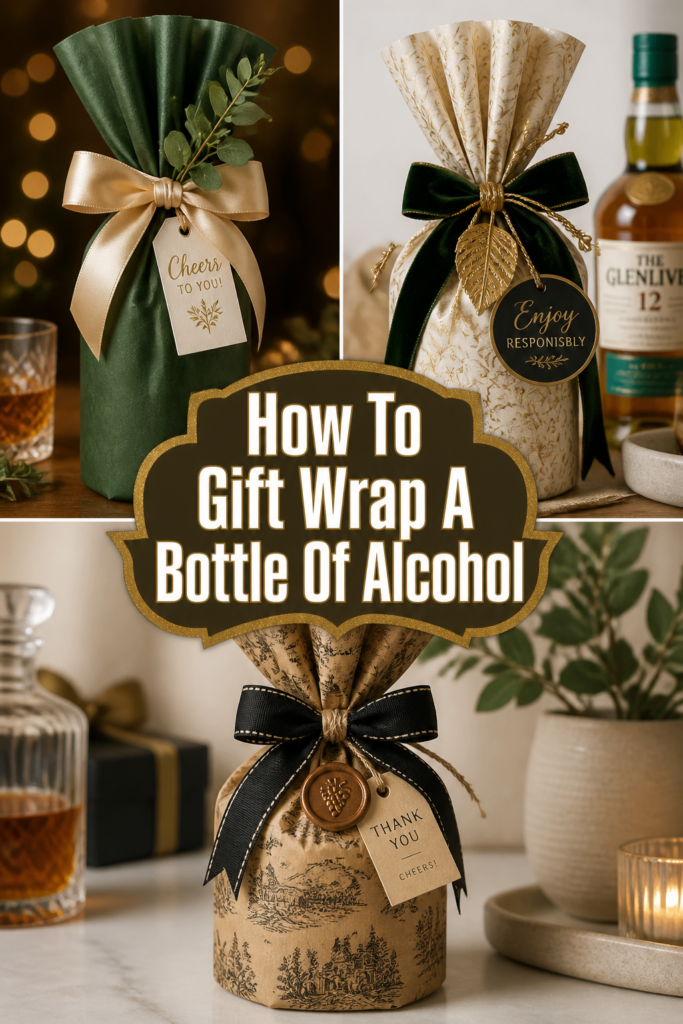
🍾 How To Gift Wrap A Bottle Of Alcohol
📋 The Event Planner's Essential Toolkit
Whether you're throwing a massive birthday bash or an intimate baby shower, the right tools make execution effortless. These are the 5 essential items that professional event coordinators and DIY party hosts consistently rely on to pull off flawless celebrations without the stress.
🎈 Electric Dual-Nozzle Balloon Pump
The absolute lifeline for creating those trending balloon arches and garlands that everyone loves. This dual-nozzle pump lets you inflate hundreds of balloons in a fraction of the time, saving your lungs and transforming hours of prep work into minutes.
🛡️ Command Clear Party Hooks & Strips
The secret to magazine-worthy venue decorations without losing your security deposit. Professional planners stock up on these clear, damage-free hooks to hang banners, string lights, and paper lanterns securely on walls and ceilings, removing cleanly when the party is over.
🧁 Wilton Tiered Cupcake & Dessert Stand
The easiest way to make a simple dessert table look professionally catered. This customizable, multi-tier display stand gives crucial height and dimension to your treats, effortlessly elevating the presentation of cupcakes, cookies, or appetizers at any gathering.
🚂 Heavy-Duty Collapsible Utility Wagon
The unsung hero of off-site parties, park birthdays, and trunk-or-treats. This rugged folding wagon hauls folding chairs, coolers, and mountains of decor from your car to the venue in one trip, completely eliminating the exhausting pre-party back-and-forth hauling.
📓 Clever Fox Event Planner Organizer
The ultimate command center for keeping your sanity intact while hosting. Dedicated sections for guest lists, budget tracking, vendor contacts, and day-of timelines ensure that not a single crucial detail falls through the cracks before the big day.
There’s a special kind of magic in presenting a gift that’s as thoughtfully wrapped as it is chosen.
I’ve always believed that a beautifully packaged bottle of something celebratory can transform a simple present into an unforgettable gesture.
Join me as we explore how to elevate your gift-giving, making every occasion sparkle with personal flair and Pinterest-worthy charm.
Quick Overview
You’re about to master the art of wrapping a bottle, turning it into a stunning centerpiece for any celebration.
This guide will equip you with all the tips and tricks to create a truly memorable gift.
- Time needed: 15-30 minutes (depending on embellishments)
- Difficulty: Beginner to Intermediate
- What you’ll need: Wrapping paper, ribbon, tape, scissors, bottle of choice, optional decorative elements.
Step-by-Step Instructions
Step 1: Gather Your Creative Arsenal
Before you begin your wrapping adventure, ensure all your supplies are within easy reach.
A well-organized space makes the process smooth and enjoyable, letting your creativity flow freely.
- Select your wrapping paper. Think about the occasion – a vibrant floral for spring birthdays, rich metallics for holidays, or subtle pastels for a baby shower (perhaps a sparkling cider for the parents-to-be!).
- Choose your ribbon. Satin, grosgrain, twine, or even raffia can add a beautiful textural contrast.
- Grab your trusty scissors, double-sided tape (my secret weapon!), and a clear, flat surface to work on.
Pro Tip: Consider the bottle’s label when choosing paper. Sometimes a clear wrap or a peek-a-boo design can highlight a beautiful vintage or artisanal label, adding another layer of sophistication.
Step 2: Measure and Cut Your Paper
Precision is key to a neat wrap, especially with the unique shape of a bottle.
You want enough paper to cover the bottle completely without excess bulk.
- Place your bottle on its side at one edge of your wrapping paper.
- Roll the bottle once to determine the width needed to encircle it fully, adding about an inch for overlap.
- Stand the bottle upright and measure the paper’s length. It should reach from the bottom of the bottle to just above the neck, where it begins to taper.
- Cut your paper carefully according to these measurements.
Step 3: Position the Bottle for Perfection
The starting position of your bottle on the paper makes all the difference for a smooth finish.
This step sets the foundation for a professional-looking wrap.
- Lay your cut wrapping paper face down on your clean work surface.
- Center the bottle horizontally on one end of the paper, ensuring the bottom of the bottle aligns with the paper’s edge.
- Ensure the paper extends just past the shoulder of the bottle, allowing enough length to gather and secure the top.
Step 4: Secure the Base with a Smooth Roll
Creating a clean, tight seal at the bottom of the bottle is crucial for stability and appearance.
This prevents the bottle from “peeking out” from the bottom of the wrap.
- Bring the edge of the paper up over the bottom of the bottle. Use a small piece of double-sided tape to secure it firmly to the bottle’s base.
- Roll the bottle tightly across the paper, keeping the paper taut as you go.
- Secure the overlapping edge of the paper with a strip of double-sided tape, running it neatly along the seam.
Pro Tip: For a truly seamless look, use double-sided tape for all visible seams. It disappears beautifully and holds everything in place without distracting tape lines.
Step 5: Master the Art of Pleating the Top
This is where the magic happens, transforming a flat sheet into a elegant, gathered top.
The pleating technique gives your bottle a sophisticated, tailored finish.
- Stand the wrapped bottle upright. You’ll have excess paper extending above the bottle’s neck.
- Gather the excess paper at the top, gently pressing it inward towards the bottle’s neck.
- Create small, even pleats all around the bottle’s circumference, working your way towards the center. Aim for neat, uniform folds.
- Press the pleated paper down against the bottle’s neck, forming a neat, star-like pattern at the very top.
Step 6: Tie the Neck with Flair
A well-tied ribbon not only secures your pleats but also acts as a beautiful decorative element.
It’s your chance to add a pop of color or texture.
- Hold the pleated paper firmly in place around the bottle’s neck.
- Take your chosen ribbon and wrap it tightly around the neck, just below where the pleats gather.
- Tie a secure knot, then fashion a beautiful bow or a simple, elegant knot depending on your style.
- Trim the ribbon ends at an angle or create a neat “V” shape for a polished look.
Step 7: Adorn with Elegant Embellishments
Now for the fun part: adding those Pinterest-worthy details that make your gift truly unique.
Think beyond just a bow and consider elements that enhance your chosen theme.
- Attach a small sprig of fresh rosemary or eucalyptus for a rustic, natural touch, perfect for holiday gatherings or a housewarming.
- Dangle a miniature ornament or charm from the ribbon for a festive holiday bottle.
- Include a tiny preserved flower or a silk bloom to match a bridal shower or anniversary theme.
- Secure a small, personalized tag with a heartfelt message, handwritten for that extra special touch.
Step 8: Personalize with a Heartfelt Message
A handwritten tag transforms your gift from a generic item into a cherished memory.
It’s the final, most personal touch you can add.
- Choose a beautiful gift tag that complements your wrapping paper and ribbon.
- Write a sincere message, wishing them joy, celebrating their milestone, or simply expressing your gratitude.
- Attach the tag securely to the ribbon, letting it hang gracefully.
Pro Tip: For a baby shower, consider attaching a tiny baby bootie or a “Hello World” tag to a non-alcoholic sparkling beverage. It’s a sweet, thoughtful nod to the parents-to-be.
Common Mistakes to Avoid
Using Too Much Paper
A common pitfall is cutting an excessive amount of wrapping paper, leading to bulky, uneven folds.
This extra material makes it difficult to achieve a crisp, clean finish, especially around the bottle’s neck and base.
Always measure carefully, aiming for just enough paper to overlap slightly, ensuring a sleek and professional appearance.
Skipping the Base Securement
Neglecting to properly secure the paper at the bottle’s base can result in a sloppy, unfinished look.
The bottle might poke through, or the paper could unravel, diminishing the overall presentation.
Always use a strong adhesive, like double-sided tape, to firmly attach the paper to the bottle’s bottom before rolling.
Forgetting the Bottle’s Shape
Treating every bottle like a rectangular box will lead to frustration and an awkward wrap.
Bottles have curves, necks, and sometimes unique shapes that require specific attention during the pleating process.
Embrace the bottle’s form, allowing the paper to gently contour and pleat around its unique silhouette for the best result.
Over-Decorating
While embellishments add charm, too many can overwhelm the gift and distract from its elegance.
A cluttered appearance can make the gift look less sophisticated and more haphazard.
Choose one or two focal decorative elements that complement your theme, letting them enhance rather than overpower the wrap.
Troubleshooting
Paper Tears Easily
If your wrapping paper is tearing as you fold or tighten, it might be too thin or you’re applying too much pressure.
Try using a slightly heavier weight of wrapping paper, or opt for a fabric wrap like a silk scarf for delicate gifts.
Work gently and deliberately, using your fingers to guide the paper rather than forcing it, especially around curves.
Ribbon Slips Off
A loose ribbon can quickly undo all your careful pleating and decorating efforts.
This usually happens if the ribbon isn’t tied tightly enough around the bottle’s tapered neck.
Ensure you tie a very secure first knot before attempting to make a bow, and consider adding a tiny dot of hot glue under the knot if the ribbon is particularly slippery.
Awkward Top Folds
Uneven or bulky pleats at the top can make your bottle look less polished and more amateurish.
This often occurs when pleats are not consistently sized or when too much paper is gathered at once.
Start with smaller, more numerous pleats, working your way around the neck in a consistent direction, gently pressing them down as you go to create a uniform fan effect.
Key Takeaways
- Preparation is paramount: Gather all your supplies before you begin for a smooth wrapping experience.
- Measure twice, cut once: Precise paper measurements prevent bulk and ensure a neat, tailored finish.
- Secure the base: A well-taped bottom provides stability and a polished look for your wrapped bottle.
- Master the pleat: Gentle, even pleating around the bottle’s neck creates an elegant, professional top.
- Less is often more: Choose a few thoughtful embellishments that enhance, rather than overwhelm, your design.
- Personalize with heart: A handwritten tag adds an invaluable touch of warmth and sincerity to your gift.
Frequently Asked Questions
What if my bottle is an unusual shape, like a flask or a squat bottle?
For uniquely shaped bottles, you might adjust your paper length to cover the entire bottle, securing the top with a fabric tie or a custom-fitted cap rather than traditional pleats.
Alternatively, consider a fabric wrap, like Furoshiki, which adapts beautifully to various forms and offers a reusable, eco-friendly option.
Can I use fabric instead of paper for wrapping a bottle?
Absolutely! Fabric, such as a silk scarf, linen napkin, or even a piece of patterned cotton, creates a luxurious and reusable gift wrap.
The Furoshiki technique, a traditional Japanese method of fabric wrapping, is perfect for bottles and adds an extra layer of thoughtfulness to your present.
How do I make my bottle gift wrap more eco-friendly?
To make your gift wrap sustainable, opt for recycled or recyclable paper, or choose reusable fabric wraps.
Use natural twine or raffia instead of plastic ribbons, and embellish with natural elements like dried flowers, leaves, or reusable ornaments.
Encourage the recipient to reuse the wrap or its components.
What are some creative themes for bottle wrapping for different occasions?
For a birthday, think “Party Popper” with bright, confetti-patterned paper and a mini party hat on top. For holidays, a “Winter Wonderland” theme with white paper, silver ribbon, and a tiny snowflake ornament works beautifully.
A “Garden Party” theme for a spring gathering could feature botanical prints, twine, and a fresh herb sprig. The possibilities are endless!
Our Top Recommended Finds
- Double-Sided Tape Dispenser: A game-changer for seamless seams and a clean finish without visible tape lines.
- Curated Ribbon Assortment: Having a variety of colors, textures, and widths on hand allows for endless creative combinations.
- Elegant Gift Tags & Stamp Set: Elevate your personalization with beautifully designed tags and a custom stamp for a sophisticated touch.
Crafting Joy, One Bottle at a Time
You now hold the secrets to transforming a simple bottle into a show-stopping gift, brimming with personal charm and celebratory spirit.
Imagine the delight on your loved one’s face as they receive a present that reflects not just generosity, but genuine care and creativity.
Don’t wait for a special occasion; start experimenting with these techniques today.
Gather your supplies, let your imagination soar, and prepare to elevate every celebration into an unforgettable, Pinterest-worthy moment!