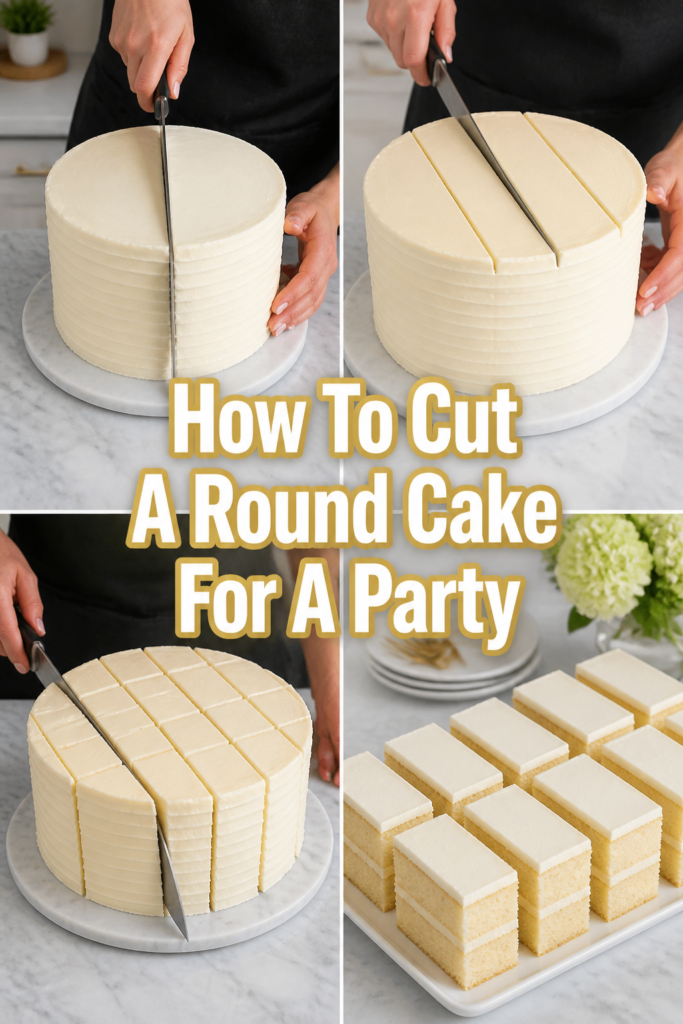
🎂 How To Cut A Round Cake For A Party
📋 The Event Planner's Essential Toolkit
Whether you're throwing a massive birthday bash or an intimate baby shower, the right tools make execution effortless. These are the 5 essential items that professional event coordinators and DIY party hosts consistently rely on to pull off flawless celebrations without the stress.
🎈 Electric Dual-Nozzle Balloon Pump
The absolute lifeline for creating those trending balloon arches and garlands that everyone loves. This dual-nozzle pump lets you inflate hundreds of balloons in a fraction of the time, saving your lungs and transforming hours of prep work into minutes.
🛡️ Command Clear Party Hooks & Strips
The secret to magazine-worthy venue decorations without losing your security deposit. Professional planners stock up on these clear, damage-free hooks to hang banners, string lights, and paper lanterns securely on walls and ceilings, removing cleanly when the party is over.
🧁 Wilton Tiered Cupcake & Dessert Stand
The easiest way to make a simple dessert table look professionally catered. This customizable, multi-tier display stand gives crucial height and dimension to your treats, effortlessly elevating the presentation of cupcakes, cookies, or appetizers at any gathering.
🚂 Heavy-Duty Collapsible Utility Wagon
The unsung hero of off-site parties, park birthdays, and trunk-or-treats. This rugged folding wagon hauls folding chairs, coolers, and mountains of decor from your car to the venue in one trip, completely eliminating the exhausting pre-party back-and-forth hauling.
📓 Clever Fox Event Planner Organizer
The ultimate command center for keeping your sanity intact while hosting. Dedicated sections for guest lists, budget tracking, vendor contacts, and day-of timelines ensure that not a single crucial detail falls through the cracks before the big day.
There’s nothing quite like the joyful anticipation of a perfectly cut cake, especially when celebrating life’s sweetest moments.
From whimsical baby showers to milestone birthdays, I’ve hosted countless gatherings where the cake became the centerpiece of unforgettable memories.
This guide shares my tried-and-true methods, ensuring your party cake is served with ease and elegance every single time.
Quick Overview
Transforming a beautiful round cake into perfectly portioned slices doesn’t have to be a daunting task. This method ensures every guest gets a neat piece, making your serving experience smooth and celebratory.
- Time needed: 5-10 minutes (for a 8-10 inch cake)
- Difficulty: Beginner
- What you’ll need: A sharp, long knife, a damp cloth, a serving spatula, and a clean plate.
Step-by-Step Instructions
Step 1: Gather Your Tools and Prepare
Before you make the first cut, ensure all your tools are clean and ready. A sharp, long knife is your best friend here, ideally one with a thin blade.
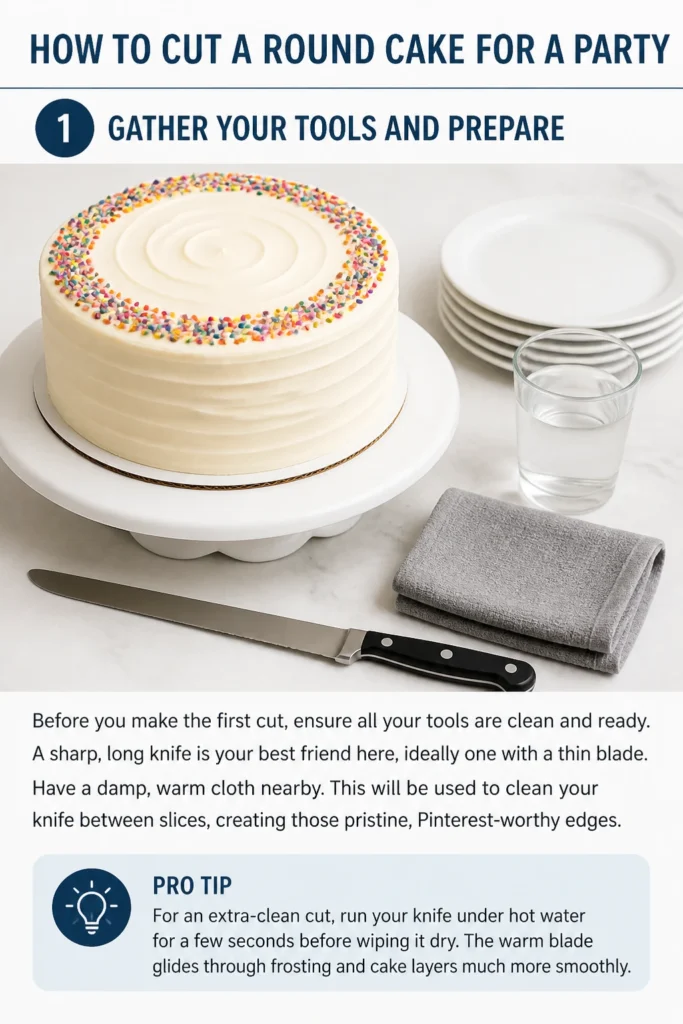
Have a damp, warm cloth nearby. This will be used to clean your knife between slices, creating those pristine, Pinterest-worthy edges.
Pro Tip: For an extra-clean cut, run your knife under hot water for a few seconds before wiping it dry. The warm blade glides through frosting and cake layers much more smoothly.
Step 2: Chill the Cake (If Time Allows)
A slightly chilled cake is easier to cut cleanly. The frosting and layers firm up, preventing crumbling and smudging.
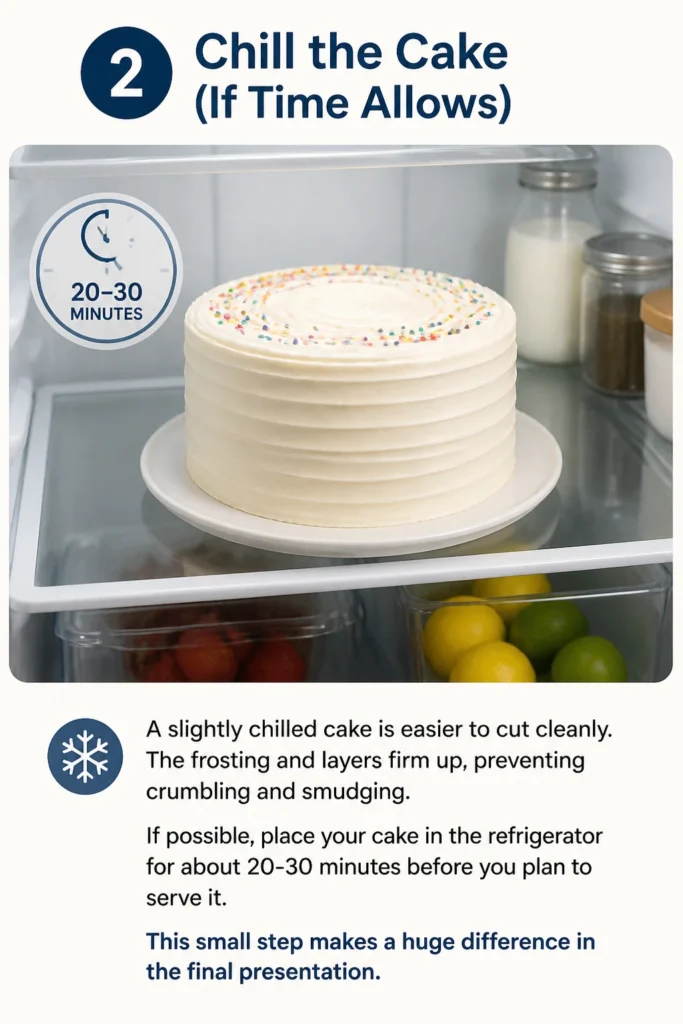
If possible, place your cake in the refrigerator for about 20-30 minutes before you plan to serve it. This small step makes a huge difference in the final presentation.
Step 3: Mark Your First Cuts
Instead of the traditional pie-slice method, we’re going for a more efficient approach that yields consistent portions. Start by making two parallel cuts straight across the center of the cake.
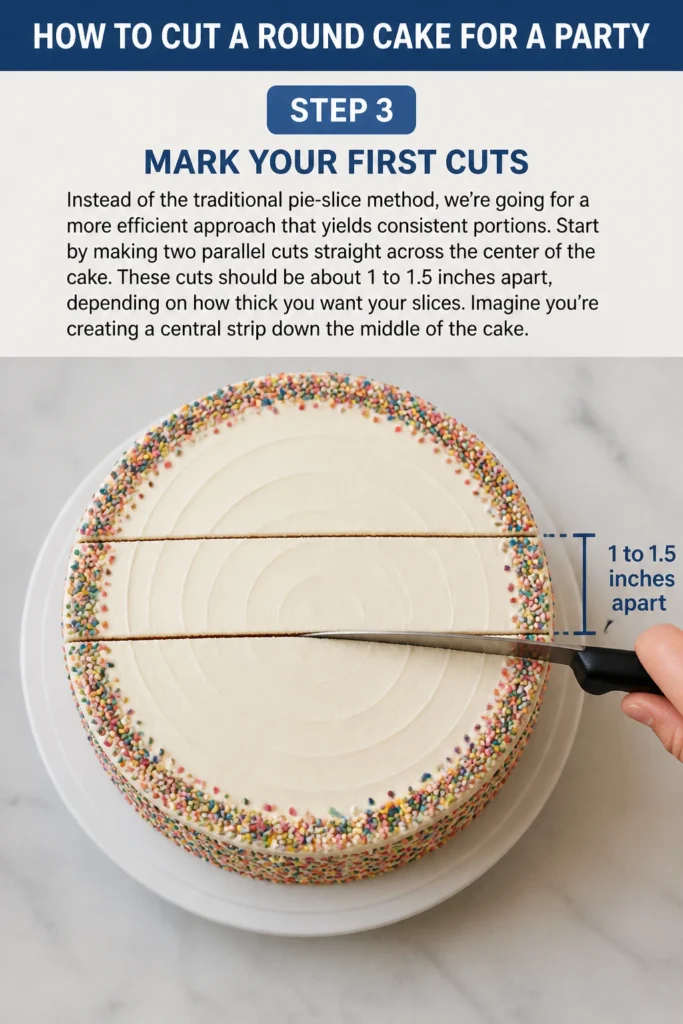
These cuts should be about 1 to 1.5 inches apart, depending on how thick you want your slices. Imagine you’re creating a central “strip” down the middle of the cake.
Step 4: Create the Central Strip Slices
Now, make perpendicular cuts along this central strip. These cuts should run from one parallel line to the other, creating rectangular pieces.
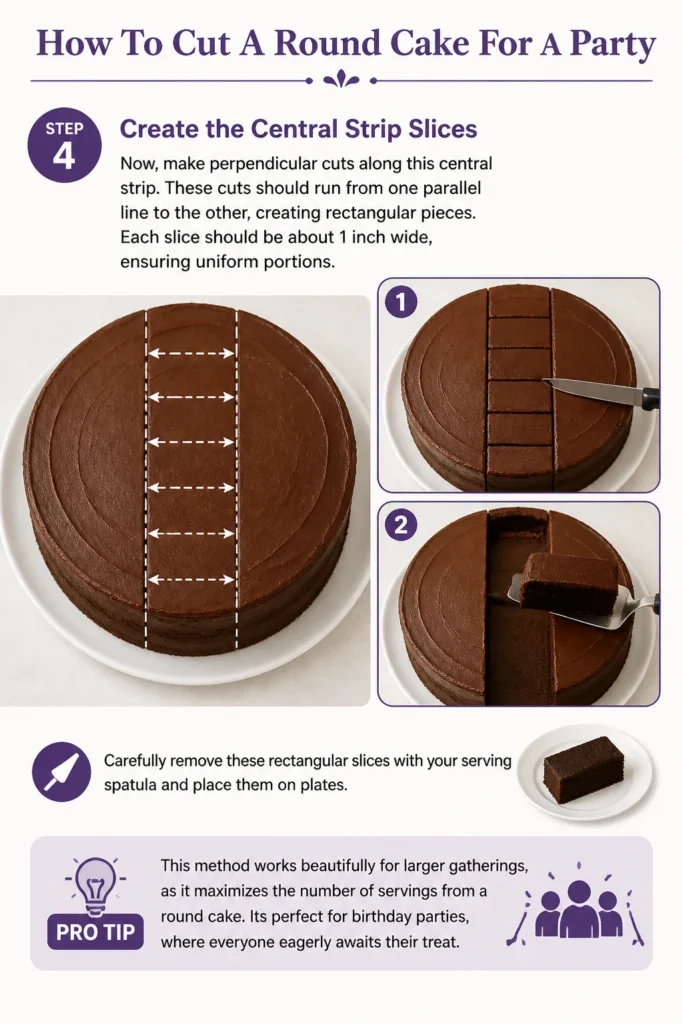
Each slice should be about 1 inch wide, ensuring uniform portions. Carefully remove these rectangular slices with your serving spatula and place them on plates.
Pro Tip: This method works beautifully for larger gatherings, as it maximizes the number of servings from a round cake. It’s perfect for birthday parties, where everyone eagerly awaits their treat.
Step 5: Move to the Outer Rings
Once the central strip is cleared, you’ll be left with two crescent-shaped sections on either side. These are now much easier to manage.
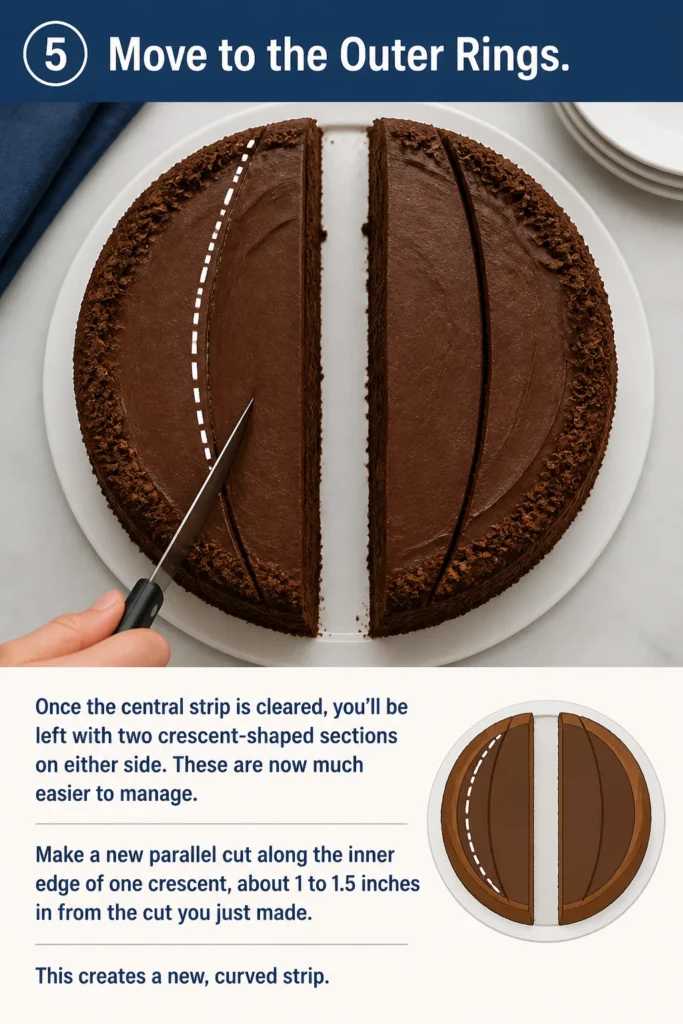
Make a new parallel cut along the inner edge of one crescent, about 1 to 1.5 inches in from the cut you just made. This creates a new, curved strip.
Step 6: Slice the Curved Strips
Repeat the perpendicular cuts on this new curved strip, just as you did with the central section. This will create smaller, slightly curved rectangular pieces.
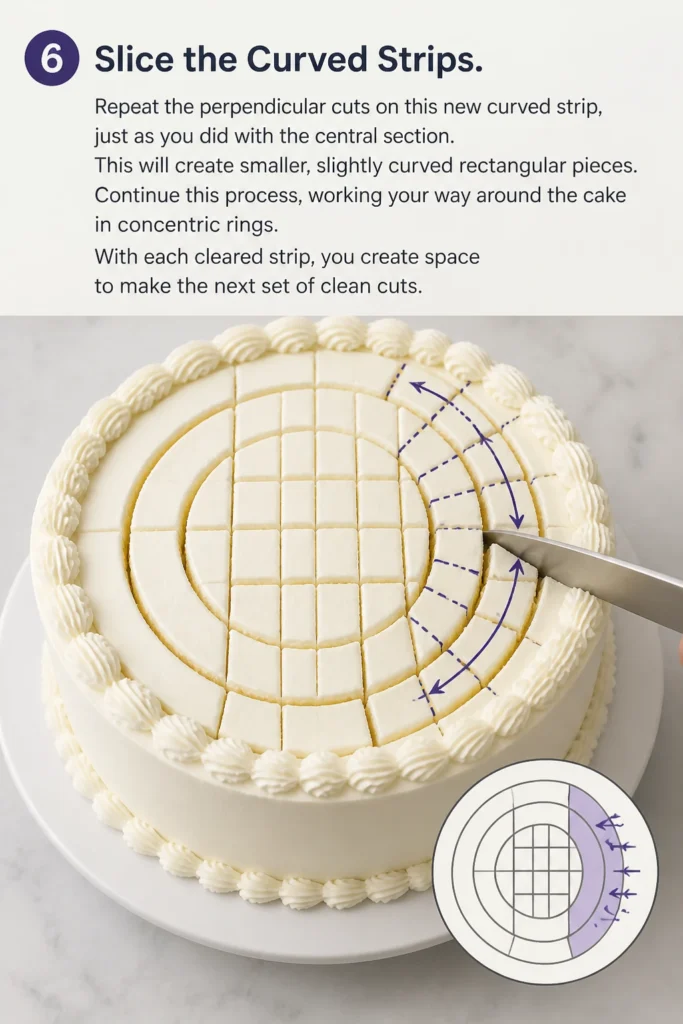
Continue this process, working your way around the cake in concentric rings. With each cleared strip, you create space to make the next set of clean cuts.
Step 7: Clean Your Knife Frequently
After every few slices, or whenever frosting builds up on your blade, wipe it clean with your damp cloth. This prevents cross-contamination of flavors and keeps your cuts sharp.
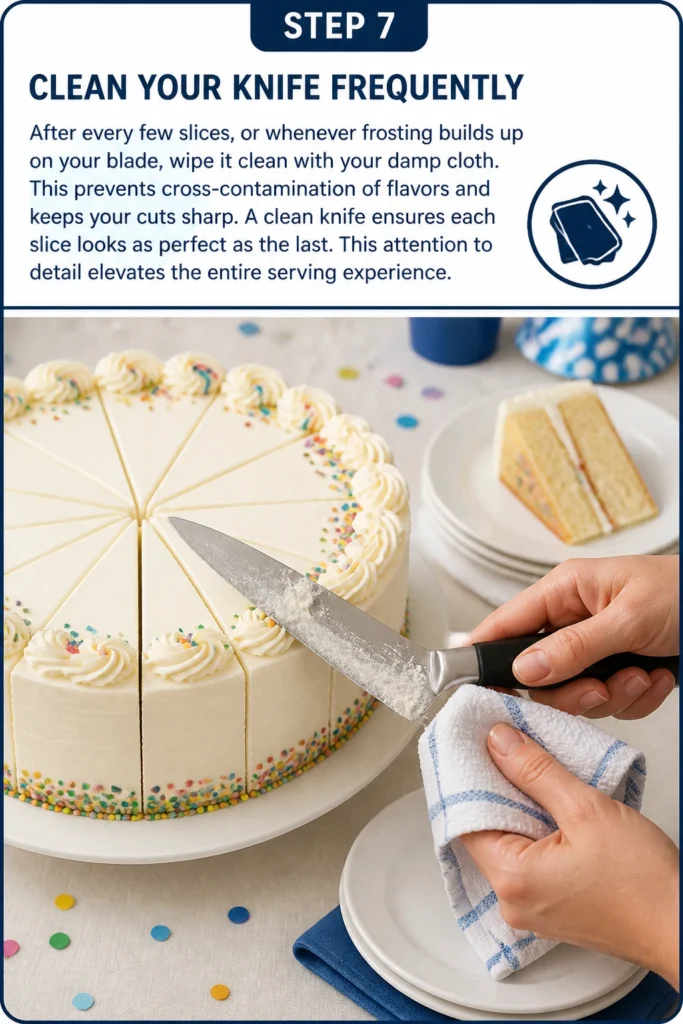
A clean knife ensures each slice looks as perfect as the last. This attention to detail elevates the entire serving experience.
Step 8: Serve with Joy and Style
As you serve each beautifully cut slice, remember the celebration at hand. A birthday cake brings smiles, a baby shower cake sweet anticipation, and a holiday cake warm cheer.
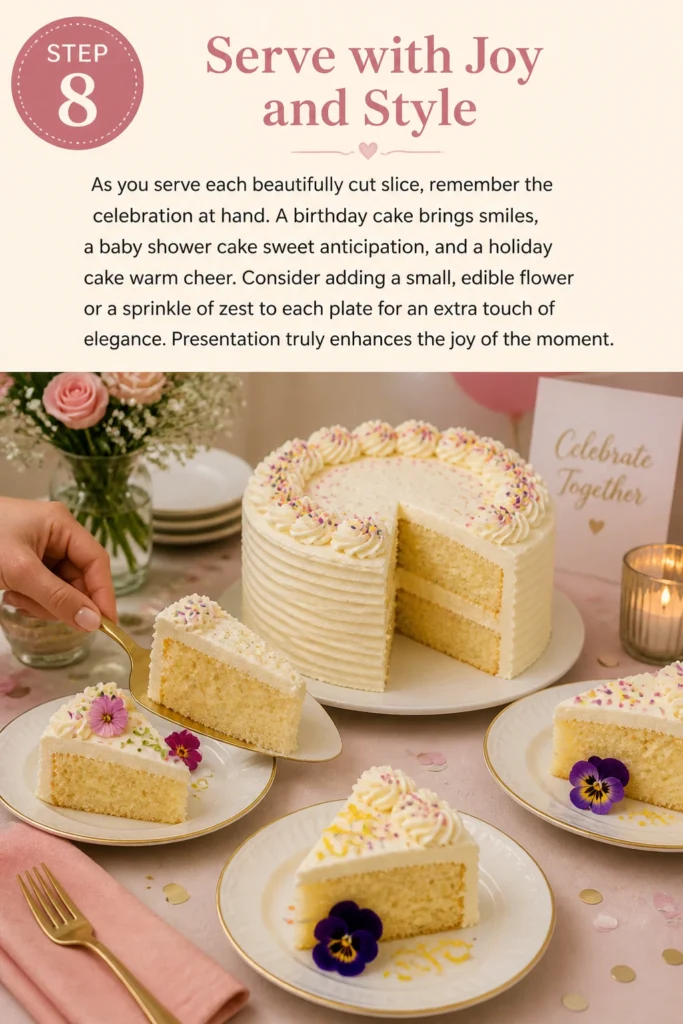
Consider adding a small, edible flower or a sprinkle of zest to each plate for an extra touch of elegance. Presentation truly enhances the joy of the moment.
Common Mistakes to Avoid
Using a Dull Knife
Attempting to cut a cake with a dull knife often leads to jagged edges and smushed frosting. The cake will tear rather than slice cleanly, making for a messy presentation.
Always ensure your knife is sharp before you begin. A sharp blade is safer and more effective, giving you precise, clean cuts every time.
Forgetting to Clean the Blade
Skipping the knife-cleaning step between slices is a common error. This results in frosting from one slice smearing onto the next, creating a less-than-perfect look.
Keep that warm, damp cloth handy and make it a habit to wipe the blade clean after every one or two cuts. This simple action maintains the integrity of each slice.
Cutting Traditional Pie Slices
While traditional pie slices look charming, they are often difficult to serve from a large round cake, especially the smaller inner pieces. These pieces can crumble easily and are not uniform.
Embrace the strip-cutting method to ensure even portions and easier serving. This technique minimizes waste and maximizes satisfaction for all your guests.
Not Chilling the Cake
Cutting a cake straight from room temperature can lead to soft frosting and crumbly layers. The cake might stick to the knife, making clean slices almost impossible.
A brief chill in the fridge firms everything up, allowing for smoother, more precise cuts. This small preparation step yields significant benefits in presentation.
Troubleshooting
Cake is Sticking to the Knife
If your cake is stubbornly adhering to the knife, it’s likely either too warm or the blade isn’t clean enough. A sticky knife can ruin the appearance of your slices.
Re-chill the cake for another 15-20 minutes. Also, ensure you are cleaning and warming your knife frequently between each cut. A little cooking spray on the blade can also help in a pinch.
Slices are Crumbly or Falling Apart
Crumbly slices often indicate the cake is either too warm, or the knife isn’t sharp enough to make a clean break. Soft cake layers are prone to disintegration.
Ensure the cake has been adequately chilled. Use a very sharp knife and apply gentle, steady pressure rather than sawing motions. For very delicate cakes, a serrated knife can sometimes work better.
Uneven Slice Sizes
Inconsistent slice sizes can happen if you’re eyeballing the cuts without a guide. This means some guests might get larger pieces while others receive smaller ones.
Before cutting, you can lightly score the cake’s surface with a ruler or a toothpick to mark your parallel and perpendicular lines. This provides a visual guide for uniform portions.
Key Takeaways
- Prepare Your Tools: A sharp, clean knife and a damp cloth are essential for clean cuts.
- Chill for Success: A slightly chilled cake is much easier to slice neatly and prevents crumbling.
- Adopt the Strip Method: Cut parallel lines first, then perpendicular, to maximize servings and ensure even portions.
- Clean Your Blade Regularly: Wipe your knife after every few slices to prevent frosting buildup and maintain pristine edges.
- Serve with Confidence: This technique makes serving smooth, allowing you to focus on the joy of your celebration.
- Enhance Presentation: Consider small garnishes to elevate each served slice, adding to the party’s charm.
Frequently Asked Questions
Can I use a serrated knife for cutting cake?
Yes, a serrated knife can be excellent for cutting cakes, especially those with delicate or multiple layers. The serrations help saw through the cake without squishing it, creating a cleaner cut.
How far in advance can I cut the cake?
It’s best to cut the cake just before serving to keep it fresh and moist. If you must cut it a little earlier, cover the cut edges tightly with plastic wrap to prevent them from drying out.
What if my cake is very tall?
For very tall cakes, use an extra-long, thin knife. You might need to make two passes, one for the top half and one for the bottom, ensuring the entire height is cut. A ruler can help guide your cuts straight down.
How do I make sure everyone gets an equal slice?
The strip-cutting method is designed for this! By making parallel lines and then perpendicular cuts, you naturally create uniform rectangular pieces. Lightly score the cake first if you need extra precision.
Our Top Recommended Finds
- Extra-Long Serrated Cake Knife: Perfect for gliding through even the tallest, most decadent cakes with ease, leaving beautiful, clean lines.
- Offset Cake Spatula: This tool makes lifting and plating delicate cake slices simple, ensuring they arrive on the plate perfectly intact.
- Decorative Cake Server Set: A lovely serving set adds a touch of elegance to any party, making the cake cutting ceremony even more special and photo-worthy.
Crafting Unforgettable Moments, Slice by Slice
Imagine your next party, whether it’s a whimsical baby shower with pastel treats or a vibrant birthday bash adorned with glitter. With this simple cake-cutting technique, you’re not just serving dessert; you’re creating a moment.
Every perfectly portioned slice can be a canvas for creativity. Think about adding a small, personalized topper or a fresh berry for a touch of elegance that speaks volumes.
Planning a celebration is about weaving together details that spark joy. From choosing a delightful cake flavor to picking out a thoughtful gift, each step contributes to the magic.
So go ahead, embrace the joy of hosting! With a beautifully cut cake, your next gathering is sure to be filled with laughter, love, and memories that truly last a lifetime.