🎉 How To Fold Napkins Fancy
Imagine the gasps of delight as your guests approach a table adorned with exquisite, artfully folded napkins, each a tiny masterpiece hinting at the joy to come. Folding napkins isn’t just about utility; it’s an act of love, a creative flourish that transforms an ordinary meal into an extraordinary event, setting a tone of elegance and thoughtful celebration that truly makes memories.

Quick Overview
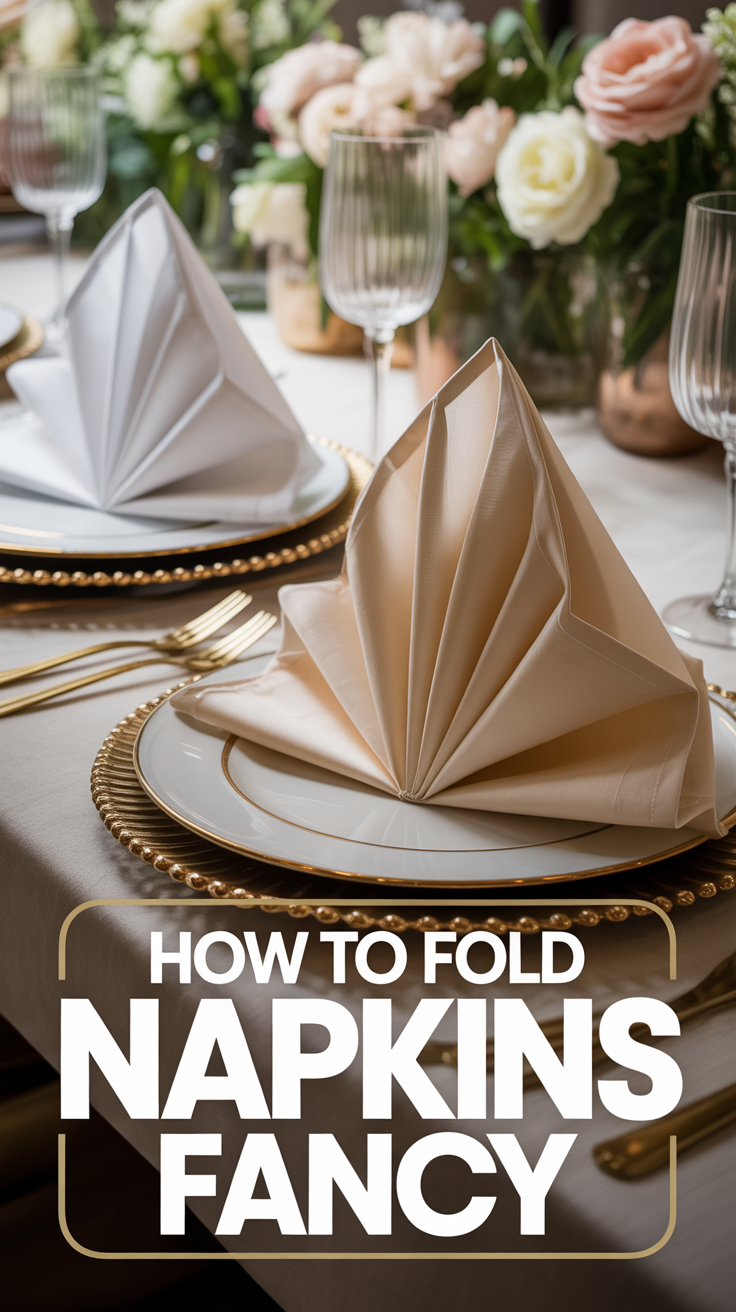
Ready to elevate your hosting game and add a touch of magic to your next gathering? This guide will walk you through creating a stunning “Pyramid Fold,” a classic choice that’s surprisingly simple yet incredibly impactful, perfect for any occasion from a casual brunch to a grand holiday feast.
Time needed: Approximately 2-5 minutes per napkin (once you get the hang of it!)
Difficulty: Beginner
What you’ll need: A square cloth napkin (preferably cotton or linen), an iron (optional, but highly recommended for crisp results).
Step-by-Step Instructions
Let’s embark on this delightful journey together and craft a show-stopping Pyramid Fold that will leave your guests utterly charmed and your table looking straight out of a Pinterest dream board!
Step 1: Lay Flat & Smooth Your Canvas
Begin by laying your clean, ironed square cloth napkin flat on a clean, hard surface. The smoother and crisper your napkin, the more defined and elegant your final fold will be. Think of it as preparing a fresh canvas for your culinary artwork!
Pro tip: For truly professional-looking results, give your napkin a quick press with a warm iron before you begin. This eliminates any stubborn creases and makes the folding process much easier, ensuring sharp, clean lines in your finished pyramid. Consider using a light starch for extra crispness, especially for formal events.
Step 2: Fold in Half to Create a Rectangle
Take the bottom edge of your napkin and bring it up to meet the top edge, creating a neat rectangle. Gently press along the fold to create a crisp crease. This initial fold is the foundation of your pyramid, so take a moment to ensure it’s perfectly aligned.
Pro tip: When folding for a themed party, like a baby shower, imagine the potential. This simple rectangle could be the base for so many creative additions later. For example, if your theme is “Twinkle Twinkle Little Star,” think about incorporating a tiny star charm or a pastel ribbon once the fold is complete.
Step 3: Fold in Half Again for a Smaller Square
Now, take the right side of your rectangle and fold it over to meet the left side, forming a smaller, perfectly square shape. Press down firmly to create another sharp crease. You should now have a neat square with four layers of fabric.
Pro tip: This compact square is where the magic truly begins. For a holiday gathering, consider fabric napkins in festive colors like deep cranberry, emerald green, or shimmering gold. The quality of the fabric truly shines in these foundational folds.
Step 4: Create Your First Triangle
Locate the open corner of your square (where all four layers are loose). Gently peel back only the top layer of fabric from this open corner and fold it diagonally across to the opposite closed corner, forming a triangle. Press this fold firmly. You’ve just created the first face of your pyramid!
Pro tip: This step is crucial for defining the pyramid’s shape. For a birthday celebration, especially for an adult milestone, choosing a luxurious linen napkin will instantly elevate the feel. Imagine these elegant pyramids gracing a “Champagne Brunch” table setting!
Step 5: Fold Up the Remaining Corners
Now, take the next two layers of fabric (the second and third layers from the top) from the open corner. Fold them together diagonally across to the opposite closed corner, just like you did with the first layer, but stop about an inch or two short of the first triangle’s point. This creates a slightly smaller, nested triangle. Repeat this with the final single layer, folding it up to create an even smaller, third nested triangle.
Pro tip: The slight offset in these folds adds depth and dimension to your pyramid. For a baby shower, you could subtly vary the size of your napkins for different table sections, perhaps a larger pyramid for the main food table and smaller ones for guest seating. This adds visual interest and a curated touch.
Step 6: Flip and Fold for Stability
Carefully flip the entire napkin over so the folded triangles are now face down. You should see a large, flat square with a central diagonal line. Now, take the bottom corner of this square and fold it up towards the top corner, creating a large triangle. Press this fold firmly.
Pro tip: This seemingly simple flip and fold is what gives your pyramid its structural integrity. For gift inspiration, consider pairing a set of beautifully folded napkins with a gourmet food basket or a bespoke tablecloth as a thoughtful hostess gift. It shows you’ve thought about presentation and practicality!
Step 7: Stand Tall and Admire Your Pyramid
With the napkin still flipped over, take the left corner of the large triangle and fold it inwards towards the center. Do the same with the right corner, folding it inwards so that the two folded edges meet or slightly overlap in the middle. You’ve essentially created a smaller, more compact triangle. Now, carefully stand your napkin upright. The folds you just made will serve as the base, allowing your elegant pyramid to stand proudly on its own.
Pro tip: The final stand is the moment of truth! If it wobbles, gently adjust the base folds until it’s stable. To enhance the Pinterest-worthy appeal, tuck a sprig of fresh rosemary, a small flower, a personalized place card, or even a tiny party favor into one of the pyramid’s pockets. Imagine a tiny chocolate truffle or a handwritten note nestled within for a truly memorable touch at any event.
Common Mistakes to Avoid
Even the most seasoned host can stumble, but with these tips, you’ll glide through napkin folding like a pro!
1. Using the Wrong Fabric:
Problem: Flimsy fabrics (like thin polyester) won’t hold a crisp shape, resulting in a floppy, undefined fold. Conversely, overly stiff fabrics (like heavy canvas) can be difficult to crease and manipulate, leading to bulky, uneven results.
Why it’s problematic: The whole point of a fancy fold is its defined structure. The wrong fabric undermines this entirely, making your efforts look messy rather than elegant.
Correct Approach: Opt for medium-weight cotton, linen, or a good quality cotton-polyester blend. These fabrics offer the perfect balance of pliability and structure to hold creases beautifully. Always test a small corner first if you’re unsure.
2. Not Ironing/Smoothing Your Napkins:
Problem: Starting with wrinkled napkins means your folds will never be truly sharp or clean. Existing creases will fight against your new ones, leading to a rumpled appearance.
Why it’s problematic: A fancy napkin fold is all about precision and crisp lines. Wrinkles detract from this immediately, making even the most intricate fold look sloppy.
Correct Approach: Always iron your napkins thoroughly before you begin. A quick pass with a steam iron makes an enormous difference. For extra crispness, consider using a fabric starch spray.
3. Not Creasing Sharply Enough:
Problem: Gentle or weak creases won’t hold the shape of your fold, causing it to unravel or collapse.
Why it’s problematic: Each crease is a structural component of your finished design. Without firm creases, the napkin lacks the necessary support to stand or hold its shape.
Correct Approach: After each fold, use your fingers or the edge of a ruler to press down firmly and create a sharp, defined crease. Don’t be afraid to apply a little pressure!
4. Rushing the Process:
Problem: Hurrying through the steps often leads to misaligned edges, uneven folds, and a generally sloppy outcome.
Why it’s problematic: Napkin folding is a mindful activity that requires precision. Rushing compromises alignment and the integrity of each fold, making the final product look amateurish.
Correct Approach: Take your time with each step. Align edges carefully, press creases firmly, and don’t move on until the current fold is perfect. Enjoy the process – it’s part of the joy of preparing for your special event!
Troubleshooting
Even with the best intentions, things can sometimes go awry. Here are a couple of common issues and how to quickly fix them.
1. My Napkin Won’t Stand Upright!
Issue: This is usually a sign that your creases aren’t sharp enough, or the fabric is too soft/thin to hold its own weight.
Quick Solution: Go back through the steps, paying extra attention to pressing each crease firmly, especially the final base folds. If your fabric is the culprit, try a light spray starch before ironing, or consider using a slightly heavier napkin for future attempts. You can also gently tuck the back flaps further into each other to create a tighter, more stable base.
2. The Edges of My Pyramid Aren’t Neat and Straight.
Issue: Misalignment during the initial folds or insufficient ironing can lead to messy edges.
Quick Solution: Unfold your napkin completely and start again, ensuring that each edge is perfectly aligned before you make a crease. Ironing thoroughly before you begin will also make it much easier to achieve those crisp, straight lines. Pay close attention in Step 5 to ensure your nested triangles are evenly spaced.
Key Takeaways
Congratulations, you’ve mastered the art of the Pyramid Fold! Here are the essential points to remember for beautiful results every time:
Preparation is Key: Always start with a clean, ironed, and ideally starched napkin for the crispest folds.
Fabric Matters: Choose medium-weight cotton or linen for the best structure and pliability.
Precision in Creases: Each fold needs a firm, sharp crease to hold its shape. Don’t be afraid to press down!
Take Your Time: Napkin folding is a creative, mindful process. Enjoy it and ensure each step is accurate.
Practice Makes Perfect: The more you fold, the faster and more confident you’ll become.
Frequently Asked Questions
Let’s address some common curiosities about fancy napkin folding.
1. Can I use paper napkins for fancy folds?
While technically possible for some very simple folds, paper napkins generally lack the pliability and structure needed for truly fancy and standing folds like the Pyramid. They tend to tear, wrinkle excessively, and won’t hold sharp creases. Stick to cloth napkins for the best results.
2. How do I store folded napkins if I’m preparing them in advance?
For best results, store them flat in a clean, dry box or container, ideally with tissue paper between layers to prevent crushing or wrinkling. If you need them to stand upright, place them in a box with dividers or gentle supports, but for most folds, assembling just before the event is ideal.
3. How can I make my folds even more secure or add extra flair?
To secure a fold, you can use a dab of fabric glue (if the napkin won’t be washed immediately) or discreetly tuck a small safety pin from the back. To add flair, consider using decorative napkin rings, tying with a beautiful ribbon, or tucking in natural elements like fresh flowers, herbs, or small decorative items that match your party theme.
4. What’s the best napkin size for fancy folds?
Standard dinner napkins (around 20×20 inches or 50×50 cm) are generally ideal. This size provides enough fabric to create intricate folds without being too bulky or too small to manipulate. Cocktail napkins (smaller) are usually too small for most fancy folds.
What’s Next?
You’ve mastered the elegant Pyramid Fold, and your table is already looking more inviting! But the journey of creating memorable celebrations has just begun. Let your newly acquired skill be the spark for planning truly unforgettable events, brimming with Pinterest-worthy details and heartfelt touches.
Birthday Bash Brilliance: Crafting Unforgettable Moments
Think beyond just cake and candles! For a milestone birthday – sweet sixteen, a roaring twenties party, or a sophisticated 50th – your beautifully folded napkins can be the cornerstone of a captivating theme.
Themes & Decor: Imagine a “Glam Gatsby” party with black and gold napkins folded into sleek Pyramids, perhaps adorned with a single pearl or a mini feather. For an “Enchanted Forest” theme, use deep green or moss-colored napkins, tucking a tiny sprig of fresh lavender or a small wooden charm into each fold. A vibrant “Fiesta Fun” birthday could feature brightly colored napkins in a Fan Fold (your next challenge!), with small maracas or chili pepper charms.
DIY Touches: Create DIY centerpieces using repurposed jars filled with fairy lights, or simple floral arrangements that complement your napkin colors. Design personalized place cards that match your theme, perhaps with a fun fact about the birthday person.
Gift Inspiration: When gifting, present a set of luxurious linen napkins, perhaps monogrammed, alongside a beautiful cookbook or a bottle of fine wine. Or, for the host, a thoughtful gift basket filled with gourmet treats and a beautifully folded napkin as the “wrapper” for a small, accompanying gift.
Baby Shower Bliss: Celebrating New Beginnings with Gentle Elegance
Baby showers are all about tender anticipation and joy. Your fancy napkin folds can add an extra layer of sweetness and charm.
Themes & Decor: For a “Twinkle Twinkle Little Star” shower, use pale blue or yellow napkins with a tiny silver star tucked into the Pyramid fold. A “Oh Boy/Girl!” reveal party could feature two different colored napkins (blue and pink) on alternating plates, or a single napkin holding a small “guess the gender” card. For a “Woodland Creatures” theme, opt for earthy tones and incorporate tiny faux leaves or miniature animal figurines.
Creative Uses: Beyond just plate decor, your folded napkins can hold small baby-themed favors (like miniature rubber duckies or candy pacifiers), or even serve as a unique way to present a thank-you note from the parents-to-be.
Gift Inspiration: For the expectant parents, consider a “new parent survival kit” basket, where a beautifully folded receiving blanket acts as the large “napkin” lining the basket, filled with practical yet luxurious items. Or, gift a personalized baby blanket, tied with a ribbon and a small, perfectly folded napkin mimicking a tiny baby’s swaddle.
Holiday Hosting Harmony: Spreading Cheer, One Fold at a Time
Holidays are synonymous with gathering and feasting. Fancy napkin folds instantly elevate your holiday table, making every guest feel cherished.
Themes & Decor: For Christmas, try a “Christmas Tree” fold (a fantastic next challenge!) in rich reds or greens, adorned with a tiny ornament or a cinnamon stick. For Thanksgiving, an autumnal-colored Pyramid fold can hold a sprig of wheat or a small, polished acorn. Hanukkah calls for elegant blue and silver napkins, perhaps with a small dreidel or star of David charm.
DIY Touches: Craft DIY place cards from natural elements like pinecones or dried orange slices. Incorporate fairy lights, candles, and seasonal foliage (cranberries, pine branches) into your centerpieces. Set up a “hot cocoa bar” or “mulled wine station” with beautifully folded napkins ready for use.
Gift Inspiration: A hostess gift of artisanal olive oil, a gourmet coffee blend, or a set of handcrafted coasters can be beautifully presented wrapped in a fancy napkin, tied with a festive bow.
Gift-Giving Galore: The Art of Presentation
A beautifully folded napkin isn’t just for the table; it’s a versatile tool for enhancing gift presentations, making even a simple gesture feel incredibly special.
Creative Wrapping: Use a large, elegant napkin to wrap a small gift box (like a piece of jewelry or a gourmet chocolate bar) instead of traditional paper. The fabric adds a luxurious, reusable touch.
Basket Liners: Line a gift basket with a vibrantly folded napkin before filling it with goodies. It adds color, texture, and a hint of sophistication.
Themed Enclosures: For a cooking enthusiast, wrap a new kitchen gadget in a napkin folded into a “Chef’s Hat” (another fun fold to learn!). For a relaxation gift, fold a soft hand towel like a napkin and tie it with a silky ribbon.
Beyond the Fold: Expanding Your Napkin Repertoire
The Pyramid Fold is a wonderful start, but there’s a whole world of napkin artistry waiting for you!
Explore New Folds: Challenge yourself to learn the elegant “Fan Fold,” the romantic “Rose Fold,” the practical “Pocket Fold” (perfect for holding cutlery or a menu), or the intricate “Lily Fold.” Each offers a unique aesthetic for different occasions.
Accessorize with Style: Don’t forget the power of embellishments! Napkin rings, whether simple metal bands, rustic twine, or elaborate jeweled designs, can dramatically change the look. Fresh flowers, sprigs of herbs (rosemary, thyme), cinnamon sticks, personalized tags, or even small, themed favors tucked into the folds add that extra layer of charm.
Mix and Match: Experiment with different napkin colors and patterns. You don’t have to stick to solids! A patterned napkin can add a playful or sophisticated touch, depending on the design.
You now have the skills and inspiration to transform any gathering into a truly memorable celebration. Don’t let your beautiful napkins gather dust! Practice your new skill, experiment with different fabrics and embellishments, and most importantly, have fun creating those magical moments. Start planning your next event today, and watch your guests’ faces light up with delight!