🥳 How To Keep Things Cold At A Party
📋 The Event Planner's Essential Toolkit
Whether you're throwing a massive birthday bash or an intimate baby shower, the right tools make execution effortless. These are the 5 essential items that professional event coordinators and DIY party hosts consistently rely on to pull off flawless celebrations without the stress.
🎈 Electric Dual-Nozzle Balloon Pump
The absolute lifeline for creating those trending balloon arches and garlands that everyone loves. This dual-nozzle pump lets you inflate hundreds of balloons in a fraction of the time, saving your lungs and transforming hours of prep work into minutes.
🛡️ Command Clear Party Hooks & Strips
The secret to magazine-worthy venue decorations without losing your security deposit. Professional planners stock up on these clear, damage-free hooks to hang banners, string lights, and paper lanterns securely on walls and ceilings, removing cleanly when the party is over.
🧁 Wilton Tiered Cupcake & Dessert Stand
The easiest way to make a simple dessert table look professionally catered. This customizable, multi-tier display stand gives crucial height and dimension to your treats, effortlessly elevating the presentation of cupcakes, cookies, or appetizers at any gathering.
🚂 Heavy-Duty Collapsible Utility Wagon
The unsung hero of off-site parties, park birthdays, and trunk-or-treats. This rugged folding wagon hauls folding chairs, coolers, and mountains of decor from your car to the venue in one trip, completely eliminating the exhausting pre-party back-and-forth hauling.
📓 Clever Fox Event Planner Organizer
The ultimate command center for keeping your sanity intact while hosting. Dedicated sections for guest lists, budget tracking, vendor contacts, and day-of timelines ensure that not a single crucial detail falls through the cracks before the big day.
I remember hosting my very first summer barbecue, full of excitement and grand plans. Yet, halfway through, I noticed guests politely sipping lukewarm sodas and nibbling on slightly-too-soft cheese. It was a learning curve, to say the least.
Since then, I’ve perfected the art of keeping everything wonderfully chilled, ensuring every celebration is a refreshing success. This guide shares all my secrets, so you can host with confidence and style.

Quick Overview
- Time needed: 1-2 hours (initial setup & planning)
- Difficulty: Beginner
- What you’ll need: Coolers, ice, serving dishes, towels, creativity
Step-by-Step Instructions
Step 1: Envision Your Chilled Oasis
Every memorable party begins with a vision. Before you even think about ice, imagine your guests enjoying perfectly crisp drinks and cool, delicious bites. Consider the size of your gathering, how long it will last, and the types of refreshments you’ll be serving.
Will it be a backyard bash, an elegant indoor soirée, or a cozy holiday get-together? Your chill strategy will adapt beautifully to each unique setting. This initial thought helps you plan for both function and fabulous aesthetics.
Step 2: Assemble Your Cooling Collection
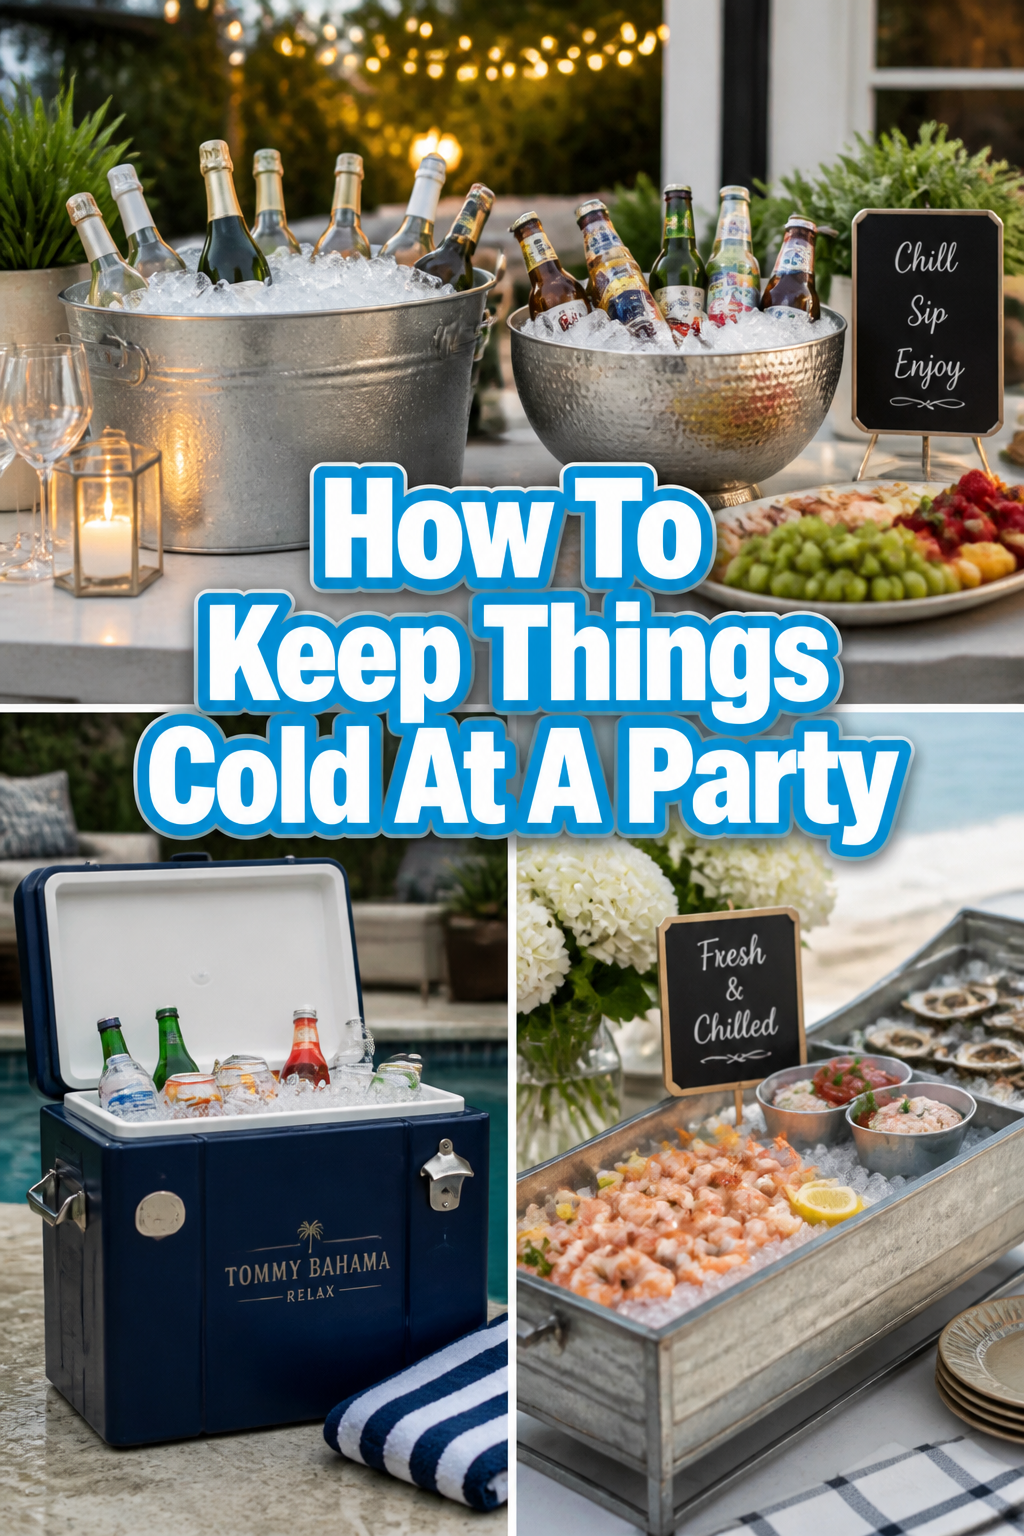
Your tools are key to maintaining that perfect chill. Gather an assortment of coolers, insulated serving bowls, and decorative ice buckets. Think beyond basic plastic; galvanized tubs, wooden crates lined with plastic, or even large ceramic planters can become stylish cooling stations.
For drinks, consider a large, attractive beverage dispenser that can hold ice at its core. Individual insulated tumblers can also be a thoughtful touch for guests, reducing ice melt in their own cups.
Step 3: Master the Mighty Ice Game
Ice is the true hero of cold keeping. Plan to have plenty – a good rule of thumb is one pound of ice per guest, per hour. Don’t forget to account for any ice needed for drinks themselves, not just for chilling containers.
Consider different types of ice: standard cubes for drinks, crushed ice for chilling bottles quickly, and large block ice for longevity in coolers. Block ice melts much slower, making it ideal for keeping items cold for extended periods.
Pro Tip: Always pre-chill your drinks and food in the refrigerator or freezer before placing them into coolers. This significantly extends the life of your ice and keeps items colder longer.
Step 4: Layer for Lasting Freshness
The secret to effective chilling is smart layering. Start with a generous layer of ice at the bottom of your cooler or tub. Then, place your drinks or food items, ensuring they aren’t packed too tightly.
Top with another generous layer of ice, making sure items are fully submerged or surrounded. Repeat this process until your container is full, finishing with a thick layer of ice on top. This creates an insulating barrier that locks in the cold.
Step 5: Design Pinterest-Worthy Chill Zones
Transform your practical cooling stations into stunning visual elements. For a birthday party, create a “Hydration Station” with various chilled beverages, each clearly labeled with cute custom tags. Use a tiered stand for fruit skewers, with a bowl of ice tucked underneath the bottom tier to keep them crisp.
For a baby shower, imagine small, pastel-colored tubs filled with sparkling cider bottles, adorned with tiny bows. You could even use a vintage pram filled with ice and drinks as a whimsical focal point. A holiday gathering might feature a rustic wooden trough filled with ice, holding bottles of wine and sparkling grape juice, accented with pinecones and fairy lights.
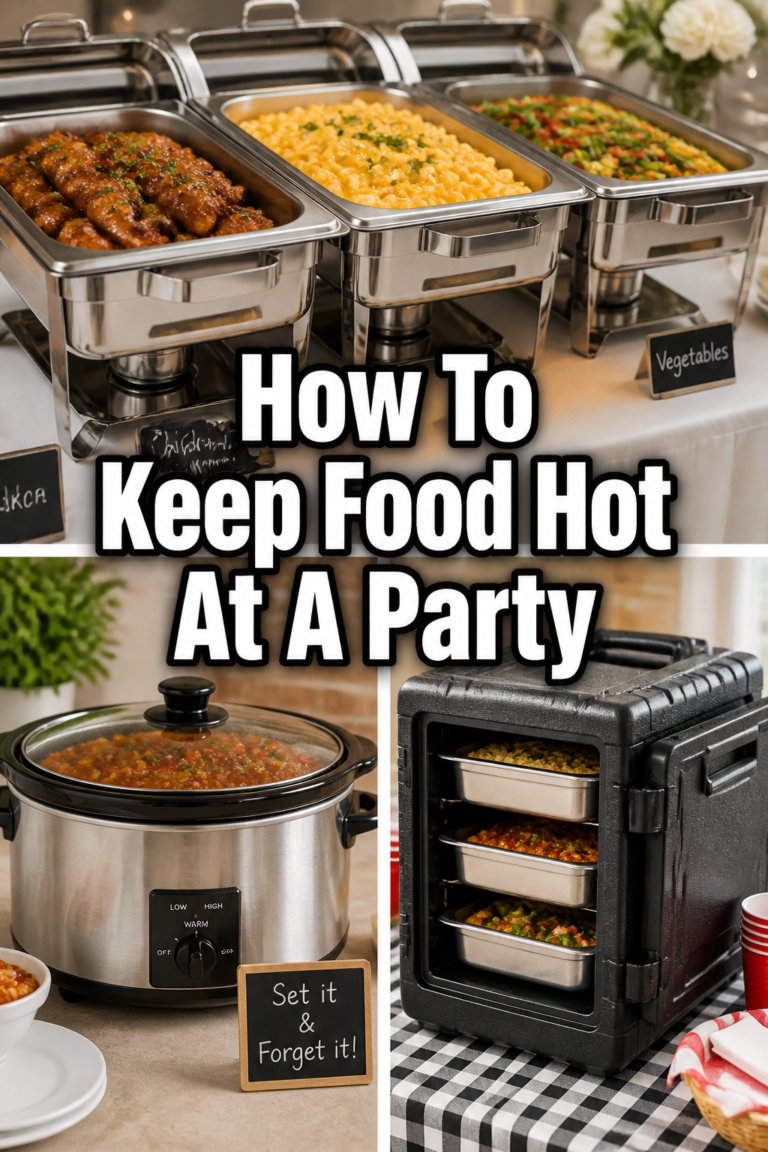
Step 6: Keep Food Fantastically Frosty
Chilled food items like salads, fruit platters, and dips require special attention. Use nested bowls: a larger bowl filled with ice, and a smaller serving bowl placed directly inside it. This keeps food at safe, delicious temperatures.
For delicate desserts like mini cheesecakes or fruit tarts, consider a dedicated dessert bar. Place a shallow pan of ice on your table, then arrange your dessert plates directly on top, perhaps covering with a sheer dome to protect from elements. This ensures every bite is as refreshing as intended.
Step 7: Themed Touches for Every Celebration
Elevate your cold-keeping with details that match your party’s theme. For a summer birthday, create fruit-infused ice cubes with berries and mint. These look beautiful and add flavor as they melt into drinks.
A baby shower could feature ice molds shaped like rubber duckies or baby bottles. For Christmas, freeze cranberries and rosemary sprigs into large ice rings for your punch bowl, adding a festive touch. These small details make a big impact.
Step 8: Maintain the Chill Throughout the Fun
Parties are dynamic, and so should your cold-keeping strategy be. Have extra bags of ice stored in a separate, insulated cooler, ready to replenish your main stations. Designate someone to periodically check ice levels and top them off.
Keep coolers and tubs in shaded areas, away from direct sunlight or heat sources. Drape a light, damp towel over your ice buckets to help slow melting on particularly warm days. These small acts ensure the cold lasts as long as the celebration.
Pro Tip: For outdoor parties, consider placing a small fan near your drink station, aimed slightly above the ice. The gentle breeze can help slow down the melting process by moving warm air away.
Common Mistakes to Avoid
Underestimating Your Ice Needs
Many hosts mistakenly believe a small bag or two of ice will suffice. Running out of ice prematurely is a common party faux pas that quickly leads to warm drinks and disappointed guests. Always err on the side of caution and buy more ice than you think you’ll need; it’s better to have too much than too little.
Using Warm Items in Coolers
Placing room-temperature or warm beverages and food directly into a cooler with ice is a recipe for rapid ice melt. The ice will expend all its energy trying to cool down the items, rather than simply maintaining their already chilled state. Always pre-chill everything in your refrigerator or freezer first.
Opening Coolers Too Frequently
Every time a cooler lid is opened, cold air escapes and warm air rushes in. This drastically reduces the efficiency of your ice. Encourage guests to grab what they need quickly, or consider setting up multiple smaller chill stations to distribute access and minimize heat loss from any one container.
Ignoring Food Safety Temperatures
Keeping food cold isn’t just about taste; it’s about safety. Perishable foods, especially those containing dairy, eggs, or meat, should not be left at room temperature for more than two hours. Ensure dips, salads, and other chilled edibles are consistently kept below 40°F (4°C) to prevent bacterial growth.
Troubleshooting
Drinks Getting Warm Quickly
If your drinks aren’t staying cold, check if they were pre-chilled before going into the cooler. Ensure there’s enough ice, and that bottles or cans are fully surrounded by it, not just sitting on top. Adding a layer of rock salt to your ice can also slightly lower its melting point, making it colder.
Ice Melting Too Fast
Rapid ice melt often points to a few issues. Your cooler might be old or poorly insulated; consider upgrading if this is a recurring problem. Make sure the cooler is in the shade, and avoid opening it unnecessarily. Using block ice instead of cubes, or adding dry ice (with caution), will also extend the chill.
Condensation Mess on Tables
To combat condensation, place towels or absorbent mats underneath your ice buckets and serving bowls. For particularly drippy items, consider using a decorative tray with a raised edge to catch any water. You can also place a small, thin towel inside your decorative tubs to absorb moisture around bottles.
Key Takeaways
- Plan Ahead: Estimate ice needs and gather your cooling equipment before the party.
- Pre-Chill Everything: Always cool drinks and food in the fridge first to maximize ice longevity.
- Layer Smartly: Use a generous base and top layer of ice, ensuring items are surrounded.
- Style Your Stations: Integrate cooling solutions into your party decor for a beautiful look.
- Prioritize Food Safety: Keep perishable foods consistently cold to ensure guest well-being.
- Replenish Regularly: Have extra ice on hand and refresh your chill zones throughout the event.
Frequently Asked Questions
How much ice do I truly need for a party?
A good starting point is one pound of ice per guest, per hour, especially if drinks are being served from coolers. Factor in extra for cocktails, ice baths for food, and potential hot weather. It’s always better to overbuy than run out.
Can I make my own ice ahead of time?
Absolutely! Start making large batches of ice cubes or even freeze water in plastic containers (like clean milk jugs or deli containers) to create large blocks of ice a few days before your event. This saves money and ensures you have a steady supply.
Is dry ice a good option for keeping things cold?
Dry ice is incredibly effective for keeping items frozen or extremely cold for extended periods. Use it with extreme caution: never touch it directly, ensure good ventilation, and place it at the bottom of a cooler with a layer of regular ice or cardboard between it and your items. It’s best for long-term freezing, like for an ice cream bar.
How do I keep ice cream cold at an outdoor party?
For ice cream, a high-quality, well-insulated cooler is essential. Place a layer of dry ice at the bottom (wrapped in newspaper or a towel, and handled with gloves), then a barrier, and then your ice cream cartons. Keep the cooler lid tightly shut. For serving, bring it out only when ready, and perhaps have a small, decorative ice bath for toppings.
Our Top Recommended Finds
- Insulated Beverage Dispenser: Perfect for large batches of punch or iced tea, keeping drinks cold and accessible with a stylish spigot.
- Galvanized Party Tub with Stand: A classic, rustic choice that elevates drinks off the ground, making them easy to reach and a charming decor piece.
- Reusable Freezer Packs/Ice Blocks: Ideal for food safety, these can be placed under serving dishes or layered in coolers to supplement or replace ice, leaving less watery mess.
Crafting Unforgettable Chilled Moments
Planning a party should be a joy, not a source of stress over melting ice. With these practical tips and creative styling ideas, you’re now equipped to host celebrations where every drink is crisp and every bite is fresh. Imagine the smiles, the laughter, and the compliments on your perfectly chilled offerings.
Don’t wait for your next big event to put these ideas into action. Start experimenting with infused ice cubes or a beautifully arranged drink station today. Your guests will thank you, and you’ll love being the host who always keeps things cool.