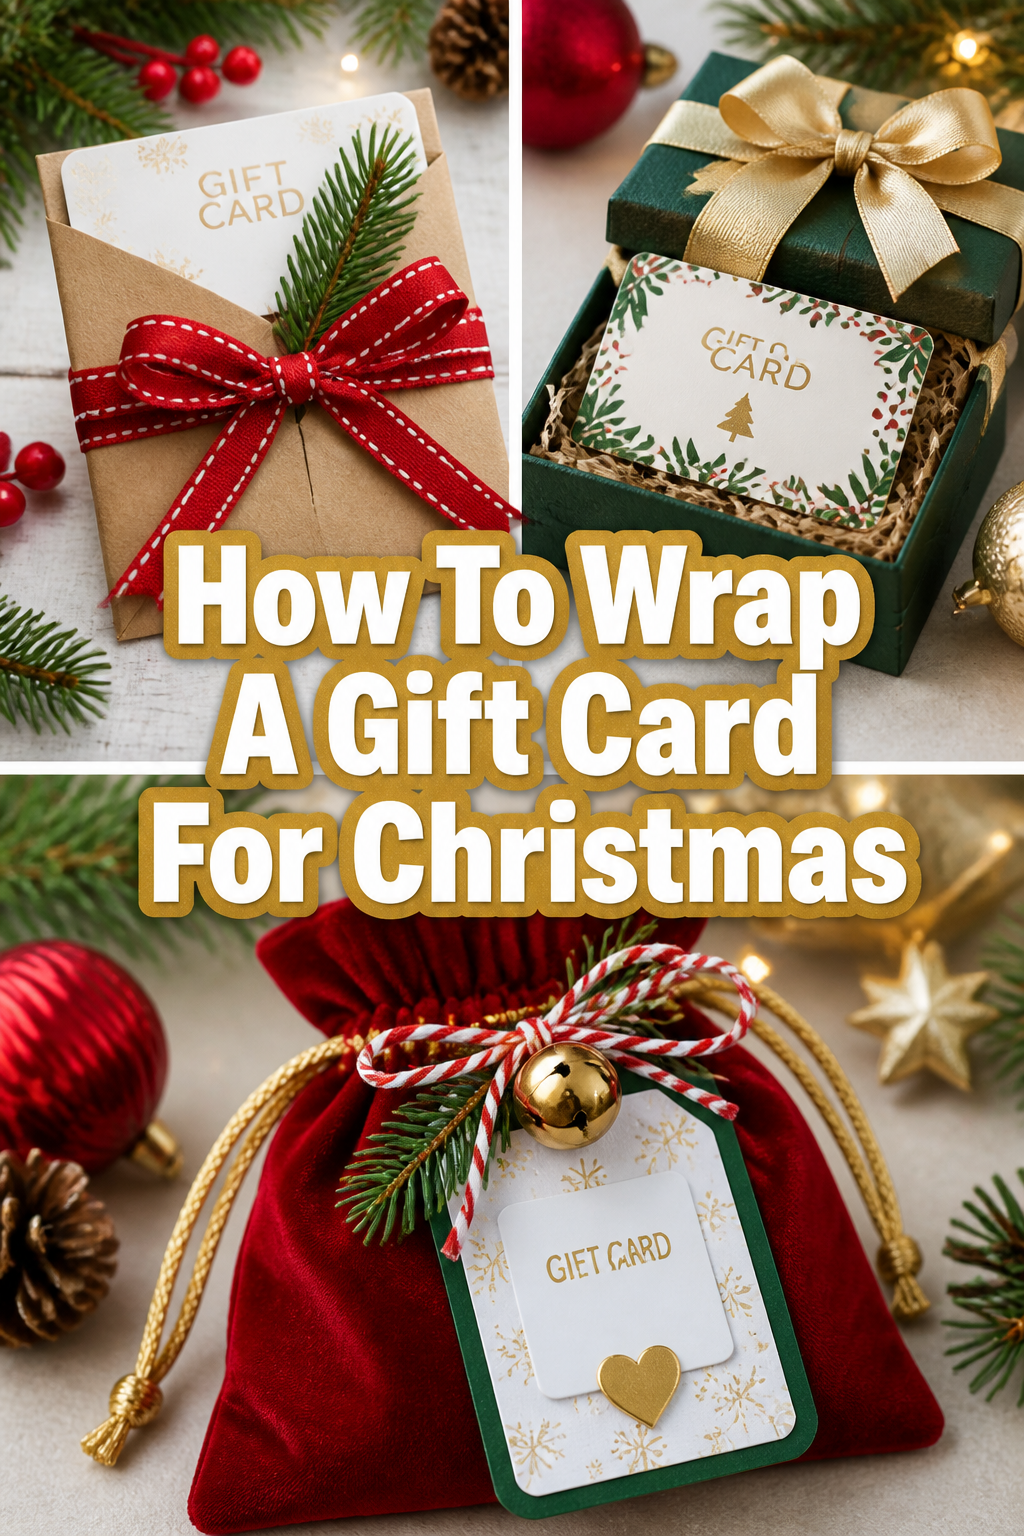
🎁 How To Wrap A Gift Card For Christmas
📋 The Event Planner's Essential Toolkit
Whether you're throwing a massive birthday bash or an intimate baby shower, the right tools make execution effortless. These are the 5 essential items that professional event coordinators and DIY party hosts consistently rely on to pull off flawless celebrations without the stress.
🎈 Electric Dual-Nozzle Balloon Pump
The absolute lifeline for creating those trending balloon arches and garlands that everyone loves. This dual-nozzle pump lets you inflate hundreds of balloons in a fraction of the time, saving your lungs and transforming hours of prep work into minutes.
🛡️ Command Clear Party Hooks & Strips
The secret to magazine-worthy venue decorations without losing your security deposit. Professional planners stock up on these clear, damage-free hooks to hang banners, string lights, and paper lanterns securely on walls and ceilings, removing cleanly when the party is over.
🧁 Wilton Tiered Cupcake & Dessert Stand
The easiest way to make a simple dessert table look professionally catered. This customizable, multi-tier display stand gives crucial height and dimension to your treats, effortlessly elevating the presentation of cupcakes, cookies, or appetizers at any gathering.
🚂 Heavy-Duty Collapsible Utility Wagon
The unsung hero of off-site parties, park birthdays, and trunk-or-treats. This rugged folding wagon hauls folding chairs, coolers, and mountains of decor from your car to the venue in one trip, completely eliminating the exhausting pre-party back-and-forth hauling.
📓 Clever Fox Event Planner Organizer
The ultimate command center for keeping your sanity intact while hosting. Dedicated sections for guest lists, budget tracking, vendor contacts, and day-of timelines ensure that not a single crucial detail falls through the cracks before the big day.
Christmas morning is all about the magic of discovery under the glowing lights of the tree.
I remember one year when I handed my sister a plain white envelope, and the look of slight disappointment before she even opened it broke my heart.
Since then, I have dedicated myself to making gift cards feel like the most thoughtful, curated treasures in the room.

Quick Overview
Transforming a simple plastic card into a festive masterpiece is easier than you think and adds a wonderful personal touch to your holiday hosting.
- Time needed: 20 to 30 minutes
- Difficulty: Beginner
- What you’ll need: Small boxes or tins, decorative filler, festive ribbon, cardstock, and seasonal embellishments like pinecones or bells.
Step-by-Step Instructions
Step 1: Define Your Holiday Aesthetic
Before you reach for the scissors, decide on a visual theme that matches your Christmas decor or the recipient’s personality.
Choose a palette like “Classic Crimson,” “Midnight Gold,” or “Rustic Woodland” to guide your material selection.
For a Pinterest-worthy look, I often lean toward a Scandi-Chic vibe using brown kraft paper, white ink, and fresh evergreen sprigs.
Setting a theme ensures that even a small gift card feels like a deliberate part of your holiday celebration.
Pro Tip: Look at your tree decorations and try to mimic those textures in your gift wrapping for a cohesive holiday display.
Step 2: Select a Creative Vessel
The biggest mistake people make is sticking to a standard envelope that gets lost in the pile of presents.
Find a small container that adds bulk and intrigue, such as a mini wooden crate, a vintage tea tin, or a clear glass ornament ball.
Using a physical object as the “wrapper” gives the recipient something to hold and unwrap, building that classic Christmas anticipation.
If you are feeling extra festive, try using a hollowed-out book or a beautiful velvet jewelry box for an upscale feel.
Step 3: Layer the Interior with Texture
Once you have your vessel, you need to create a cozy “nest” for the gift card so it doesn’t rattle around.
Fill the bottom of your box with shredded metallic paper, dried moss, or even tiny faux marshmallows for a hot cocoa theme.
This layer of texture makes the presentation feel high-end and thoughtful, rather than a last-minute purchase.
I love using scented filler like cinnamon sticks or dried orange slices to engage the recipient’s sense of smell as soon as they open the lid.
Pro Tip: Use a bit of double-sided tape on the back of the card to keep it perfectly centered on top of your filler.
Step 4: Incorporate a Small Keepsake
A gift card is a promise of a future treat, but adding a small physical token provides instant gratification.
Tuck a miniature bottle of luxury hand cream, a gourmet chocolate truffle, or a handmade Christmas ornament alongside the card.
This turns the gift into a “bundle” and shows that you spent time thinking about their likes beyond just the dollar amount.
For a coffee shop gift card, you might include a small bag of flavored coffee beans or a reusable festive straw.
Step 5: Master the Art of the Wrap
If your vessel is a box, you can now wrap the exterior in high-quality paper that feels substantial in the hand.
Wrap the box tightly, ensuring your seams are hidden at the bottom for a professional, clean finish.
If you are using a jar or a tin, you might skip the paper and instead use a fabric wrap like a linen napkin or a piece of velvet ribbon.
The goal is to make the exterior look so beautiful that they almost don’t want to open it.
Step 6: Add Architectural Ribbon Elements
Standard curls of plastic ribbon are fine for some, but for a truly memorable gift, you want something with more character.
Layer different widths of ribbon, such as a wide velvet band topped with a thin metallic cord.
Tie a classic bow, but leave the tails long and elegant to create a sense of movement and luxury.
You can also weave in a bit of baker’s twine for a more casual, “handmade with love” appearance.
Pro Tip: Use a tiny drop of hot glue to secure the center of your bow so it stays perfectly symmetrical under the tree.
Step 7: Embellish with Natural Accents
Nothing says “Christmas” like elements brought in from the winter landscape.
Attach a small pinecone, a sprig of holly, or a frosted berry branch to the top of your bow using thin floral wire.
These organic touches add a 3D element that makes the gift card stand out among larger boxes.
If you prefer a modern look, try a small gold-dipped feather or a geometric wooden bead.
Step 8: Personalize with Hand-Lettered Tags
The final touch is the tag, which serves as the bridge between the gift and the recipient.
Write their name in a beautiful script using a metallic paint pen or a classic calligraphy nib.
Instead of just writing “To” and “From,” consider adding a short, sweet message like “For your next cozy adventure” or “A little holiday magic for you.”
Personalization is what transforms a generic card into a heartfelt gesture of appreciation.
Common Mistakes to Avoid
The Invisible Gift Card
Many people place a gift card inside a giant box without any padding or weight.
When the recipient picks it up, it feels empty, which can be confusing and takes away from the excitement.
Always ensure there is enough filler or a small companion gift so the box has a satisfying weight and doesn’t sound hollow.
Over-Taping the Card
It is tempting to use a lot of tape to make sure the card stays in place, but this can be a nightmare for the recipient.
If they have to scrape tape residue off the magnetic strip or the barcode, it ruins the experience.
Use a small piece of low-tack washi tape or a decorative paperclip instead to keep the card secure but accessible.
Forgetting the Value Label
While it might feel tacky to leave the price on some gifts, a gift card is different.
The recipient needs to know the value so they can plan their shopping trip accordingly.
If the value isn’t printed on the card, write it neatly on the back of the gift tag or on a small separate note inside the box.
Troubleshooting
The Card Is Sliding Around
If your box is slightly too large and the card won’t stay put, you need a structural fix.
Cut a small piece of cardstock that fits the dimensions of the box and cut two diagonal slits in the center.
Slide the corners of the gift card into these slits to create a custom “mounting” that looks professional and keeps everything stable.
The Ribbon Keeps Slipping Off
Satin and silk ribbons are beautiful but can be very slippery on glossy wrapping paper.
Apply a tiny square of double-sided tape to the corners of the box before you wrap the ribbon around it.
This provides enough grip to keep your bow perfectly centered even if the gift is moved around under the tree.
Ink Smearing on the Card or Tag
Many gift cards have a glossy finish that doesn’t play well with standard ballpoint pens.
If you are writing directly on a card or a shiny tag, use a permanent fine-tip marker and let it dry for at least five minutes.
Test your pen on a scrap of similar material first to ensure it won’t smudge when you touch it.
Key Takeaways
- Elevation is key: Use a physical vessel like a tin or box to give the gift card presence.
- Sensory details matter: Add scents, textures, and weights to make the unboxing memorable.
- Themes create cohesion: Match your wrapping style to your overall holiday decor for a polished look.
- Keepsakes add value: Including a small ornament or treat makes the gift feel more substantial.
- Security without mess: Use washi tape or clips instead of heavy adhesives to protect the card’s functionality.
- Hand-lettering adds heart: A beautiful, personalized tag is the perfect finishing touch.
Frequently Asked Questions
Is it okay to just give a gift card for Christmas?
Absolutely, especially when you know the recipient has a specific hobby or a favorite store they love to visit.
The key is in the presentation; by putting effort into the wrapping, you show that the gift was a thoughtful choice rather than a last-minute one.
Many people actually prefer gift cards because it gives them the freedom to choose exactly what they want or need.
How do I wrap a digital gift card?
Digital cards can feel a bit intangible, so I recommend printing out the code or the confirmation email.
Fold the paper neatly and place it inside a beautiful card or a small gift box just as you would with a physical card.
You can even create a QR code that leads to the gift card and print it on a pretty piece of cardstock for a tech-savvy twist.
What are some cheap ways to make gift card wrapping look expensive?
Focus on natural elements like pine branches, dried berries, or even interesting stones from your garden.
Repurposing household items like glass jars, fabric scraps from old clothes, or even brown paper grocery bags can look incredibly chic when paired with a nice ribbon.
The “expensive” look usually comes from the attention to detail and the layering of materials rather than the cost of the supplies themselves.
Our Top Recommended Finds
- Velvet Ribbon Spools: These add an instant touch of luxury and come in deep jewel tones perfect for the holidays.
- Miniature Kraft Boxes: Having a set of these on hand makes it easy to wrap gift cards or jewelry at a moment’s notice.
- Metallic Paint Markers: These are essential for creating beautiful hand-lettered tags that pop against dark or rustic paper.
Make This Holiday Truly Magical
Now that you have the secrets to creating the perfect gift card presentation, it is time to gather your supplies and get creative.
Imagine the look on your loved one’s face when they see a beautifully crafted package that reflects the care you have for them.
You can even set up a small wrapping station at your next holiday party to share these tips with your friends and family.
Start looking for those unique tins and ribbons today so you are ready to spread joy all season long.