👔 How To Wrap A Tie As A Gift
📋 The Event Planner's Essential Toolkit
Whether you're throwing a massive birthday bash or an intimate baby shower, the right tools make execution effortless. These are the 5 essential items that professional event coordinators and DIY party hosts consistently rely on to pull off flawless celebrations without the stress.
🎈 Electric Dual-Nozzle Balloon Pump
The absolute lifeline for creating those trending balloon arches and garlands that everyone loves. This dual-nozzle pump lets you inflate hundreds of balloons in a fraction of the time, saving your lungs and transforming hours of prep work into minutes.
🛡️ Command Clear Party Hooks & Strips
The secret to magazine-worthy venue decorations without losing your security deposit. Professional planners stock up on these clear, damage-free hooks to hang banners, string lights, and paper lanterns securely on walls and ceilings, removing cleanly when the party is over.
🧁 Wilton Tiered Cupcake & Dessert Stand
The easiest way to make a simple dessert table look professionally catered. This customizable, multi-tier display stand gives crucial height and dimension to your treats, effortlessly elevating the presentation of cupcakes, cookies, or appetizers at any gathering.
🚂 Heavy-Duty Collapsible Utility Wagon
The unsung hero of off-site parties, park birthdays, and trunk-or-treats. This rugged folding wagon hauls folding chairs, coolers, and mountains of decor from your car to the venue in one trip, completely eliminating the exhausting pre-party back-and-forth hauling.
📓 Clever Fox Event Planner Organizer
The ultimate command center for keeping your sanity intact while hosting. Dedicated sections for guest lists, budget tracking, vendor contacts, and day-of timelines ensure that not a single crucial detail falls through the cracks before the big day.
There’s a special kind of magic in giving a gift that’s beautifully presented, especially a thoughtful item like a tie.
I’ve always found that the effort put into wrapping can make a simple present feel like a grand gesture, creating unforgettable moments for the recipient.
Let this guide inspire you to transform a tie into a Pinterest-worthy treasure, perfect for any celebration.
Quick Overview
Transforming a simple tie into a stunning gift is easier than you might think, adding a personal touch that truly celebrates the recipient.
You’ll soon master the art of elegant presentation, making every occasion feel extra special and memorable.
- Time needed: 15-30 minutes (depending on desired embellishments)
- Difficulty: Beginner
- What you’ll need: Wrapping paper, scissors, tape, ribbon, optional decorative elements
Step-by-Step Instructions
Step 1: Gather Your Artistic Arsenal
To begin this delightful wrapping adventure, assemble all your materials. Think of this as preparing your creative canvas for a masterpiece.
Having everything ready beforehand makes the process smooth and enjoyable, transforming a task into a joyful ritual.
Step 2: Choose Your Perfect Paper Story
Select wrapping paper that tells a story, aligning with the occasion and the recipient’s personality. For a birthday, a bold, geometric print or a playful confetti pattern instantly sparks joy.
For a baby shower, gentle pastels or whimsical animal motifs create a tender, sweet vibe. Holidays call for festive metallics, classic plaids, or elegant winter scenes that evoke warmth and cheer.
Pro Tip: Consider a double-sided paper for extra flair, allowing a peek of a contrasting pattern when opened. This adds an unexpected layer of visual delight.
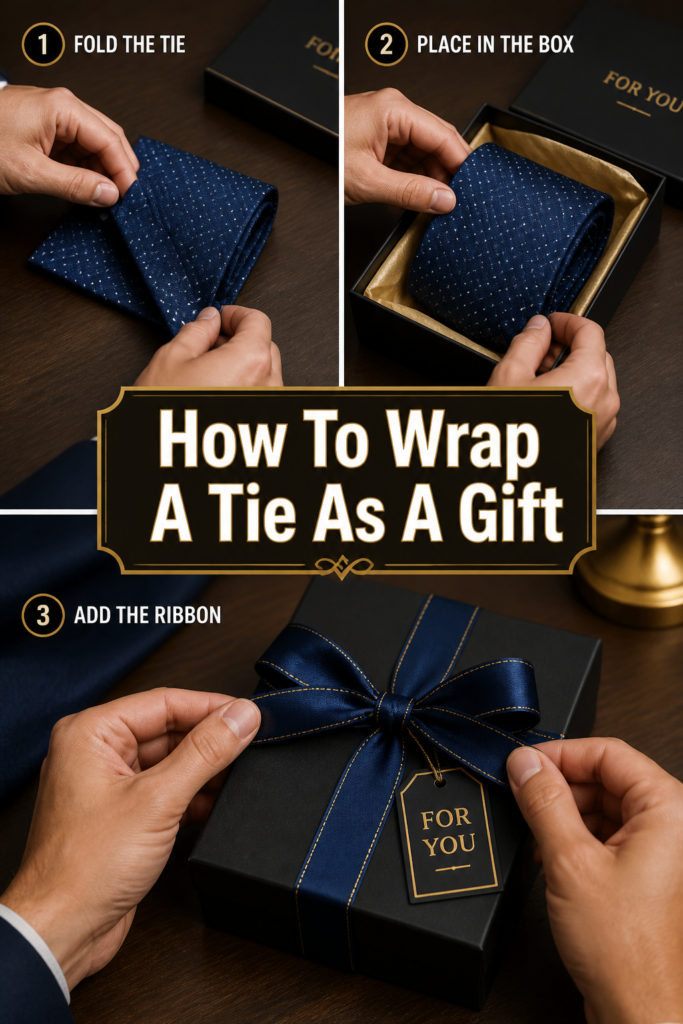
Step 3: Prepare the Tie for its Grand Reveal
Fold the tie neatly to create a compact, elegant package. Lay the tie flat, then fold it in half lengthwise, bringing the narrow end up to meet the wider end.
Next, gently fold it into thirds or quarters, depending on the tie’s length and your desired final shape. Aim for a flat, rectangular form that’s easy to wrap.
Alternatively, you can roll the tie carefully from the wider end, creating a cylindrical shape. This can be placed in a small, decorative tube or a custom-made box for a unique presentation.
Step 4: Measure and Cut Your Paper Precisely
Lay the folded tie on your chosen wrapping paper. Measure enough paper to completely cover the tie with a slight overlap on the long sides and sufficient length to fold over the ends.
Cut the paper cleanly with sharp scissors. A straight edge ensures a professional finish, making your gift look even more refined and thoughtfully prepared.
Step 5: Secure the First Fold with Flair
Center the folded tie on the paper. Bring one long edge of the paper over the tie and secure it with a small piece of double-sided tape along the edge.
Then, bring the other long edge over, creating a neat seam. Use double-sided tape here too for an invisible finish that enhances the gift’s sleek appearance.
Pro Tip: For a truly Pinterest-worthy look, use a clear ruler and a craft knife for perfectly straight cuts. This small detail elevates the entire presentation.
Step 6: Craft Crisp, Elegant Ends
Now, work on the ends of your wrapped tie. Gently push in the sides of the paper, creating neat triangular flaps on both ends.
Fold the top flap down and the bottom flap up, ensuring they meet cleanly in the middle. Secure each fold with a tiny piece of double-sided tape for a polished, seamless look.
Repeat this process for the other end of the package. Crisp corners are key to an elegant wrap, showcasing your attention to detail.
Step 7: Adorn with a Ribbon of Celebration
Choose a ribbon that complements your wrapping paper and the occasion. A luxurious satin ribbon in a rich jewel tone adds sophistication for a formal gift or holiday.
For a whimsical birthday, opt for a playful grosgrain ribbon with polka dots or stripes. A simple twine and a sprig of dried lavender are perfect for a rustic, heartfelt touch.
Wrap the ribbon around the package, either lengthwise or crosswise, and tie a beautiful bow. Experiment with different bow styles, like a classic four-loop bow or a more intricate layered design.
Step 8: Personalize with Charming Embellishments
Elevate your gift with personal touches that truly make it shine. Attach a small, hand-written gift tag with a heartfelt message.
For a baby shower, consider attaching a tiny rattle or a delicate paper cut-out of a baby bottle. For a birthday, a miniature balloon or a custom wax seal adds a festive flourish.
Sprigs of fresh greenery, dried flowers, or even a small, themed ornament can transform your gift into a delightful keepsake. These details show you truly care.
Step 9: Present Your Masterpiece with Joy
Place your beautifully wrapped tie in a gift bag if needed, or present it as is, allowing its stunning presentation to speak volumes. The act of giving becomes a moment of shared joy and appreciation.
Imagine the smiles and gasps of delight as your recipient sees the care and creativity you’ve poured into their gift. This thoughtful presentation makes any occasion truly memorable.
Common Mistakes to Avoid
Using Too Much Tape
Over-taping can make a gift look messy and difficult to open, detracting from its elegant presentation. Excessive tape also creates unsightly bumps and creases, ruining the smooth finish you worked so hard to achieve.
Instead, use small, strategic pieces of double-sided tape for an invisible and secure hold. Aim for just enough tape to keep the paper neatly in place, preserving the clean lines of your wrap.
Ignoring the Tie’s Material
Some ties, especially those made of delicate silk or knit fabrics, can crease easily if folded incorrectly or pressed too hard. Forcing a tie into a small box can damage its structure.
Always handle the tie gently and choose a folding or rolling method that respects its fabric. If in doubt, a larger gift box provides ample space and protection for the tie’s integrity.
Sloppy Corners and Edges
Uneven or poorly folded corners can instantly make a gift look less polished and rushed. This small detail significantly impacts the overall impression of your thoughtful presentation.
Take your time to create crisp, sharp folds on all edges and corners. Precision here makes a world of difference, showcasing your dedication to a beautiful finish.
Mismatched Decorations
A beautiful tie can be overshadowed by mismatched or overwhelming decorations that clash with the paper or the occasion. Too many conflicting colors or textures can create a chaotic look.
Strive for harmony in your decorative choices. Select ribbons, tags, and embellishments that complement the wrapping paper’s design and color palette, creating a cohesive and elegant theme.
Troubleshooting
Wrinkled Wrapping Paper
If your wrapping paper gets wrinkled during the process, it can detract from the pristine look of your gift. Wrinkles often occur from rushing or not smoothing the paper carefully.
To fix this, gently un-tape the affected area if possible and smooth the paper with your hand or a clean, soft cloth. For future wraps, work on a flat, clean surface and smooth the paper as you go, pressing out air bubbles.
Ribbon Comes Undone
A beautiful bow that unravels before the gift is even opened can be disappointing. This usually happens if the knot isn’t tight enough or the ribbon material is too slippery.
To prevent this, ensure your first knot is very secure before forming the loops of your bow. For slippery ribbons like satin, a small dab of hot glue hidden beneath the knot can provide extra security, ensuring your bow stays perfect.
Tie Doesn’t Fit in the Box
Sometimes, after folding, the tie might still be a bit too long or bulky for your chosen gift box, leading to an awkward fit. This can damage the tie or the box.
If this happens, consider re-folding the tie into a different configuration, perhaps rolling it instead of folding, or folding it into more sections. Alternatively, opt for a slightly larger gift box that comfortably accommodates the tie without squishing it.
Key Takeaways
- Thoughtful wrapping transforms a gift into a memorable experience.
- Select wrapping paper and embellishments that reflect the occasion and recipient.
- Neatly fold or roll the tie to create a compact, elegant shape.
- Precision in cutting and taping ensures a professional, polished finish.
- Personalize your gift with unique ribbons, tags, and charming decorative elements.
- Avoid common pitfalls like excessive tape or mismatched decorations for a seamless look.
- Embrace the joy of creative gifting, making every present a celebration.
Frequently Asked Questions
Should I use a gift box for wrapping a tie?
Using a gift box for a tie is often recommended, especially for delicate silk ties, as it provides structure and protection. A box helps maintain the tie’s pristine condition and makes wrapping much easier, resulting in a cleaner, more professional appearance.
How can I make the wrapping look more luxurious?
To achieve a luxurious look, focus on high-quality materials. Choose thick, textured wrapping paper, velvet or silk ribbons, and add sophisticated embellishments like custom wax seals or a sprig of fresh eucalyptus. Gold or silver accents always add a touch of elegance.
Can I wrap multiple ties together?
Yes, you can absolutely wrap multiple ties together. The best approach is to either stack them neatly in a larger gift box or roll them individually and place them side-by-side in a wider box. Ensure each tie is protected from creasing by tissue paper or a small divider.
What if I don’t have double-sided tape?
If you don’t have double-sided tape, you can use regular clear tape, but try to hide the seams by folding the paper edges under or placing the tape on the underside of the package. A small amount of craft glue or a glue stick can also work for securing edges, just allow ample drying time.
Our Top Recommended Finds
- High-Quality Wrapping Paper Set: A curated collection of thick, patterned papers ensures you always have the perfect design for any celebration.
- Assorted Ribbon Collection: Having a variety of satin, grosgrain, and velvet ribbons in different widths and colors allows for endless creative possibilities.
- Craft Scissors and Double-Sided Tape: Sharp scissors guarantee clean cuts, while double-sided tape provides an invisible, professional finish to your beautifully wrapped gifts.
Embrace the Art of Thoughtful Gifting
Now that you have the tools and inspiration, it’s time to transform your next tie gift into a memorable masterpiece.
Imagine the delight on a loved one’s face when they receive a gift that clearly shows so much care and creativity.
Why wait? Gather your supplies today and start planning your next celebration with a personalized, beautifully wrapped tie that truly speaks volumes.