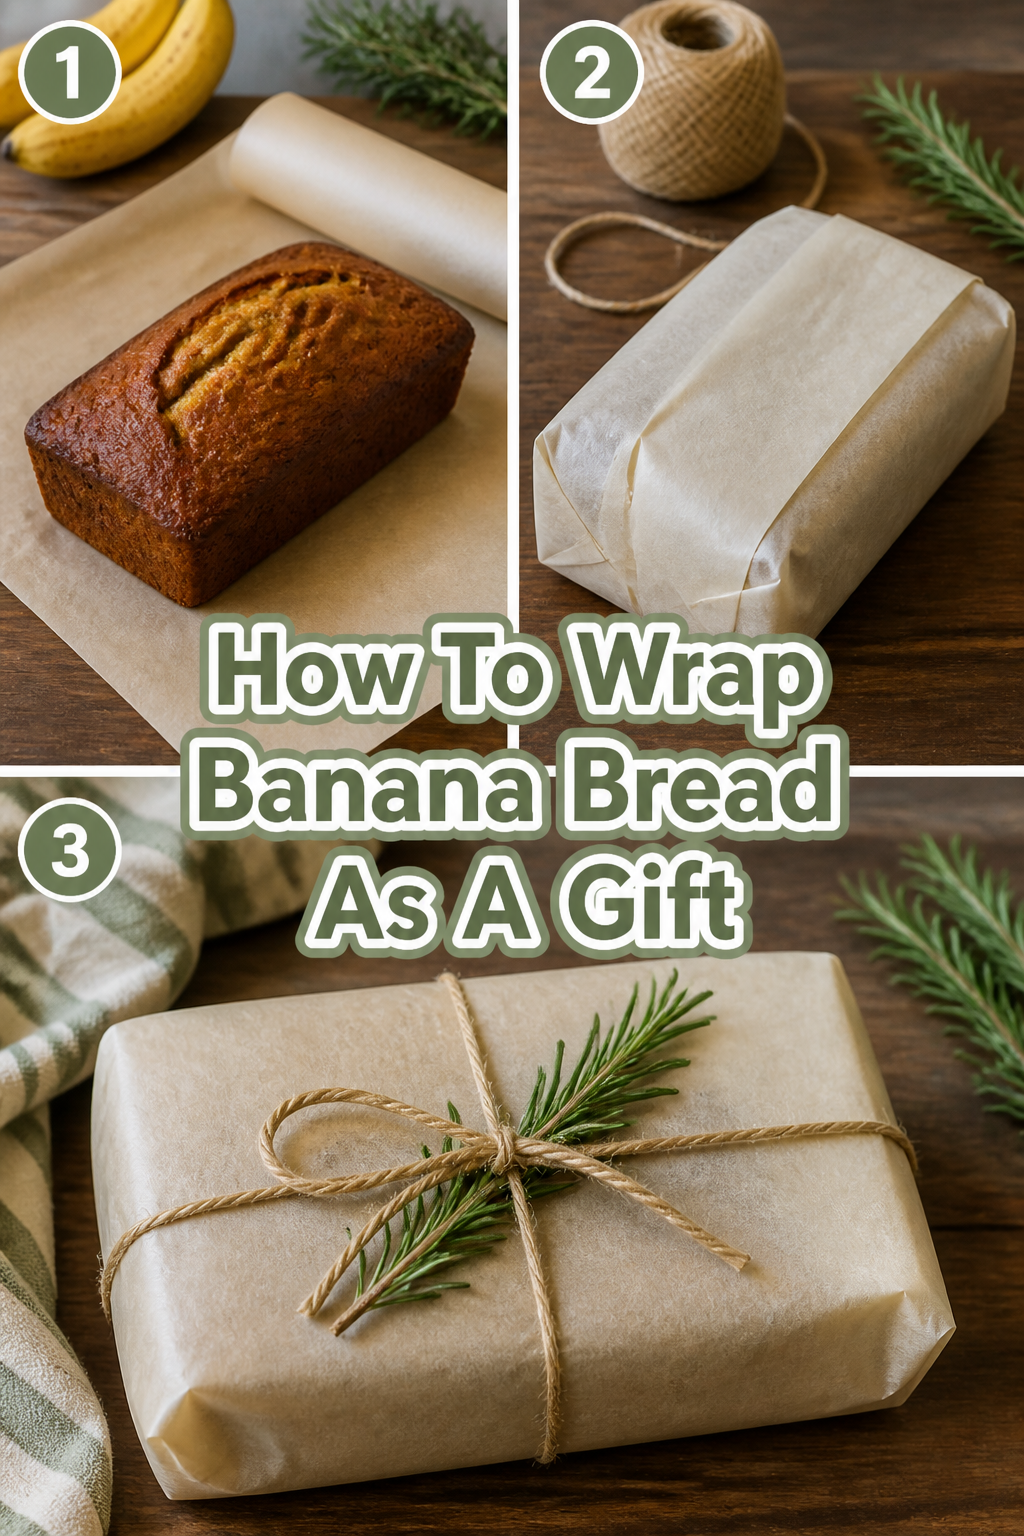
🎁 How To Wrap Banana Bread As A Gift
📋 The Event Planner's Essential Toolkit
Whether you're throwing a massive birthday bash or an intimate baby shower, the right tools make execution effortless. These are the 5 essential items that professional event coordinators and DIY party hosts consistently rely on to pull off flawless celebrations without the stress.
🎈 Electric Dual-Nozzle Balloon Pump
The absolute lifeline for creating those trending balloon arches and garlands that everyone loves. This dual-nozzle pump lets you inflate hundreds of balloons in a fraction of the time, saving your lungs and transforming hours of prep work into minutes.
🛡️ Command Clear Party Hooks & Strips
The secret to magazine-worthy venue decorations without losing your security deposit. Professional planners stock up on these clear, damage-free hooks to hang banners, string lights, and paper lanterns securely on walls and ceilings, removing cleanly when the party is over.
🧁 Wilton Tiered Cupcake & Dessert Stand
The easiest way to make a simple dessert table look professionally catered. This customizable, multi-tier display stand gives crucial height and dimension to your treats, effortlessly elevating the presentation of cupcakes, cookies, or appetizers at any gathering.
🚂 Heavy-Duty Collapsible Utility Wagon
The unsung hero of off-site parties, park birthdays, and trunk-or-treats. This rugged folding wagon hauls folding chairs, coolers, and mountains of decor from your car to the venue in one trip, completely eliminating the exhausting pre-party back-and-forth hauling.
📓 Clever Fox Event Planner Organizer
The ultimate command center for keeping your sanity intact while hosting. Dedicated sections for guest lists, budget tracking, vendor contacts, and day-of timelines ensure that not a single crucial detail falls through the cracks before the big day.
There’s a special magic in sharing homemade treats, especially a warm, fragrant loaf of banana bread.
It’s more than just a gift; it’s a hug in edible form, a thoughtful gesture that speaks volumes.
Having wrapped countless loaves for every occasion imaginable, I’ve discovered the secrets to turning a simple bake into a show-stopping, Pinterest-worthy present that truly delights.

Quick Overview
This guide will transform your delicious banana bread into an unforgettable gift, complete with stunning presentation ideas for any celebration.
You’ll learn practical techniques and creative touches to make your homemade offering shine.
- Time needed: 15-30 minutes (after baking and cooling)
- Difficulty: Beginner
- What you’ll need: Wrapping paper, ribbon, clear cellophane, gift tags, various embellishments.
Step-by-Step Instructions
Step 1: Choose Your Canvas – The Banana Bread
Before any wrapping begins, ensure your banana bread is completely cooled to room temperature. Warm bread will create condensation, making your beautiful wrapping soggy and unappealing.
Consider baking your bread in a disposable aluminum loaf pan for easy gifting. This saves your bakeware and makes transfer simple.
A well-baked, golden-brown loaf is the best foundation for a truly impressive gift.
Pro Tip: For an extra touch, dust the top of your cooled banana bread with a light layer of powdered sugar before wrapping, or add a sprinkle of cinnamon for visual warmth.
Step 2: Prepare for Protection – The Inner Layer
The first layer of wrapping is all about freshness and protection. Use clear cellophane wrap, food-safe plastic wrap, or even parchment paper.
Lay out a generous sheet of your chosen inner wrap on a clean surface. Place the cooled banana bread, still in its disposable pan or removed carefully, in the center.
Fold the sides of the cellophane up and over the bread, ensuring it’s completely enclosed. Seal it tightly, either by twisting the ends or using tape, to lock in moisture and flavor.
This barrier is crucial for keeping your banana bread fresh and preventing any oils from seeping into your decorative outer wrapping.
Step 3: Select Your Style – The Outer Wrapping
Now for the fun part: choosing your decorative outer wrap. This is where your gift’s personality truly shines and ties into your event theme.
For a rustic, farmhouse vibe, choose kraft paper or brown butcher paper. It offers a wonderful neutral base for colorful ribbons and natural elements.
Celebrating a birthday? Opt for vibrant, playful patterns or classic polka dots. A baby shower might call for soft pastels, gentle florals, or cute animal prints.
For holidays, select festive designs like classic red and green for Christmas, warm autumnal patterns for Thanksgiving, or shimmering silver and blue for Hanukkah.
Pro Tip: Think about the recipient’s personal style. Do they love minimalist chic, bold and bright, or cozy and traditional? Tailoring the wrap makes the gift feel even more personal.
Step 4: Master the Wrap – The Technique
Lay your chosen decorative wrapping paper face down on a flat surface. Measure enough paper to fully cover your banana bread, with a few inches to spare on all sides.
Place the cellophane-wrapped banana bread in the center of the paper. Bring one long edge of the paper over the top of the bread, then bring the opposite long edge over, overlapping slightly.
Secure the seam with double-sided tape for a clean finish, or clear tape if preferred. Fold in the short ends like a neatly wrapped present, creating crisp triangles on each side.
Tape these flaps down securely. Aim for neat, sharp creases for a professional, “Pinterest-worthy” look.
Step 5: Adorn with Ribbon – The Elegant Touch
Ribbons instantly elevate any gift. Choose a ribbon that complements your wrapping paper and the occasion’s color scheme.
For a birthday, a satin ribbon in a bright hue or a fun striped grosgrain adds cheer. Baby showers often look lovely with sheer organza or delicate lace ribbons.
For a rustic feel, tie with natural twine, jute, or a plaid flannel ribbon. Holidays invite luxurious velvet, metallic threads, or classic plaid patterns.
Wrap the ribbon around the width or length of the wrapped bread, tying it in a neat bow on top. You can also crisscross two ribbons for added visual interest.
Pro Tip: For perfectly curled ribbon ends, gently run one blade of scissors along the underside of curling ribbon, pulling firmly but carefully.
Step 6: Personalize with a Tag – The Heartfelt Message
A gift tag is essential for conveying your message and identifying the delicious contents. Handwrite a sweet note to make it truly special.
For a birthday, a tag shaped like a cupcake or balloon is charming. For a baby shower, a onesie or tiny footprint tag is adorable.
Holiday tags can be simple kraft paper with a festive stamp, or elegant cardstock with a metallic pen. Attach the tag to your ribbon using a small hole punch and thread, or simply tuck it under the bow.
Don’t forget to mention “Homemade Banana Bread” on the tag, perhaps even listing key ingredients if there are dietary concerns.
Step 7: Elevate with Embellishments – The Decorative Flourish
This is where you infuse true Pinterest-worthy charm! Think beyond just ribbon and a tag.
For a cozy, hygge-inspired gift, tuck a small sprig of fresh rosemary or a cinnamon stick under the ribbon. A mini pinecone or a few dried orange slices work beautifully for autumn or winter.
For a birthday, add a small celebratory charm, a tiny party hat, or even a single, colorful balloon tied to the ribbon. A baby shower could feature tiny wooden letters spelling “BABY” or a delicate silk flower.
You can also attach a tiny whisk or measuring spoon for a baking-themed gift. Small fabric flowers, berries, or even a tiny ornament can transform your presentation.
Pro Tip: Create a small cluster of embellishments rather than scattering them. This creates a focal point and looks more professionally styled. Use a dab of hot glue or baker’s twine to secure items.
Step 8: Consider a Gift Box or Basket – For Grand Gestures
For a more substantial gift, or if you’re including other items, consider a gift box or basket. This is perfect for creating a themed gift set.
Line a sturdy box or a charming wicker basket with crinkle paper, tissue paper, or a pretty tea towel. Place your wrapped banana bread inside.
Add complementary items like a small jar of homemade jam, a selection of gourmet coffee or tea, a decorative mug, or even a small cookbook focused on baking.
For a “New Mom” gift, include a cozy blanket or a soothing candle. For a “Housewarming” theme, a small plant or a set of measuring spoons would be lovely.
Arrange everything artfully, ensuring the banana bread is the star. Wrap the entire basket in clear cellophane and tie with a large bow for a grand presentation.
Common Mistakes to Avoid
Wrapping Warm Bread
This is the most common pitfall. Wrapping warm banana bread creates condensation inside the packaging.
The moisture will make your bread soggy, mushy, and prone to spoiling faster. Always wait until your bread is completely cool, often several hours, before wrapping.
Using Non-Food Safe Materials
While pretty, some decorative papers or fabrics might not be safe for direct contact with food. They can transfer inks or chemicals.
Always use a food-safe inner layer like cellophane, parchment paper, or plastic wrap to create a barrier between the bread and any outer decorative materials.
Skimping on Inner Protection
A flimsy or insufficient inner wrap won’t protect your bread from drying out or absorbing external odors.
Ensure your inner layer is tightly sealed and completely encloses the bread to maintain freshness and prevent leaks from any buttery crumbs.
Over-Embellishing
While embellishments are wonderful, too many can make your gift look cluttered and overwhelming. Less is often more when it comes to elegant presentation.
Choose 1-3 key decorative elements that complement your theme and colors, rather than trying to include everything. Focus on a cohesive look.
Troubleshooting
Banana Bread Feels Dry After Wrapping
If your banana bread feels dry, it likely wasn’t sealed properly in its initial food-safe wrap. Air exposure is the enemy of freshness.
Next time, ensure the cellophane or plastic wrap is pulled taut and sealed completely around the bread, leaving no gaps. You can also add a slice of apple or a small piece of plain bread inside the sealed wrap for extra moisture, though this is rarely needed for banana bread.
Wrapping Paper Tears Easily
Thin or cheap wrapping paper can tear, especially around the corners of a loaf. This can be frustrating when you’re aiming for a perfect look.
Invest in higher-quality, thicker wrapping paper. For extra durability, you can also double-wrap the bread with two layers of paper, or use a sturdy kraft paper as an inner decorative layer before your patterned paper.
Ribbon Slips Off
A loose ribbon can detract from your beautiful presentation. This often happens if the ribbon isn’t tied tightly enough or if the surface of the wrapping paper is too slick.
Ensure your knot is secure and tight. For very slick papers, a tiny dab of hot glue (applied carefully and sparingly to the paper, not the bread) can help hold the ribbon in place on the underside of the loaf.
Key Takeaways
- Always ensure banana bread is completely cooled before wrapping to prevent condensation and spoilage.
- Use a food-safe inner layer (cellophane, plastic wrap, parchment) to protect freshness and prevent oil transfer.
- Match your outer wrapping, ribbons, and embellishments to the occasion and recipient’s style for a personalized touch.
- Master crisp folds and secure taping for a professional, polished presentation.
- Thoughtful embellishments and a handwritten tag elevate a simple gift into a memorable gesture.
Frequently Asked Questions
How long will wrapped banana bread stay fresh?
When properly wrapped with a tight inner seal, homemade banana bread can stay fresh at room temperature for 3-4 days. If refrigerated, it can last up to a week. For longer storage, it freezes beautifully for up to 3 months.
Can I wrap banana bread in foil?
Yes, aluminum foil is a good option for the inner, protective layer. It effectively keeps air out and moisture in. You can then add your decorative paper or fabric wrap over the foil for a festive look.
What if I don’t have fancy ribbon?
No problem at all! Get creative with what you have. Strips of fabric, twine, yarn, or even a simple piece of string can look incredibly charming, especially with a rustic theme. You can also cut strips from a contrasting wrapping paper for a DIY ribbon look.
Should I include reheating instructions?
It’s a thoughtful touch! A small note suggesting they warm slices in the microwave for 15-20 seconds or in a toaster oven for a few minutes can enhance the recipient’s enjoyment. This is especially nice if the bread will be eaten a few days after gifting.
Our Top Recommended Finds
- Clear Cellophane Rolls: Essential for a food-safe, moisture-locking inner layer that lets your beautiful bread peek through.
- Double-Sided Tape: Creates seamless, professional-looking seams on your wrapping paper without visible tape lines.
- Assorted Ribbon Pack: A collection of various colors and textures ensures you always have the perfect ribbon for any occasion or theme.
Crafting Joy, One Loaf at a Time
Wrapping banana bread as a gift is truly an act of love, a chance to infuse your creativity into a heartfelt offering.
It’s about more than just the bread; it’s about the joy of giving, the beauty of presentation, and the warmth you share.
So gather your supplies, put on some cheerful music, and let your imagination soar. Your next homemade gift will be a masterpiece, a delicious memory waiting to be made!