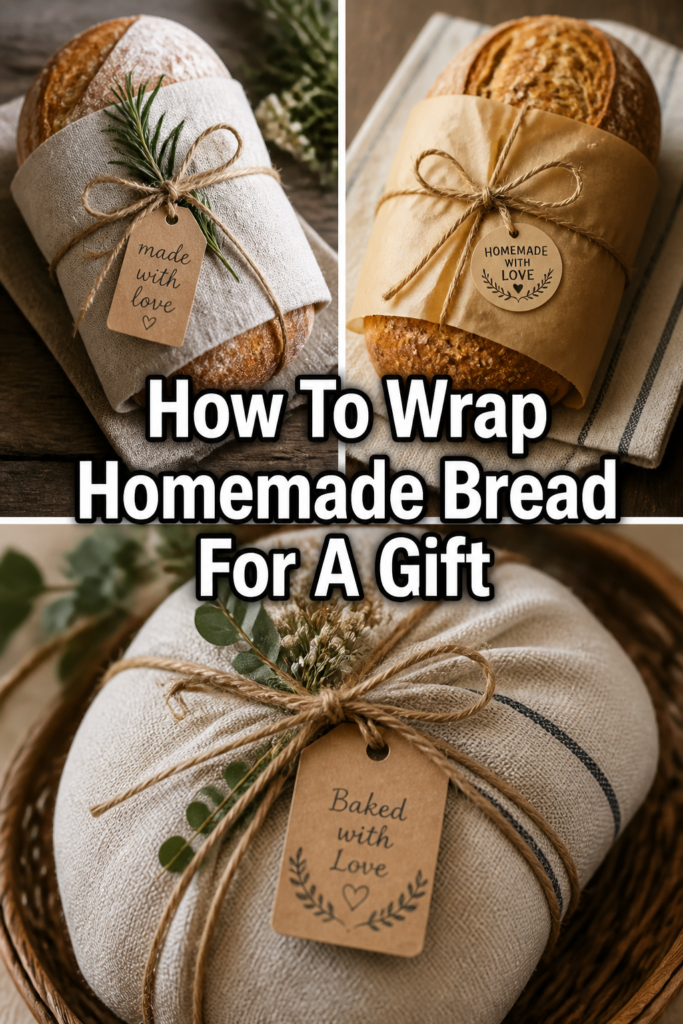
🍞 How To Wrap Homemade Bread For A Gift
📋 The Event Planner's Essential Toolkit
Whether you're throwing a massive birthday bash or an intimate baby shower, the right tools make execution effortless. These are the 5 essential items that professional event coordinators and DIY party hosts consistently rely on to pull off flawless celebrations without the stress.
🎈 Electric Dual-Nozzle Balloon Pump
The absolute lifeline for creating those trending balloon arches and garlands that everyone loves. This dual-nozzle pump lets you inflate hundreds of balloons in a fraction of the time, saving your lungs and transforming hours of prep work into minutes.
🛡️ Command Clear Party Hooks & Strips
The secret to magazine-worthy venue decorations without losing your security deposit. Professional planners stock up on these clear, damage-free hooks to hang banners, string lights, and paper lanterns securely on walls and ceilings, removing cleanly when the party is over.
🧁 Wilton Tiered Cupcake & Dessert Stand
The easiest way to make a simple dessert table look professionally catered. This customizable, multi-tier display stand gives crucial height and dimension to your treats, effortlessly elevating the presentation of cupcakes, cookies, or appetizers at any gathering.
🚂 Heavy-Duty Collapsible Utility Wagon
The unsung hero of off-site parties, park birthdays, and trunk-or-treats. This rugged folding wagon hauls folding chairs, coolers, and mountains of decor from your car to the venue in one trip, completely eliminating the exhausting pre-party back-and-forth hauling.
📓 Clever Fox Event Planner Organizer
The ultimate command center for keeping your sanity intact while hosting. Dedicated sections for guest lists, budget tracking, vendor contacts, and day-of timelines ensure that not a single crucial detail falls through the cracks before the big day.
There’s a special magic in sharing something you’ve created with love. I’ve spent countless hours baking and gifting homemade bread, witnessing firsthand the joy it brings. This guide will transform your delicious loaves into unforgettable presents, perfect for any celebration.
Quick Overview
Get ready to elevate your homemade bread from a simple bake to a show-stopping gift. You’ll learn the art of beautiful presentation, making every loaf a cherished memory.
- Time needed: 15-30 minutes (after baking and cooling)
- Difficulty: Beginner
- What you’ll need: Bread, wrapping materials (parchment, cellophane, fabric), ribbon, tags, optional embellishments.
Step-by-Step Instructions
Step 1: Cool Your Loaf Completely
The very first, most crucial step is to let your homemade bread cool entirely. This prevents condensation from forming inside your wrapping, which can lead to a soggy crust. A fully cooled loaf maintains its beautiful texture and freshness.
It’s best to place the bread on a wire rack for several hours, or even overnight, depending on its size and density. Patience here pays off immensely, ensuring your gift arrives in perfect condition. Imagine gifting a perfectly crisp artisan loaf that stays that way!
Pro Tip: For a truly rustic feel, let your bread cool in a spot where its aroma can gently waft through your home, building anticipation for the lucky recipient.
Step 2: Choose Your Primary Wrap
Now for the fun part – selecting the base layer for your bread. Your choice here sets the tone for the entire gift. Consider the occasion and the recipient’s style.
For a rustic, natural look, parchment paper is your best friend. It breathes beautifully and offers a clean, understated elegance. If you want to showcase the bread’s golden crust, clear cellophane is a fantastic choice, allowing its beauty to shine through. For a more sophisticated or eco-friendly option, consider a clean tea towel or a fabric napkin, which becomes part of the gift itself.
Step 3: Create a Protective Layer (If Needed)
If you’ve chosen a decorative fabric or a very thin paper for your outer layer, an inner protective layer is a smart move. This ensures the bread stays fresh and prevents any oils from seeping through.
A simple sheet of food-grade parchment paper or a thin, clear bread bag placed over the cooled loaf before the outer wrap works wonders. This extra step is especially valuable for longer journeys or for breads with a higher oil content, like brioche or challah. It’s all about preserving that fresh-from-the-oven goodness.
Step 4: Secure the Base Wrap
Once your bread is nestled in its primary wrap, it’s time to secure it neatly. This step ensures the bread stays snug and protected.
Gather the edges of your chosen material around the bread. For a round loaf, you might gather the paper or cellophane at the top, creating a little bundle. For a rectangular loaf, you can fold the edges neatly, much like wrapping a present. Use a piece of baker’s twine or a clear piece of tape to hold everything in place temporarily. This creates a clean foundation for your decorative touches.
Step 5: Add a Ribbon or Twine for Flair
This is where your gift truly starts to come alive! A beautiful ribbon or rustic twine can completely transform the presentation. Think about the celebration you’re preparing for.
For a birthday, a vibrant satin ribbon in their favorite color adds a festive pop. For a baby shower, soft pastel ribbons or a delicate lace trim evoke a sweet, gentle feeling. During the holidays, a classic red and green plaid ribbon or natural jute twine with a sprig of evergreen brings warmth. Tie a simple bow, a double knot, or even a fancy multi-loop bow – whatever suits your style.
Step 6: Personalize with a Gift Tag
A handwritten gift tag adds an incredibly personal touch that elevates your bread from a simple offering to a heartfelt gesture. It’s a chance to share a message of love and appreciation.
Use a beautifully designed blank tag or create your own with cardstock and a hole punch. Write a warm note, perhaps mentioning the type of bread and wishing them well. For a housewarming, “Welcome Home!” with the bread type is perfect. For a host, “Thank you for having us!” feels wonderfully thoughtful. This small detail speaks volumes about your care.
Step 7: Embellish for Pinterest-Worthy Charm
Now for the final, magical touches that make your bread gift truly unforgettable and Instagram-ready. Think beyond the basic wrap to create a memorable package.
Attach a small sprig of fresh rosemary or lavender for an aromatic flourish. Tuck in a tiny wooden spoon or a cute cookie cutter for a culinary theme. For a fall harvest gift, a miniature pinecone or a dried orange slice tied with twine looks stunning. At a baby shower, a tiny pacifier charm or a small, sweet bow can be adorable. These thoughtful details show extra effort and turn your bread into a curated experience.
Common Mistakes to Avoid
Wrapping Warm Bread
Many people, excited to share their fresh bake, wrap their bread before it has fully cooled. This is a common pitfall that leads to disappointment. Warm bread creates condensation inside the wrapper, which then makes the crust soggy and can even encourage mold growth, significantly shortening the bread’s shelf life. Always ensure your bread is completely cool to the touch, both inside and out, before beginning any wrapping. Patience is truly a virtue when gifting homemade bread.
Using Scented or Non-Food-Safe Materials
While that beautifully patterned wrapping paper might look tempting, it often contains dyes or scents that are not food-safe. These can transfer to your bread, affecting its flavor and potentially making it unsafe to eat. Always opt for food-grade materials like parchment paper, cellophane, or clean, unused fabric. If you’re using decorative paper or baskets, ensure there’s a food-safe barrier between the bread and the outer material. Safety and taste should always come first.
Over-Complicating the Wrap
Sometimes, in an effort to make a gift look extra special, we can go overboard with layers, tapes, and intricate folds. This can make the bread difficult to unwrap, frustrating the recipient and potentially damaging the loaf in the process. Aim for elegance and simplicity. A few well-chosen elements, thoughtfully applied, are far more impactful than a cluttered design. The bread itself is the star; the wrapping is simply its beautiful frame.
Forgetting a Personal Touch
In the rush to get a gift ready, it’s easy to overlook the small details that make a gift truly personal. A generic “To/From” tag misses an opportunity to connect. Homemade bread is a gift from the heart, and the wrapping should reflect that. Always include a handwritten note, even if it’s just a simple “Enjoy!” or “Baked with love for you.” This personal touch transforms the gift from an item into a cherished memory.
Troubleshooting
Bread Becomes Stale Quickly After Wrapping
If your gifted bread seems to lose its freshness too fast, it’s often due to improper wrapping materials or technique. The most common culprit is wrapping bread while it’s still warm, which traps moisture and accelerates staling. Ensure your bread is completely cool before wrapping. Also, avoid airtight plastic bags unless the bread is specifically meant for freezing. Parchment paper or a breathable cloth allows the bread to “breathe” while still offering protection, helping to maintain its crust and texture longer.
Wrapping Looks Messy or Unprofessional
A less-than-perfect wrap can detract from the beauty of your homemade gift. This usually happens when the base wrap isn’t secured properly or when too many elements are added haphazardly. Start by ensuring your primary wrap (parchment, cellophane) is snug around the bread and neatly folded or gathered. Use a bit of clear tape if needed to hold the base. Then, add your ribbon and embellishments one by one, ensuring each is intentionally placed. Practice makes perfect, and focusing on neat folds and secure ties will dramatically improve your presentation.
Embellishments Don’t Stay Attached
It’s frustrating when your carefully chosen embellishments fall off before the gift reaches its destination. This can happen with heavy items or inadequate adhesive. For lighter items like sprigs of herbs or small tags, a sturdy piece of baker’s twine or a thin ribbon tied securely around the main ribbon works best. For slightly heavier items, a dot of hot glue (applied to the ribbon, not the bread wrap itself) can be very effective. Always test how securely an embellishment is attached before sending it off.
Key Takeaways
- Always allow your homemade bread to cool completely before wrapping to prevent sogginess.
- Choose food-grade wrapping materials like parchment, cellophane, or clean fabric for safety and freshness.
- Secure your base wrap neatly to provide a clean foundation for further decoration.
- Elevate your gift with ribbons, twine, and a handwritten gift tag tailored to the occasion.
- Personalize your bread gift with thoughtful embellishments like herbs, small charms, or decorative items.
- Avoid common mistakes like wrapping warm bread or using non-food-safe materials for a perfect presentation.
Frequently Asked Questions
How long will homemade bread stay fresh when wrapped as a gift?
When wrapped properly, most homemade breads will stay fresh for 2-3 days at room temperature. Artisan loaves with a good crust tend to hold up well in breathable wraps like parchment or a tea towel. Enriched breads like brioche or challah might benefit from being placed in a bread bag after wrapping if they won’t be consumed immediately, to retain their softness. Always advise your recipient to enjoy it soon!
Can I wrap bread for a gift in advance?
It’s best to bake and wrap your bread as close to the gifting time as possible for optimal freshness. If you need to prepare a day in advance, ensure the bread is completely cool, then wrap it securely. For longer storage, you can bake the bread, cool it, and freeze it. Then, thaw it completely at room temperature before wrapping and gifting. This ensures peak deliciousness.
What are some creative ways to gift bread for a baby shower?
For a baby shower, think soft and sweet! Wrap a small loaf of brioche or a sweet quick bread in a soft, pastel-colored tea towel, tied with a delicate satin ribbon. Attach a tiny “hello world” tag or a small baby-themed charm. You could even include a small jar of homemade jam or a tiny wooden spreader. The focus is on nurturing and new beginnings, making it a truly heartwarming gift.
How can I make a bread gift perfect for a holiday party hostess?
For a holiday hostess, aim for elegance and festive cheer. Wrap a gorgeous sourdough or a cranberry-nut loaf in festive cellophane or a rich, dark-colored tea towel. Use a luxurious velvet ribbon or a classic plaid. Tuck in a sprig of fresh cedar or holly, and attach a beautiful handwritten tag that says, “Thank you for sharing your home!” A small bottle of infused olive oil or a gourmet butter spread would be a delightful accompaniment.
Our Top Recommended Finds
- Food-Grade Parchment Paper Rolls: Essential for a breathable, safe, and rustic base wrap. It’s versatile and always looks chic.
- Assorted Baker’s Twine and Ribbons: Having a variety of natural twine, jute, and colored satin ribbons on hand allows for endless customization for any occasion.
- Blank Kraft Gift Tags: Perfect for adding a personal, handwritten message, these tags instantly elevate your gift’s charm and warmth.
Crafting Joy, One Loaf at a Time
There’s a unique joy in giving, especially when that gift is made with your own hands and wrapped with intention. You now have all the tools to transform your delicious homemade bread into a gift that truly celebrates. Imagine the smiles, the shared moments, and the warmth your thoughtful present will bring.
Don’t wait for a special occasion; every day is an opportunity to spread a little happiness. Gather your ingredients, choose your favorite recipe, and start baking. Then, let your creativity flow as you wrap your masterpiece. Share your heart, one beautifully wrapped loaf at a time, and watch the magic unfold.