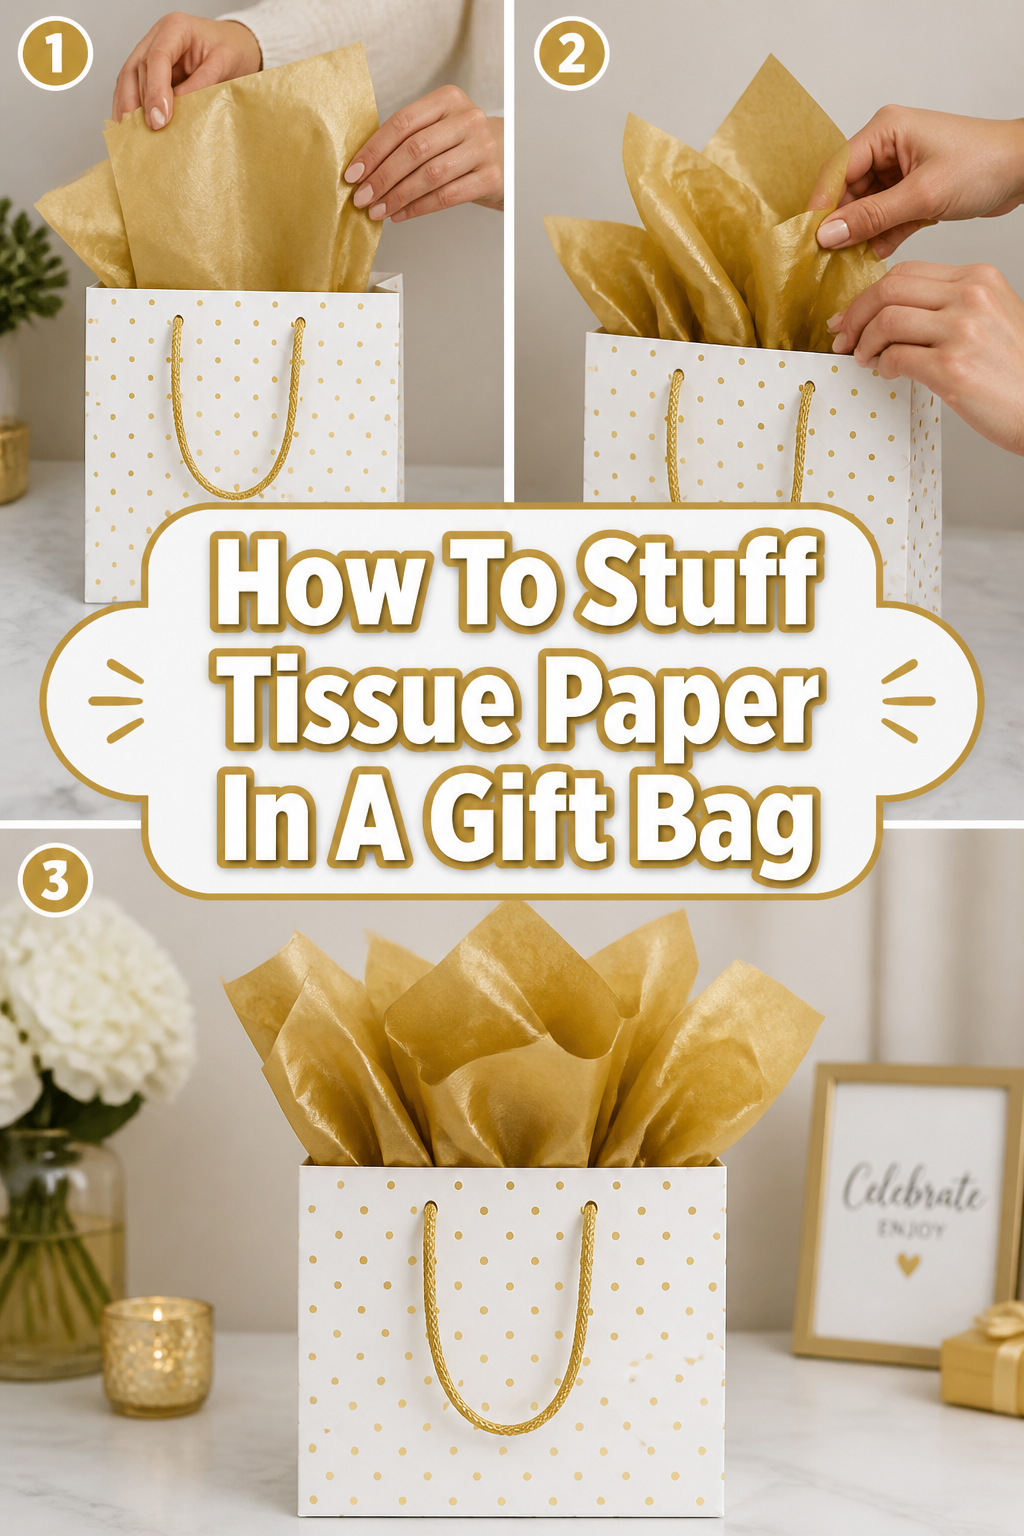
🎁 How To Stuff Tissue Paper In A Gift Bag
📋 The Event Planner's Essential Toolkit
Whether you're throwing a massive birthday bash or an intimate baby shower, the right tools make execution effortless. These are the 5 essential items that professional event coordinators and DIY party hosts consistently rely on to pull off flawless celebrations without the stress.
🎈 Electric Dual-Nozzle Balloon Pump
The absolute lifeline for creating those trending balloon arches and garlands that everyone loves. This dual-nozzle pump lets you inflate hundreds of balloons in a fraction of the time, saving your lungs and transforming hours of prep work into minutes.
🛡️ Command Clear Party Hooks & Strips
The secret to magazine-worthy venue decorations without losing your security deposit. Professional planners stock up on these clear, damage-free hooks to hang banners, string lights, and paper lanterns securely on walls and ceilings, removing cleanly when the party is over.
🧁 Wilton Tiered Cupcake & Dessert Stand
The easiest way to make a simple dessert table look professionally catered. This customizable, multi-tier display stand gives crucial height and dimension to your treats, effortlessly elevating the presentation of cupcakes, cookies, or appetizers at any gathering.
🚂 Heavy-Duty Collapsible Utility Wagon
The unsung hero of off-site parties, park birthdays, and trunk-or-treats. This rugged folding wagon hauls folding chairs, coolers, and mountains of decor from your car to the venue in one trip, completely eliminating the exhausting pre-party back-and-forth hauling.
📓 Clever Fox Event Planner Organizer
The ultimate command center for keeping your sanity intact while hosting. Dedicated sections for guest lists, budget tracking, vendor contacts, and day-of timelines ensure that not a single crucial detail falls through the cracks before the big day.
There’s a special joy in giving a beautifully presented gift, a feeling that begins even before the wrapping paper comes off.
I’ve spent countless hours perfecting the art of gift presentation, transforming simple items into unforgettable treasures for every celebration imaginable.
Trust this guide to help you create that same magic, making every gift you give a masterpiece of thoughtfulness and style.

Quick Overview
This guide will transform your gift-giving, ensuring every present you prepare looks professionally styled and absolutely delightful.
You’ll learn how to artfully arrange tissue paper, adding that perfect touch of elegance and excitement to any gift bag.
- Time needed: 5-10 minutes per gift bag
- Difficulty: Beginner
- What you’ll need: Gift bag, tissue paper, gift
Step-by-Step Instructions
Step 1: Choose Your Tissue Paper Wisely
Select tissue paper that complements your gift bag and the occasion. Think about the mood you want to set.
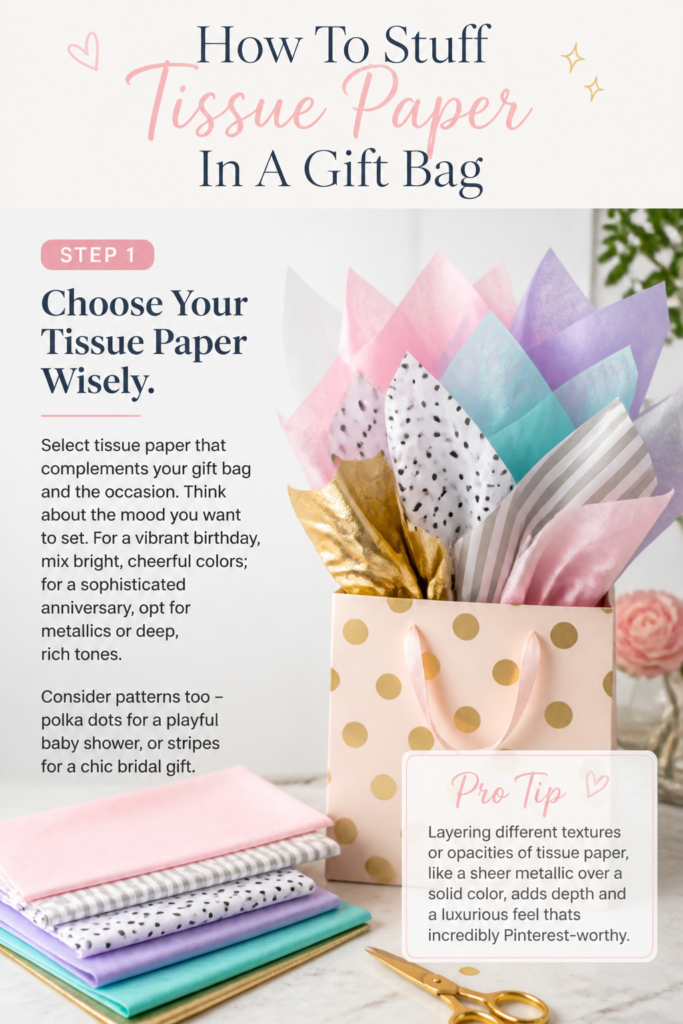
For a vibrant birthday, mix bright, cheerful colors; for a sophisticated anniversary, opt for metallics or deep, rich tones.
Consider patterns too – polka dots for a playful baby shower, or stripes for a chic bridal gift.
Pro Tip: Layering different textures or opacities of tissue paper, like a sheer metallic over a solid color, adds depth and a luxurious feel that’s incredibly Pinterest-worthy.
Step 2: Prepare Your Gift Bag and Gift
Place your gift neatly inside the bag first. Ensure it sits securely at the bottom.
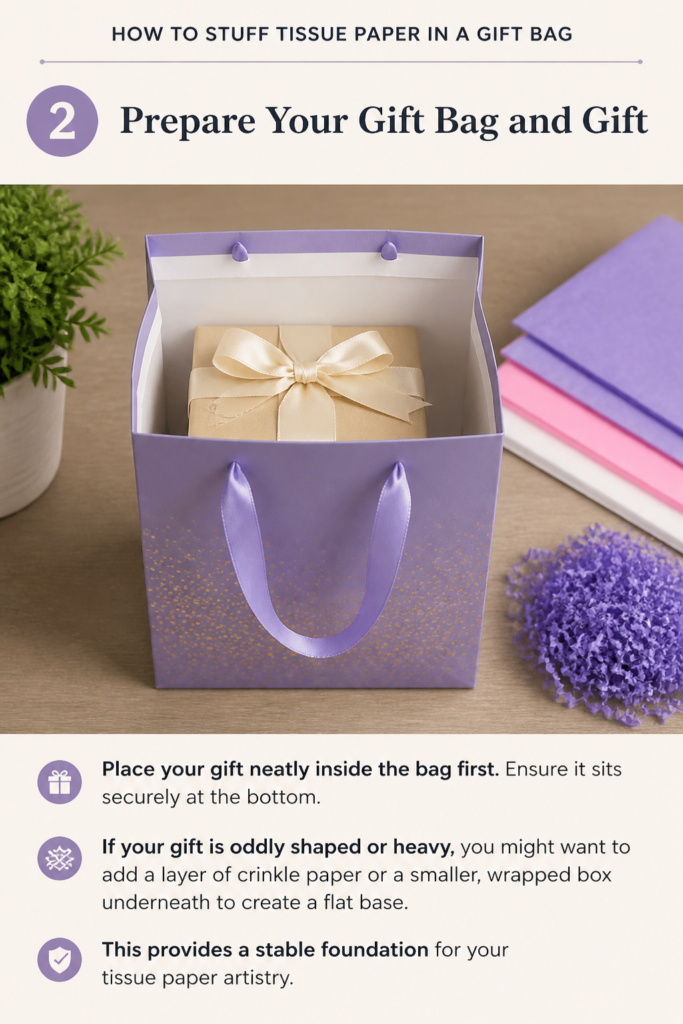
If your gift is oddly shaped or heavy, you might want to add a layer of crinkle paper or a smaller, wrapped box underneath to create a flat base.
This provides a stable foundation for your tissue paper artistry.
Step 3: The Classic Puff Method
Lay one sheet of tissue paper flat on a clean surface. This will be your base layer.
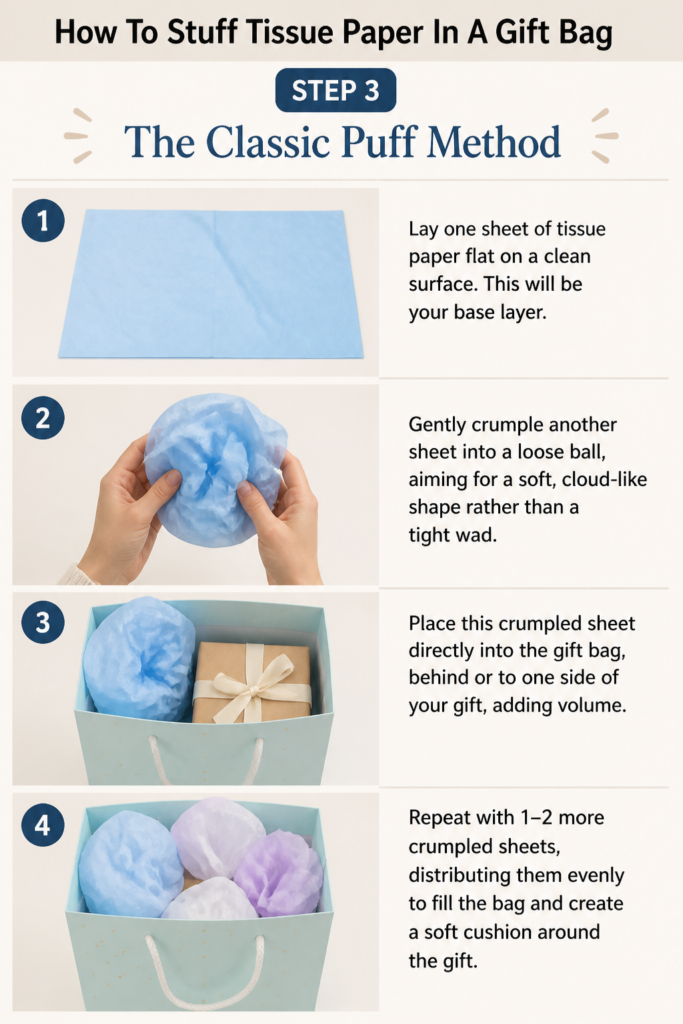
Gently crumple another sheet into a loose ball, aiming for a soft, cloud-like shape rather than a tight wad.
Place this crumpled sheet directly into the gift bag, behind or to one side of your gift, adding volume.
Repeat with 1-2 more crumpled sheets, distributing them evenly to fill the bag and create a soft cushion around the gift.
Step 4: The Elevated Fan Fold
Take a fresh sheet of tissue paper and fold it accordion-style, like a fan, along its shortest edge.
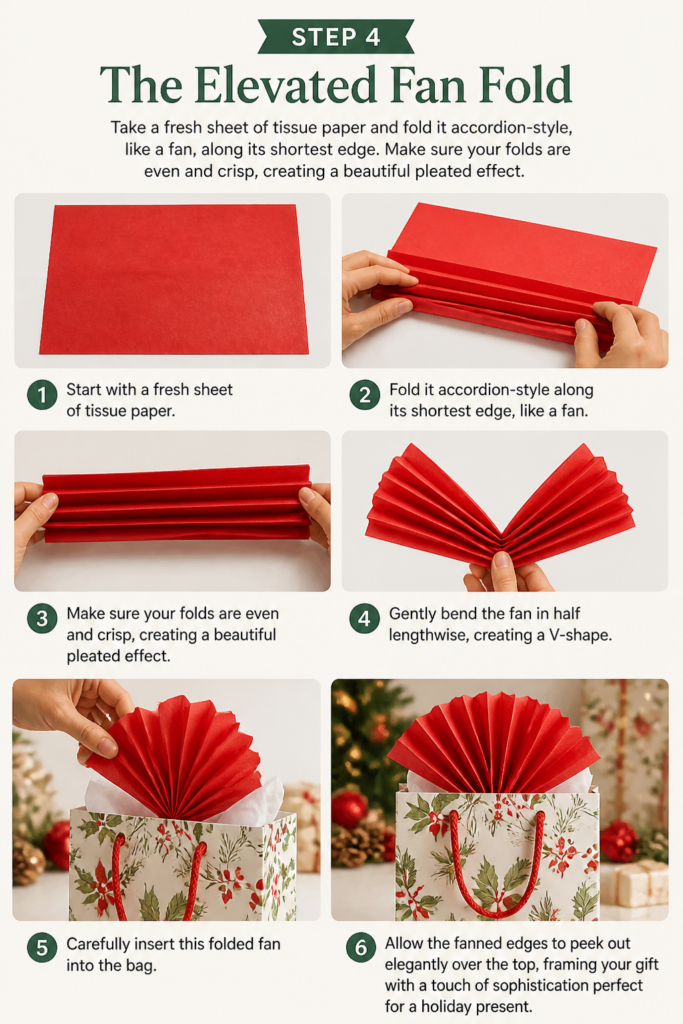
Make sure your folds are even and crisp, creating a beautiful pleated effect.
Once folded, gently bend the fan in half lengthwise, creating a V-shape.
Carefully insert this folded fan into the bag, allowing the fanned edges to peek out elegantly over the top, framing your gift with a touch of sophistication perfect for a holiday present.
Step 5: The “Mountain Peak” Technique
Grab a sheet of tissue paper from its center point. Allow the edges to drape down naturally.
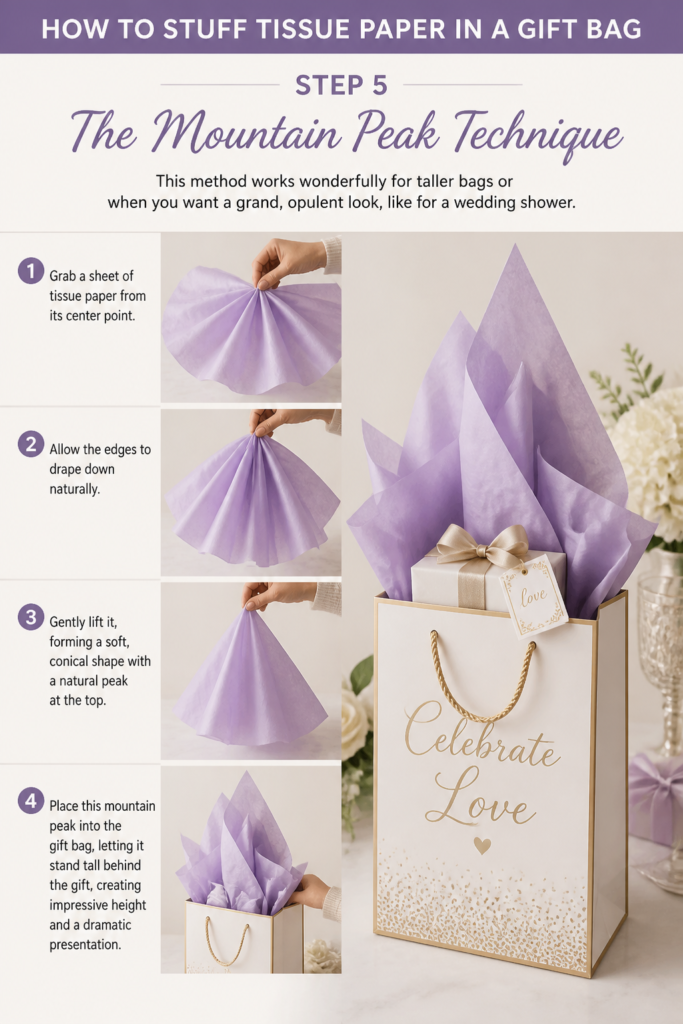
Gently lift it, forming a soft, conical shape with a natural peak at the top.
Place this “mountain peak” into the gift bag, letting it stand tall behind the gift, creating impressive height and a dramatic presentation.
This method works wonderfully for taller bags or when you want a grand, opulent look, like for a wedding shower.
Step 6: The “Soft Ripple” Effect
For a softer, more organic look, take a sheet of tissue paper and hold it by two opposite corners.
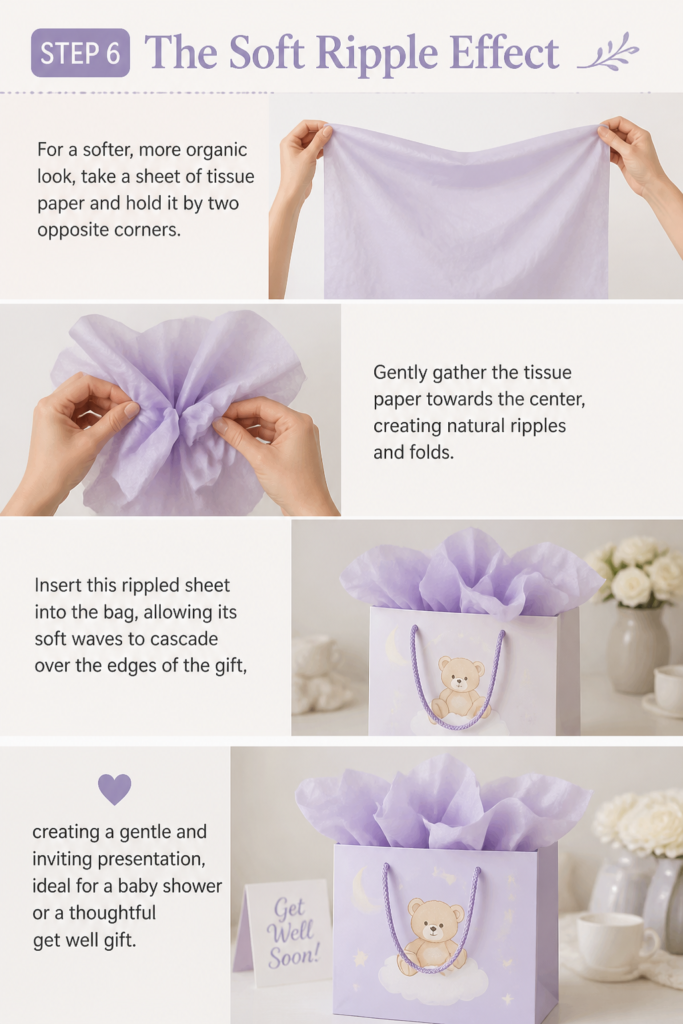
Gently gather the tissue paper towards the center, creating natural ripples and folds.
Insert this rippled sheet into the bag, allowing its soft waves to cascade over the edges of the gift, creating a gentle and inviting presentation, ideal for a baby shower or a thoughtful “get well” gift.
Step 7: Layering for Dimension
Combine different techniques for a truly dynamic display. Start with a few crumpled sheets for volume at the base.
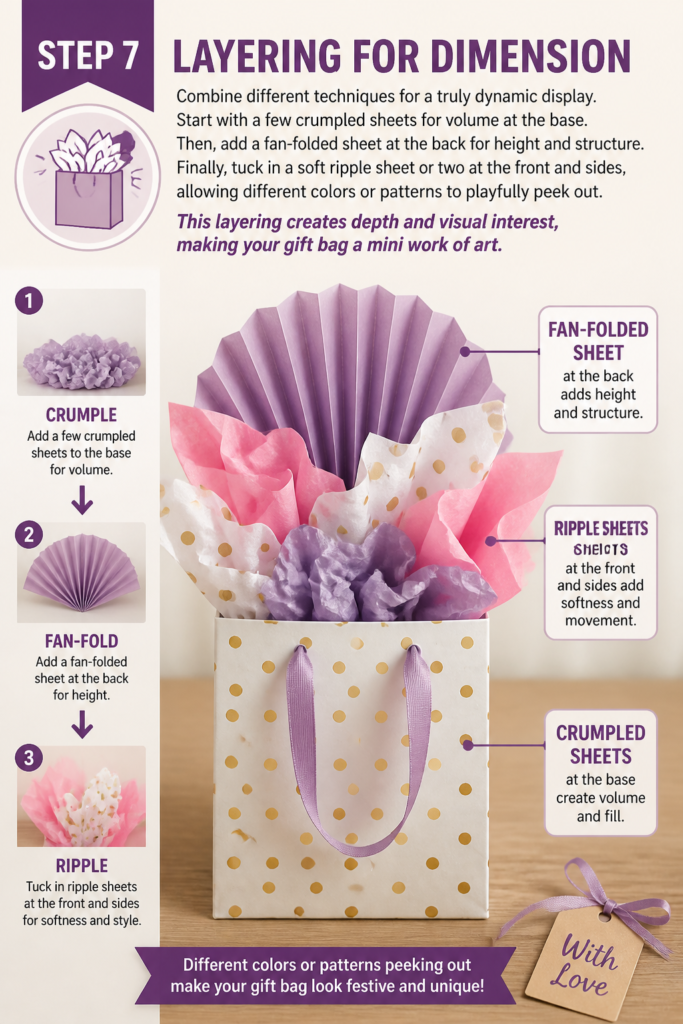
Then, add a fan-folded sheet at the back for height and structure.
Finally, tuck in a “soft ripple” sheet or two at the front and sides, allowing different colors or patterns to playfully peek out.
This layering creates depth and visual interest, making your gift bag a mini work of art.
Step 8: The Finishing Touch – A Little Fluff
Once all your tissue paper is in place, gently adjust and fluff the visible edges.
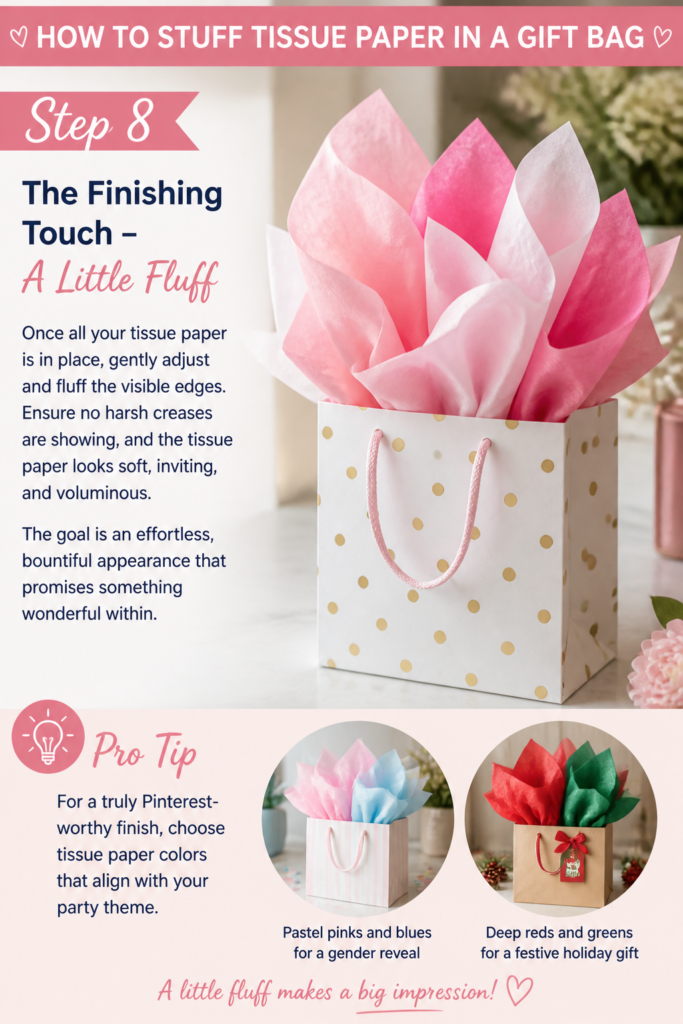
Ensure no harsh creases are showing, and the tissue paper looks soft, inviting, and voluminous.
The goal is an effortless, bountiful appearance that promises something wonderful within.
Pro Tip: For a truly Pinterest-worthy finish, choose tissue paper colors that align with your party theme. Imagine pastel pinks and blues for a gender reveal, or deep reds and greens for a festive holiday gift.
Common Mistakes to Avoid
Overstuffing the Bag
Stuffing too much tissue paper into a gift bag can make it look bulky and unrefined.
It can also make it difficult for the recipient to easily access the gift inside.
Aim for a generous, airy look, allowing the tissue to breathe and flow naturally rather than being crammed in.
Using Too Few Sheets
Conversely, using too little tissue paper can leave your gift looking sparse and unfinished.
The tissue won’t stand up properly, and the bag might appear empty or neglected.
Always use enough sheets to create adequate height and volume, typically 3-5 sheets for an average-sized bag.
Mismatched Colors or Patterns
Choosing tissue paper that clashes with the gift bag or the occasion can detract from the overall presentation.
A beautiful gift deserves a harmonious presentation.
Always consider the aesthetic of the bag and the celebration when selecting your tissue paper palette.
Visible Gift Peeking Out
Allowing the actual gift to be clearly visible through the tissue paper ruins the surprise and elegance.
The tissue paper should artfully conceal the gift, building anticipation.
Ensure your tissue paper is arranged to fully cover and cushion the present, maintaining that delightful mystery.
Troubleshooting
Tissue Paper Won’t Stand Up Tall
If your tissue paper keeps flopping over, it likely lacks sufficient structure or volume.
Try adding more crumpled sheets at the base of the bag to create a solid foundation.
You can also use the “mountain peak” technique for the innermost sheets to provide a strong central support.
Bag Looks Too Flat or Empty
This usually means you haven’t used enough tissue paper or haven’t fluffed it adequately.
Gently pull the edges of your tissue paper upwards and outwards to expand its volume.
Consider adding an extra sheet or two, using the “classic puff” method to fill any gaps and create a fuller appearance.
Tissue Paper Tears Easily
Thin tissue paper can be delicate, especially with vigorous handling.
When working with fragile tissue, handle it with extra care, making slower, gentler movements.
For more robust results, you can double up on sheets or opt for higher-quality, thicker tissue paper, which offers more resilience and a luxurious feel.
Key Takeaways
- Choose colors thoughtfully: Match tissue paper to the occasion, gift bag, and theme for a cohesive, celebratory look.
- Layer for dimension: Combine crumpled sheets for volume with fanned or peaked sheets for height and structure.
- Fluff gently: Always adjust and fluff the tissue paper at the end for an inviting, airy, and professional finish.
- Conceal the gift: Ensure the tissue paper fully covers the present to maintain an element of delightful surprise.
- Practice makes perfect: Experiment with different techniques to find what works best for various gift sizes and bag styles.
Frequently Asked Questions
How many sheets of tissue paper do I typically need for one gift bag?
For an average-sized gift bag, three to five sheets of tissue paper are usually sufficient. This allows for a good base, volume, and height.
Larger bags or gifts that require more cushioning might need more, while smaller bags could use fewer.
Can I reuse tissue paper from old gifts?
Absolutely! Reusing tissue paper is an eco-friendly choice, as long as it’s in good condition.
Gently smooth out any major creases, and if it’s slightly crinkled, you can use it for the inner, crumpled layers where perfection isn’t as critical.
What if my gift is very small in a large bag?
For small gifts in large bags, create a “false bottom” using extra crumpled tissue paper, crinkle paper, or even a small, empty box.
This elevates the gift, making it appear more substantial and easier to retrieve, before you add your decorative tissue layers on top.
How can I make the tissue paper stand up even better for a tall bag?
For extra tall bags, consider using a piece of floral wire or a thin dowel rod discreetly tucked into the back folds of your tissue paper for added support.
You can also use stiffer tissue paper or layer multiple sheets together for increased rigidity.
Our Top Recommended Finds
- Premium Assorted Tissue Paper Packs: Look for packs with a variety of colors and even some metallic or glitter options to easily match any celebration theme.
- Gift Bag Variety Sets: Having a range of bag sizes and designs on hand ensures you’re ready for any gifting occasion, from tiny treats to grand gestures.
- Crinkle Cut Paper Shred: A fantastic base filler for heavier or smaller gifts, adding cushioning and extra decorative flair before your tissue paper goes in.
Elevate Your Gifting Game Today
Transforming a simple gift bag into a breathtaking presentation is an act of love, a small detail that speaks volumes.
The joy isn’t just in the gift itself, but in the anticipation, the beauty, and the thoughtful touch that makes every celebration feel truly special.
So, gather your supplies, let your creativity sparkle, and start crafting those unforgettable, Pinterest-perfect moments for your loved ones right now!