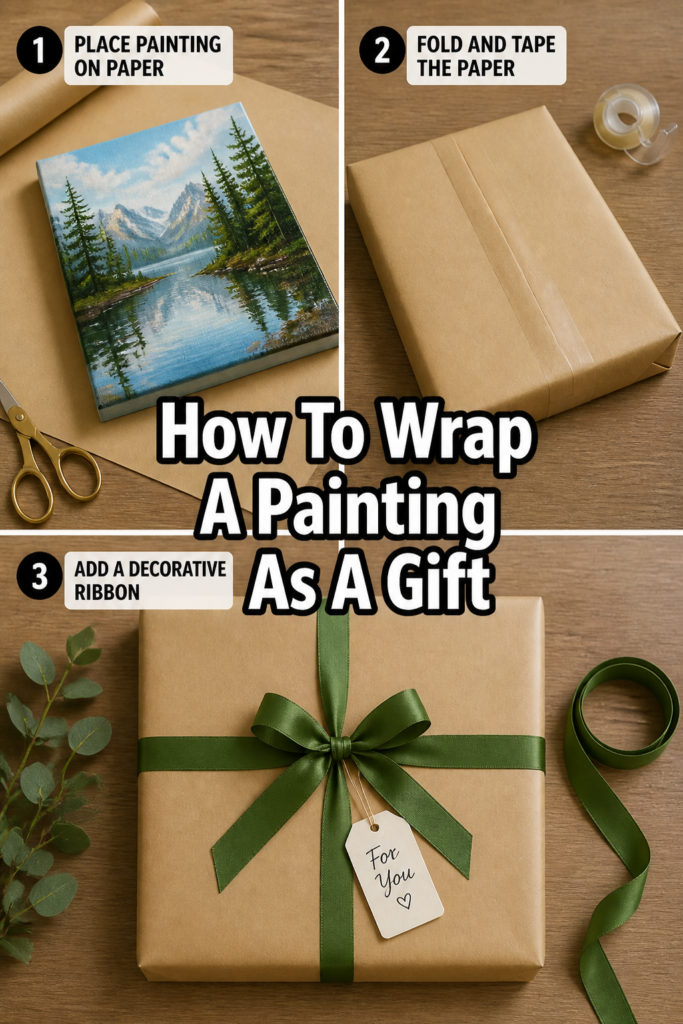
🖼️ How To Wrap A Painting As A Gift
📋 The Event Planner's Essential Toolkit
Whether you're throwing a massive birthday bash or an intimate baby shower, the right tools make execution effortless. These are the 5 essential items that professional event coordinators and DIY party hosts consistently rely on to pull off flawless celebrations without the stress.
🎈 Electric Dual-Nozzle Balloon Pump
The absolute lifeline for creating those trending balloon arches and garlands that everyone loves. This dual-nozzle pump lets you inflate hundreds of balloons in a fraction of the time, saving your lungs and transforming hours of prep work into minutes.
🛡️ Command Clear Party Hooks & Strips
The secret to magazine-worthy venue decorations without losing your security deposit. Professional planners stock up on these clear, damage-free hooks to hang banners, string lights, and paper lanterns securely on walls and ceilings, removing cleanly when the party is over.
🧁 Wilton Tiered Cupcake & Dessert Stand
The easiest way to make a simple dessert table look professionally catered. This customizable, multi-tier display stand gives crucial height and dimension to your treats, effortlessly elevating the presentation of cupcakes, cookies, or appetizers at any gathering.
🚂 Heavy-Duty Collapsible Utility Wagon
The unsung hero of off-site parties, park birthdays, and trunk-or-treats. This rugged folding wagon hauls folding chairs, coolers, and mountains of decor from your car to the venue in one trip, completely eliminating the exhausting pre-party back-and-forth hauling.
📓 Clever Fox Event Planner Organizer
The ultimate command center for keeping your sanity intact while hosting. Dedicated sections for guest lists, budget tracking, vendor contacts, and day-of timelines ensure that not a single crucial detail falls through the cracks before the big day.
There’s a unique joy in giving a gift that’s not just thoughtful, but beautifully presented.
I’ve spent countless hours in my studio, not just painting, but also meticulously preparing my art for friends and family.
This guide shares all my secrets for wrapping a painting so it feels like a true celebration, even before it’s opened.
Quick Overview
You’re about to transform a beautiful painting into an unforgettable gift experience. We’ll cover everything from protection to those “wow” embellishments.
- Time needed: 30-60 minutes (depending on embellishments)
- Difficulty: Beginner
- What you’ll need: Wrapping paper, scissors, tape, protective layers, ribbon, optional decorative elements
Step-by-Step Instructions
Step 1: Gather Your Creative Arsenal
Before you begin your wrapping masterpiece, lay out all your supplies. Think of this as setting the stage for a grand reveal.
Choose your wrapping paper with intention. Consider the recipient’s style, the occasion, or even the colors within the painting itself. A luxurious heavy-weight paper or even a beautiful fabric can elevate the experience.
Select your ribbons and embellishments. These are the jewelry of your gift! Think about natural elements like dried flowers, sprigs of eucalyptus, or elegant wax seals for a truly Pinterest-worthy touch.
Pro Tip: Always have extra tape and scissors on hand. There’s nothing worse than running out mid-wrap!
Step 2: Prepare the Painting for its Journey
Protecting your artwork is paramount. This step ensures your thoughtful gift arrives in perfect condition, ready to be admired.
Clean the painting gently with a soft, dry cloth if it’s unframed and has a finished surface. For framed pieces, ensure the glass or acrylic is spotless.
Wrap the painting in a layer of glassine paper or acid-free tissue paper. This acts as a protective barrier against dust, scratches, and any potential moisture from the outer wrapping.
Add a layer of bubble wrap, ensuring the bubbles face outwards, away from the painting’s surface. Secure this layer with painter’s tape, which is gentle and easy to remove without residue.
Step 3: Measure and Cut Your Wrapping Material
Accuracy here saves paper and creates a much neater finish. No one wants a gift with too much saggy paper.
Lay your chosen wrapping paper face down on a clean, flat surface. Place the prepared painting in the center of the paper.
Measure the width: Ensure there’s enough paper to comfortably overlap by about 2-3 inches on one side. This will create a secure seam.
Measure the length: The paper should extend beyond both the top and bottom edges of the painting by approximately the depth of the painting plus an extra inch or two. This allows for neat, crisp folds.
Step 4: Create the Perfect Central Seam
This is where the magic of neat wrapping truly begins. A clean seam makes all the difference.
Fold one long edge of the wrapping paper over the painting. Bring the opposite long edge over to meet it, ensuring a snug fit against the painting’s side.
Crease the overlapping edge under by about half an inch. This creates a clean, finished look, much like a hem.
Secure the seam with double-sided tape or small pieces of regular tape placed discreetly along the fold. Press firmly to ensure it holds.
Step 5: Master the Art of the End Folds
These folds are critical for a professional, polished presentation. Imagine an envelope, but for a painting!
Fold the paper down over the top edge of the painting. Create a sharp crease along the painting’s edge.
Bring in the two side flaps towards the center, creating neat triangles on both sides. Press down firmly to define these creases.
Fold the bottom flap up and over the entire end. Crease sharply and secure with tape. Repeat this process for the other end of the painting.
Pro Tip: Use a ruler or the edge of a book to get super crisp creases. It makes a huge difference to the final look!
Step 6: Elevate with Ribbon and Bows
Now, let’s add the celebratory flourish! Ribbon transforms a wrapped gift into a true present.
Choose a ribbon that complements your wrapping paper. Silk, velvet, or even rustic twine can create different moods.
Measure generously, wrapping the ribbon around the entire gift once for length, then adding plenty of extra for a beautiful bow or knot.
Tie your ribbon. You can go classic with a simple cross and bow, or try a more intricate design like multiple strands or a cascading knot. Experiment with different textures and widths for visual interest.
Step 7: Personalize with a Thoughtful Tag
A handwritten tag adds a deeply personal touch, making the gift even more special.
Select a tag that matches your aesthetic. Handmade paper, a charming die-cut shape, or a simple cardstock tag can all work wonderfully.
Write a heartfelt message. Keep it brief but sincere. Mention why you chose the painting, or a special memory you share with the recipient.
Attach the tag to the ribbon. You can punch a hole and thread it through, or simply tuck it beneath a bow. Consider adding a sprig of greenery or a small charm to the tag for extra charm.
Step 8: Add Pinterest-Worthy Embellishments
This is where your creativity truly shines! Think beyond just ribbon for those extra “wow” details.
Incorporate natural elements: A small bundle of dried lavender, a single pressed flower, a cinnamon stick, or a tiny pinecone can add organic beauty and scent.
Use wax seals: For an old-world, luxurious touch, seal a ribbon knot or the corner of your tag with a personalized wax seal. Choose a color that pops!
Layer textures: Combine a wide satin ribbon with a narrow piece of jute twine, or tuck a delicate lace trim under your main bow for an unexpected detail.
Step 9: The Final Inspection and Presentation
Take a moment to admire your handiwork. A final check ensures everything is perfect.
Smooth out any wrinkles or loose edges. Ensure all tape is secure and discreet.
Fluff your bow and arrange any embellishments artfully. Step back and look at it from all angles.
Present your gift with a smile! The care you put into wrapping will make the moment of giving truly memorable, building anticipation for the beautiful artwork within.
Common Mistakes to Avoid
Using Too Little Paper
Many people underestimate the amount of paper needed, especially for a thick item like a framed painting. This leads to short, messy folds at the ends that don’t meet properly, or a seam that barely overlaps.
Always measure generously. It’s better to have a little extra paper to trim away than to struggle with insufficient coverage. Remember, neat folds require enough material to work with.
Forgetting Protective Layers
Wrapping a painting directly in decorative paper is a common oversight. This leaves the artwork vulnerable to scratches, dust, or even moisture that can transfer from the wrapping paper itself.
Always use an inner layer of glassine or acid-free tissue, followed by bubble wrap. This simple step safeguards your thoughtful gift and preserves the painting’s integrity during handling.
Over-Taping or Visible Tape
While tape is essential, using too much or having it prominently visible can detract from an otherwise elegant wrap. Clumps of tape or tape showing through thin paper look messy.
Opt for double-sided tape where possible for clean seams. If using regular tape, choose clear, matte varieties and use small, strategic pieces placed discreetly on the underside of folds or along seams. Less is often more.
Ignoring the Painting’s Orientation
Sometimes, in the rush to wrap, we might not consider how the painting will be presented. If it’s a landscape, ensure the wrapping reflects that orientation when placed on a table.
Think about the “front” of the gift. Make sure your bow and tag are placed in a way that makes sense when the recipient picks it up, aligning with the painting’s intended hanging direction.
Troubleshooting
Wrinkled Wrapping Paper
Even with careful handling, paper can sometimes wrinkle, especially with larger items. This can be frustrating when aiming for a smooth finish.
To fix minor wrinkles, gently smooth them out with your hand or a soft cloth. For stubborn creases, try placing a heavy, flat object (like a book) on top for a few minutes. In the future, roll your paper tightly instead of folding, and work on a very flat, clear surface.
Loose or Saggy Wrap
If your paper feels too loose around the painting, or the ends aren’t holding their shape, it usually means the initial measurements were a bit too generous, or the folds weren’t tight enough.
Carefully un-tape one seam or end. Gently pull the paper tighter around the painting, ensuring it’s snug but not creasing the art. Re-crease and re-tape, making sure to press firmly along all edges for a crisp, secure fit.
Bows That Won’t Stay Perky
You’ve tied a beautiful bow, but it just flops or looks deflated. This often happens with softer ribbons or if the knot isn’t quite right.
For a perky bow, choose a ribbon with some body (like satin or grosgrain). When tying, make sure the initial knot is tight. After forming the loops, pull them firmly but gently to cinch them into place. You can also slip a small piece of floral wire into the back of the bow to help it hold its shape.
Key Takeaways
- Always prioritize protecting the painting with inner layers of glassine and bubble wrap.
- Measure your wrapping paper generously to ensure neat, secure folds and seams.
- Master crisp end folds for a professional, polished presentation that elevates the gift.
- Utilize double-sided tape for discreet seams and a cleaner overall aesthetic.
- Personalize your gift with thoughtful ribbons, handwritten tags, and unique embellishments.
- Take time for a final inspection to smooth wrinkles and perfect your artistic arrangement.
Frequently Asked Questions
Can I wrap an unframed canvas painting?
Absolutely! For unframed canvases, ensure the entire piece, including the edges, is protected. Wrap it in glassine paper first, then several layers of bubble wrap, securing with painter’s tape. Then proceed with the decorative wrapping as usual. This protects the canvas and paint surface.
What if the painting is very large or oddly shaped?
For very large or unusually shaped paintings, traditional wrapping paper might be impractical. Consider using a large fabric wrap (like a beautiful scarf or a piece of linen) for a unique, reusable presentation. Alternatively, you can create a custom gift bag from sturdy paper or fabric, or even present it in an open, decorated box with tissue and ribbon.
How do I prevent the wrapping paper from tearing on sharp corners?
Sharp corners are notorious for tearing paper. To prevent this, add a small extra layer of protection on the corners. You can use a small piece of cardboard, an extra patch of wrapping paper, or even a bit of felt, secured with tape, directly over the bubble wrap but under the main wrapping paper. This creates a softer, more rounded edge.
Should I remove the hanging wire before wrapping?
It’s generally best to leave the hanging wire on the painting, especially if it’s already properly installed. If the wire is very loose or extends far beyond the frame, you can gently tape it down to the back of the frame with painter’s tape to prevent it from snagging or tearing the wrapping paper. Just remember to instruct the recipient to remove the tape before hanging.
Our Top Recommended Finds
- Heavy-Duty Wrapping Paper: Look for rolls labeled “premium” or “heavy-weight” for less tearing and a luxurious feel.
- Double-Sided Tape Dispenser: A game-changer for clean seams and invisible adhesion, making your wrap look professional.
- Assorted Ribbon Pack: Having a variety of widths, textures, and colors on hand allows for endless creative embellishment possibilities.
Unleash Your Inner Gift-Giving Artist!
Wrapping a painting is more than just covering an object; it’s an act of love, an anticipation of joy, and a creative expression in itself.
Imagine the delight on a birthday, the warmth at a holiday gathering, or the gentle surprise at a baby shower when your exquisitely wrapped painting is revealed.
Don’t wait for a special occasion. Pick up those supplies, choose a beloved piece of art, and start crafting a memory today. Your next gift is destined to be a masterpiece, inside and out!