🎁 How To Wrap A Belt As A Gift
📋 The Event Planner's Essential Toolkit
Whether you're throwing a massive birthday bash or an intimate baby shower, the right tools make execution effortless. These are the 5 essential items that professional event coordinators and DIY party hosts consistently rely on to pull off flawless celebrations without the stress.
🎈 Electric Dual-Nozzle Balloon Pump
The absolute lifeline for creating those trending balloon arches and garlands that everyone loves. This dual-nozzle pump lets you inflate hundreds of balloons in a fraction of the time, saving your lungs and transforming hours of prep work into minutes.
🛡️ Command Clear Party Hooks & Strips
The secret to magazine-worthy venue decorations without losing your security deposit. Professional planners stock up on these clear, damage-free hooks to hang banners, string lights, and paper lanterns securely on walls and ceilings, removing cleanly when the party is over.
🧁 Wilton Tiered Cupcake & Dessert Stand
The easiest way to make a simple dessert table look professionally catered. This customizable, multi-tier display stand gives crucial height and dimension to your treats, effortlessly elevating the presentation of cupcakes, cookies, or appetizers at any gathering.
🚂 Heavy-Duty Collapsible Utility Wagon
The unsung hero of off-site parties, park birthdays, and trunk-or-treats. This rugged folding wagon hauls folding chairs, coolers, and mountains of decor from your car to the venue in one trip, completely eliminating the exhausting pre-party back-and-forth hauling.
📓 Clever Fox Event Planner Organizer
The ultimate command center for keeping your sanity intact while hosting. Dedicated sections for guest lists, budget tracking, vendor contacts, and day-of timelines ensure that not a single crucial detail falls through the cracks before the big day.
I remember the first time I tried to wrap a high-quality leather belt for my father’s milestone birthday.
It kept unrolling inside the box, and the heavy buckle poked a hole right through my expensive gold foil wrapping paper.
After years of styling events and perfecting the art of gift presentation, I have mastered the secret to making this awkward shape look like a boutique masterpiece.
Quick Overview
Wrapping a belt is all about managing its natural tension and protecting the hardware while creating a beautiful visual experience.
- Time needed: 15 to 20 minutes
- Difficulty: Beginner
- What you’ll need: A belt, acid-free tissue paper, a sturdy gift box, high-quality wrapping paper, double-sided tape, and decorative ribbon.
Step-by-Step Instructions
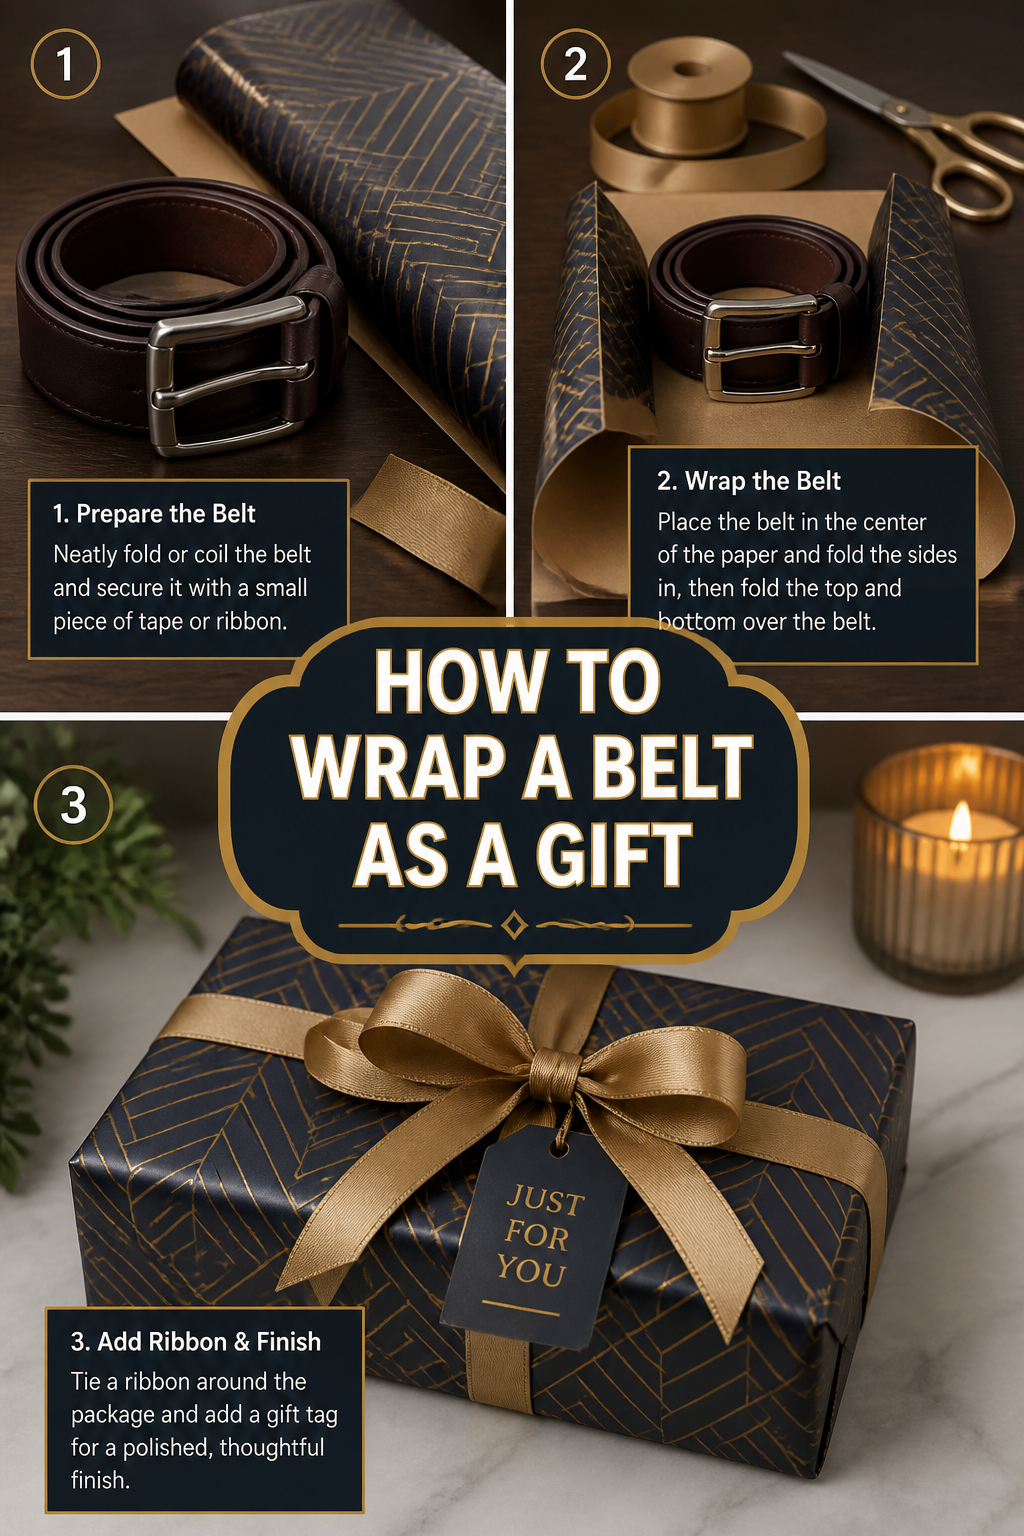
Step 1: Coil the Belt Tight and True
Start by holding the buckle in your non-dominant hand and begin rolling the leather inward toward the center.
Ensure you are rolling the belt with the “right side” or the finished leather facing outward to prevent the inner lining from cracking.
Maintain a consistent, firm pressure so the coil remains tight and does not spring open like a clockwork toy.
Pro Tip: If the belt is particularly stiff, warm it slightly between your hands first to make the leather more pliable for a tighter coil.
Step 2: Secure the Shape with a Soft Tie
Wrap a small piece of twine or a simple rubber band around the coiled belt to keep it from unraveling while you prepare the rest of the materials.
Place a small scrap of tissue paper underneath the tie if you are using a rubber band to ensure it doesn’t leave a sticky residue on the leather.
Check that the buckle is tucked neatly against the side of the coil so it doesn’t stick out and create an uneven bump.
Step 3: Cocoon the Belt in Tissue Paper
Lay out two large sheets of acid-free tissue paper in a color that complements your overall theme, such as a soft cream or a vibrant metallic silver.
Place the coiled belt in the center and fold the paper over it, tucking the edges into the center of the coil for a “donut” look.
Smooth the paper down firmly to eliminate any air bubbles, which gives the gift a professional, high-end feel before it even goes into the box.
Pro Tip: Use two different colors of tissue paper to create a beautiful “blooming” effect when the recipient opens the box.
Step 4: Select and Prepare the Gift Box
Choose a square or circular gift box that is only slightly larger than the coiled belt to prevent it from sliding around during transport.
Line the bottom of the box with a thin layer of shredded paper or extra tissue to provide a soft landing for the accessory.
Center the wrapped belt inside the box, ensuring the buckle side is facing upward so it is the first thing the recipient sees.
Step 5: Measure and Cut Your Wrapping Paper
Lay your gift box upside down on the back of your chosen wrapping paper to ensure the seams will be hidden on the bottom.
Pull the paper up the sides to check that you have enough to cover the box completely with a two-inch overlap.
Cut the paper using sharp shears to ensure a clean, crisp edge that won’t fray or look jagged when you tape it down.
Step 6: Execute the Perfect Wrap
Fold the long edges over the box and secure them with double-sided tape for a seamless, “invisible” finish that looks incredibly polished.
Crease the side flaps into sharp triangles before folding them toward the center to create those classic, professional-looking corners.
Run your fingernail along every edge of the box to sharpen the lines, which reflects light beautifully and makes the gift look Pinterest-ready.
Pro Tip: If you are using thick, high-gsm paper, use a bone folder or the edge of a credit card to get those razor-sharp creases.
Step 7: Layer Your Ribbons and Textures
Select a wide grosgrain or velvet ribbon as your base layer to add a sense of luxury and weight to the package.
Wrap the ribbon around the box twice, crossing it at the bottom and bringing it back to the top for a traditional “Tiffany” style tie.
Tie a classic bow and then layer a thinner, contrasting ribbon or a piece of metallic cord over the top to add dimension and sparkle.
Step 8: Add the Final Decorative Flourish
Tuck a small sprig of dried lavender, a piece of eucalyptus, or a cinnamon stick under the ribbon for a touch of organic beauty.
Attach a personalized gift tag using a wax seal or a handwritten note on high-quality cardstock to make the recipient feel truly special.
Spritz the ribbons very lightly with a signature scent if you want to create a multi-sensory unboxing experience that they will never forget.
Common Mistakes to Avoid
Using a Box That Is Too Large
When you use a box with too much empty space, the belt will rattle around and likely uncoil during the party.
This can cause the buckle to scratch the leather or tear the internal tissue paper, ruining the “wow” factor of the presentation.
Always fill excess space with high-quality crinkle paper or silk petals to keep the gift secure and centered.
Forgetting to Protect the Buckle
Metal buckles, especially those with polished finishes or intricate logos, can easily get scuffed against the leather or the box.
Many people forget to wrap the buckle specifically in a small piece of soft cloth or extra tissue before coiling the belt.
Taking this extra ten seconds ensures the hardware stays pristine and shiny for the big reveal.
Using Low-Quality Tape
Cheap, shiny office tape can distract from beautiful paper and often peels off if the wrapping paper is heavy or textured.
It can make a luxury gift look rushed and messy, which is the opposite of the celebratory vibe you want to achieve.
Invest in a roll of double-sided permanent tape to ensure your edges stay flat and the focus remains on your gorgeous paper choice.
Troubleshooting
The Belt Keeps Unrolling
If the leather is too stiff to stay in a coil, try rolling it and placing it inside a clean coffee mug for an hour before wrapping.
This “trains” the leather to hold the circular shape, making it much easier to manage when you move to the tissue paper stage.
You can also use a small piece of painter’s tape on the inside of the belt to hold the tail end in place, as it won’t leave a mark.
The Wrapping Paper Is Tearing at the Corners
This usually happens when the paper is too thin or the box has very sharp, pointed edges that catch on the fibers.
If you see a tear forming, don’t panic; you can cover it strategically with a wider ribbon or a decorative gift tag.
For future gifts, try reinforcing the inside of the wrapping paper corners with a small piece of clear tape before you fold them.
The Ribbon Looks Flat and Lifeless
If your bow doesn’t have that “designer” volume, it might be because the ribbon is too soft or lacks a wired edge.
You can “fluff” the loops by inserting your fingers and gently tugging outward, or by adding a second, smaller bow on top.
Alternatively, use a heat tool or a hair dryer on a low setting for a second to help certain synthetic ribbons hold their shape better.
Key Takeaways
- Coil from the buckle: Always start your roll at the buckle to protect the hardware and create a stable base.
- Choose the right box: A snug fit prevents damage and keeps the presentation looking intentional and high-end.
- Layer your textures: Combine matte paper with velvet ribbons and organic elements like greenery for a professional look.
- Use double-sided tape: This is the single easiest way to elevate your gift wrapping from “homemade” to “boutique.”
- Protect the leather: Use acid-free tissue paper to prevent any chemical reactions or color transfer over time.
- Sharpen your edges: Crisp creases on your wrapping paper catch the light and signal that the gift was prepared with care.
Frequently Asked Questions
Can I wrap a belt without using a box?
Yes, you can create a “cracker” style wrap by rolling the belt, wrapping it in several layers of tissue, and then rolling it in wrapping paper.
Tie the ends with long, flowing ribbons to make it look like a giant party favor, which is a fun and whimsical approach for birthdays.
Just ensure you use enough padding so the recipient can’t immediately tell what the gift is by the weight and shape.
What is the best type of wrapping paper for a luxury belt?
Heavy-weight, textured papers like handmade cotton paper or embossed metallic sheets work best for high-end accessories.
These papers feel substantial in the hand and communicate the value of the gift before it is even opened.
Avoid very thin, “dollar store” style paper, as the weight of the belt can easily cause it to sag or tear.
How do I wrap a very wide or chunky belt?
Wide belts are often easier to wrap if you lay them flat in a long, rectangular box rather than coiling them.
If you must coil a wide belt, use a larger, deeper box and plenty of silk ribbon to secure the roll, as it will have more tension.
Consider using a decorative hat box for these larger items to add an extra layer of style and reusable storage for the recipient.
Our Top Recommended Finds
- Double-Sided Craft Tape: Essential for achieving that seamless, professional finish without visible tape lines.
- Premium Velvet Ribbon: Adds an instant touch of luxury and a beautiful tactile element to any gift box.
- Acid-Free Tissue Paper: A must-have for protecting leather goods and ensuring the gift stays in pristine condition.
Create A Moment They Will Treasure
Gift giving is about so much more than the item inside the box; it is about the effort and love you put into the presentation.
A beautifully wrapped belt shows the recipient that you value them and that you took the time to make their celebration truly special.
Whether you are preparing for a rustic outdoor wedding or a glamorous holiday party, these techniques will help you stand out.
Gather your ribbons, choose your favorite paper, and start creating a masterpiece that will be the talk of the gift table today.
Your next celebration is the perfect opportunity to practice these skills and bring a little extra magic to someone’s day.