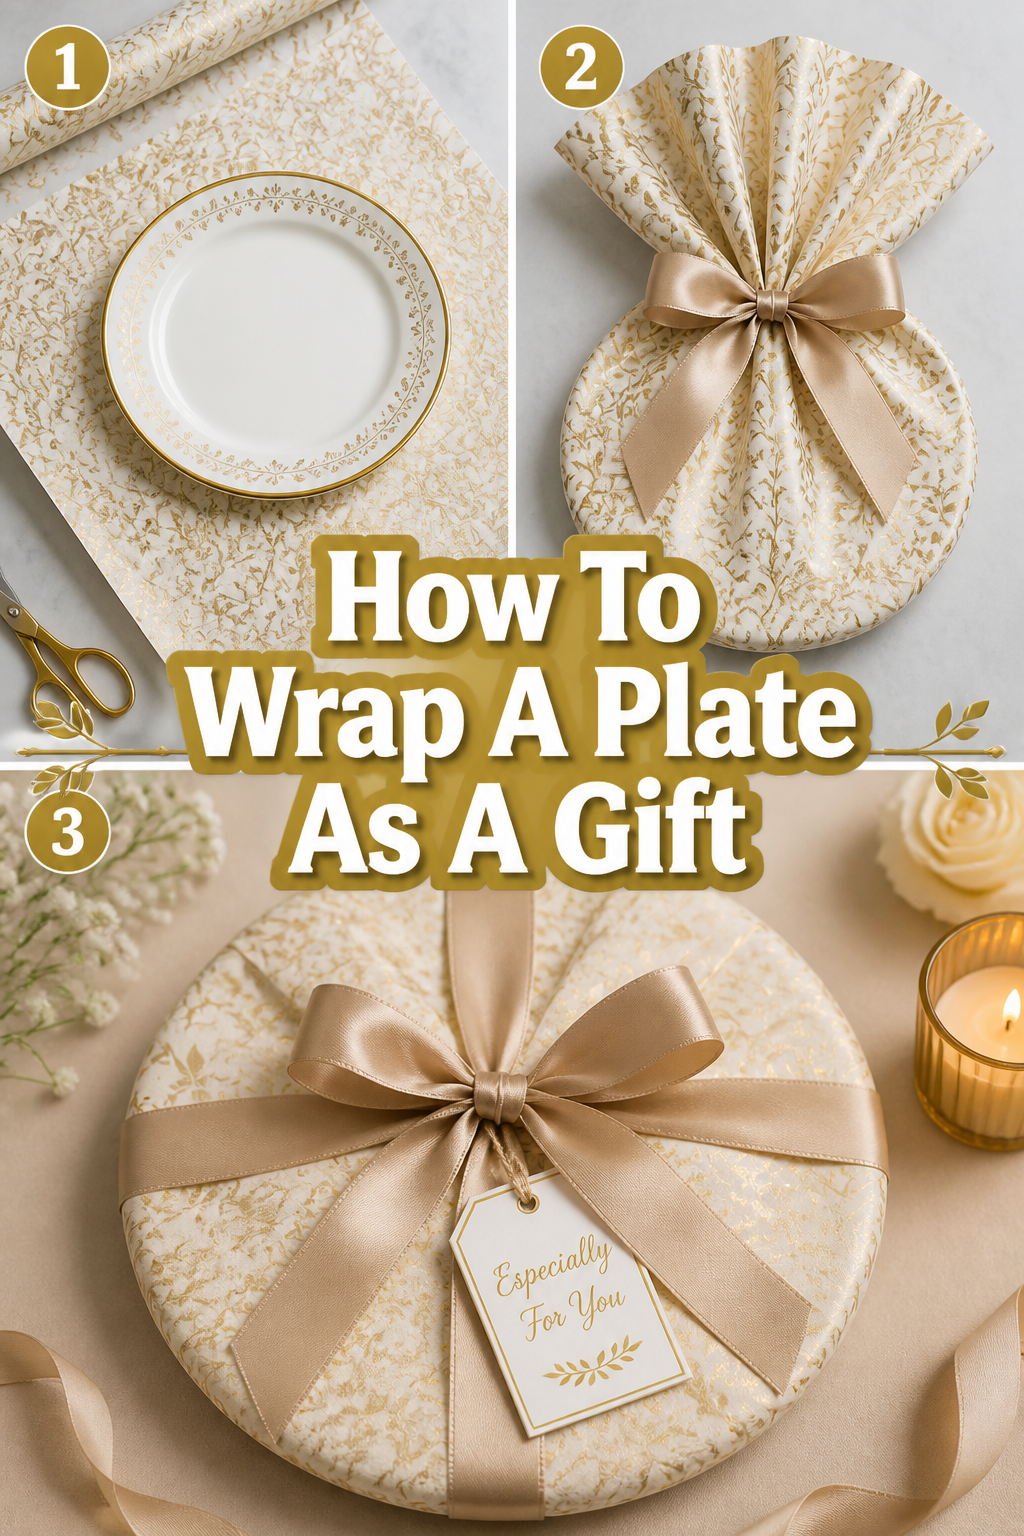
🎁 How To Wrap A Plate As A Gift
📋 The Event Planner's Essential Toolkit
Whether you're throwing a massive birthday bash or an intimate baby shower, the right tools make execution effortless. These are the 5 essential items that professional event coordinators and DIY party hosts consistently rely on to pull off flawless celebrations without the stress.
🎈 Electric Dual-Nozzle Balloon Pump
The absolute lifeline for creating those trending balloon arches and garlands that everyone loves. This dual-nozzle pump lets you inflate hundreds of balloons in a fraction of the time, saving your lungs and transforming hours of prep work into minutes.
🛡️ Command Clear Party Hooks & Strips
The secret to magazine-worthy venue decorations without losing your security deposit. Professional planners stock up on these clear, damage-free hooks to hang banners, string lights, and paper lanterns securely on walls and ceilings, removing cleanly when the party is over.
🧁 Wilton Tiered Cupcake & Dessert Stand
The easiest way to make a simple dessert table look professionally catered. This customizable, multi-tier display stand gives crucial height and dimension to your treats, effortlessly elevating the presentation of cupcakes, cookies, or appetizers at any gathering.
🚂 Heavy-Duty Collapsible Utility Wagon
The unsung hero of off-site parties, park birthdays, and trunk-or-treats. This rugged folding wagon hauls folding chairs, coolers, and mountains of decor from your car to the venue in one trip, completely eliminating the exhausting pre-party back-and-forth hauling.
📓 Clever Fox Event Planner Organizer
The ultimate command center for keeping your sanity intact while hosting. Dedicated sections for guest lists, budget tracking, vendor contacts, and day-of timelines ensure that not a single crucial detail falls through the cracks before the big day.
There’s a special joy in giving a beautifully presented gift.
I’ve always believed that the wrapping is just as much a part of the present as the item itself, transforming a simple plate into a cherished memory.
Let this guide be your personal stylist for creating stunning, Pinterest-worthy plate gifts that will delight everyone on your list.

Quick Overview
You’re about to master the art of wrapping a plate, ensuring it arrives safely and looks absolutely exquisite.
From protecting delicate china to adding those final, enchanting touches, you’ll create a gift that feels truly bespoke.
- Time needed: 15-30 minutes (depending on your chosen embellishments)
- Difficulty: Beginner
- What you’ll need: Cushioning material, sturdy wrapping paper, tape, scissors, ribbon, and optional decorative elements.
Step-by-Step Instructions
Step 1: Gather Your Creative Arsenal
Collect all your materials before you begin. This helps streamline the process and keeps your creative flow uninterrupted.
Think about the occasion and the recipient when choosing your paper, ribbons, and toppers.
A charming baby shower plate might call for soft pastels and a tiny toy, while a holiday gift could feature rich jewel tones and a sprig of evergreen.
Pro Tip: Lay out all your chosen elements on a clean, flat surface. This allows you to visualize the final look and make any adjustments to your color palette or texture combinations before you commit.
Step 2: Cushion the Precious Plate
Protect your plate with a layer of soft cushioning. Bubble wrap is a classic choice, offering excellent shock absorption.
For an eco-friendly or more elegant touch, consider using several layers of tissue paper, a soft tea towel, or even a piece of felt.
Ensure the plate is fully enclosed and snug, preventing any shifting or direct contact with hard surfaces.
This initial layer is crucial for safeguarding your beautiful gift, especially if it’s a delicate heirloom or a cherished handmade piece.
Step 3: Secure the Cushioning
Tape the cushioning material snugly around the plate. Use painter’s tape or a low-tack tape if you’re using a tea towel or fabric that the recipient might want to reuse.
The goal is a compact, secure bundle that holds its shape. This prevents the plate from rattling within its wrapping and adds an extra layer of stability.
Imagine this as the plate’s cozy little blanket, ready for its journey to a new home.
Step 4: Measure and Cut Your Wrapping Paper
Unroll your chosen wrapping paper onto a flat surface. Place your cushioned plate in the center of the paper.
Allow enough paper to fully cover the plate and overlap by about 2-3 inches on all sides. You’ll need extra length for gathering and creating those beautiful pleats.
Carefully cut the paper, ensuring straight edges for a neat finish.
For a round plate, you’ll want a square or slightly rectangular piece of paper to allow for even gathering.
Step 5: Position and Begin Wrapping
Center your cushioned plate on the cut wrapping paper, face down if the plate has a distinct front.
Bring two opposite sides of the paper up and over the plate, meeting them in the middle. Secure them with a piece of tape, creating a seam across the back of the plate.
This initial fold establishes the foundation for your elegant wrap, ensuring a clean line down the center.
Think of this as dressing your plate in its first layer of finery.
Step 6: Create Elegant Pleats (The “Fanned” Look)
Fold the remaining open sides of the paper inwards, creating neat pleats or gathers. Start from one corner and work your way around the curve of the plate.
Push the paper down gently towards the center, forming small, even folds as if you’re fanning out the paper.
Secure each pleat with a small piece of tape as you go, ensuring a tidy, flat back.
This technique creates a beautiful, tailored finish that looks incredibly professional and Pinterest-ready.
Step 7: Secure the Back and Add Final Tape
Continue pleating and taping until the entire back of the plate is covered and secured.
Ensure all raw edges of the paper are tucked in and taped down firmly. You want a smooth, flat surface on the back of the plate.
This step is all about precision, creating a seamless and polished appearance from every angle.
A well-taped back means a sturdy, long-lasting wrap.
Step 8: Embellish with Ribbon and Toppers
Adorn your beautifully wrapped plate with ribbons, bows, and decorative toppers. This is where your creativity truly shines!
Tie a wide satin ribbon around the entire gift, finishing with a generous bow at the top or side.
For a rustic touch, use twine or burlap ribbon, then tuck in a sprig of fresh eucalyptus, a small pinecone, or dried orange slices.
Consider attaching a personalized gift tag, a small ornament for holiday gifts, or a tiny rattle for a baby shower.
These thoughtful details elevate your gift from lovely to truly unforgettable, reflecting the care and thought you’ve put into it.
Pro Tip: For a truly memorable presentation, consider a theme for your embellishments. For a birthday, attach a small celebratory balloon or a miniature party hat. For a housewarming, a tiny key charm or a sprig of rosemary adds a welcoming touch. The possibilities are endless and personal!
Common Mistakes to Avoid
Not Enough Cushioning
A common oversight is underestimating the fragility of a plate. Simply wrapping it in paper without adequate padding leaves it vulnerable to chips and cracks during transport.
Always ensure at least one full layer of bubble wrap, several sheets of tissue paper, or a protective fabric like a tea towel completely encases the plate before the final wrapping paper goes on.
Too Little Wrapping Paper
Cutting your wrapping paper too small makes it impossible to create those elegant pleats and secure folds. You’ll end up with a messy, exposed back or awkward gaps.
Always err on the side of generosity. It’s much easier to trim excess paper than to try and stretch too little. Aim for at least 2-3 inches of overlap on all sides after the initial fold.
Uneven Pleats or Gathers
Rushed or inconsistent pleating can make your gift look sloppy rather than sophisticated. Large, uneven folds detract from the polished aesthetic you’re aiming for.
Take your time with this step. Practice making small, even folds, securing each one with a tiny piece of tape. The effort here will result in a perfectly fanned and professional finish.
Ignoring the Occasion or Recipient
Choosing generic wrapping paper and ribbons without considering the event or the person can make your gift feel impersonal. The wrapping is an extension of the gift’s thoughtfulness.
Always tailor your aesthetic choices. A child’s birthday calls for bright, playful colors, while a bridal shower might inspire soft, elegant pastels. Personalization makes the gift truly unique.
Troubleshooting
The Plate Feels Loose Inside the Wrap
If your wrapped plate feels like it’s shifting or rattling, it likely means your initial cushioning wasn’t tight enough or you didn’t use enough material.
Carefully unwrap the outer paper, add more tissue paper or bubble wrap, and ensure it’s taped securely around the plate before re-wrapping. The goal is a snug, immovable fit.
The Wrapping Paper Tears Easily
Thin or low-quality wrapping paper can tear, especially when pleating or handling. This can ruin the pristine look of your gift.
For plates, especially heavier ones, opt for thicker, more durable wrapping paper. If you only have thin paper, consider doubling it up or using a sturdy base layer like kraft paper before your decorative paper.
My Bows Look Flat and Uninspired
A limp bow can diminish the overall presentation. This often happens if the ribbon is too narrow, too soft, or not tied correctly.
Choose a ribbon with some body, like satin or grosgrain, and ensure it’s wide enough to make an impact. Fluff your loops after tying and trim the ends at an angle for a professional flourish.
Key Takeaways
- Always prioritize cushioning to protect the plate from damage.
- Measure your wrapping paper generously to allow for neat pleats and secure folds.
- Take your time with pleating for a polished, professional finish on the back of the plate.
- Personalize your embellishments to match the occasion and the recipient’s style.
- The wrapping is an integral part of the gift, enhancing its perceived value and thoughtfulness.
- A well-wrapped gift speaks volumes about the care and love you put into your celebrations.
Frequently Asked Questions
Can I wrap a square or rectangular plate using this method?
Absolutely! While this guide focuses on round plates, the principles apply. For square or rectangular plates, you’ll still cushion them, then bring the paper up and over. Instead of continuous pleats, you’ll create crisp, mitered corners, similar to wrapping a box, for a clean, tailored look.
What if I don’t have bubble wrap?
No problem at all! You can use several layers of tissue paper, crinkled newspaper, a soft tea towel, felt, or even a clean, old t-shirt. The key is to create a soft, protective barrier that prevents direct impact and keeps the plate snug.
How can I make the gift extra special for a baby shower?
For a baby shower, choose soft pastel or gender-neutral wrapping paper. Adorn it with a tiny rattle, a miniature baby sock, a small wooden toy, or a sprig of baby’s breath. You could even tie a ribbon that says “Oh Baby!” or attach a tiny framed ultrasound picture for a truly heartfelt touch.
Are there eco-friendly wrapping options for plates?
Yes, many! Consider using reusable fabric wraps (Furoshiki style), kraft paper decorated with natural elements like dried flowers or leaves, or even old maps or newspaper for a vintage feel. Use twine instead of plastic ribbon, and attach a handmade, recycled paper tag. Your creativity can make it sustainable and beautiful.
Our Top Recommended Finds
- Quality Double-Sided Tape: Essential for strong, invisible seams and securing those intricate pleats.
- Assorted Satin Ribbon Set: Offers a wide range of colors and widths to perfectly match any occasion or theme.
- Large Roll of Kraft Paper: A versatile, eco-friendly base layer that can be dressed up or down for any event.
Let Your Creativity Shine Bright!
Now that you’re armed with these simple yet powerful techniques, it’s time to transform your gift-giving into an art form.
Imagine the delight on your loved one’s face as they receive not just a plate, but a beautifully curated experience, wrapped with intention and love.
Don’t wait for a special occasion; choose a beautiful plate today and practice your new skills. Perhaps a personalized plate for a friend’s upcoming birthday, or a vibrant serving dish for your next family gathering.
Embrace the joy of crafting, celebrating, and giving gifts that truly sparkle, making every moment an opportunity for connection and cherished memories.