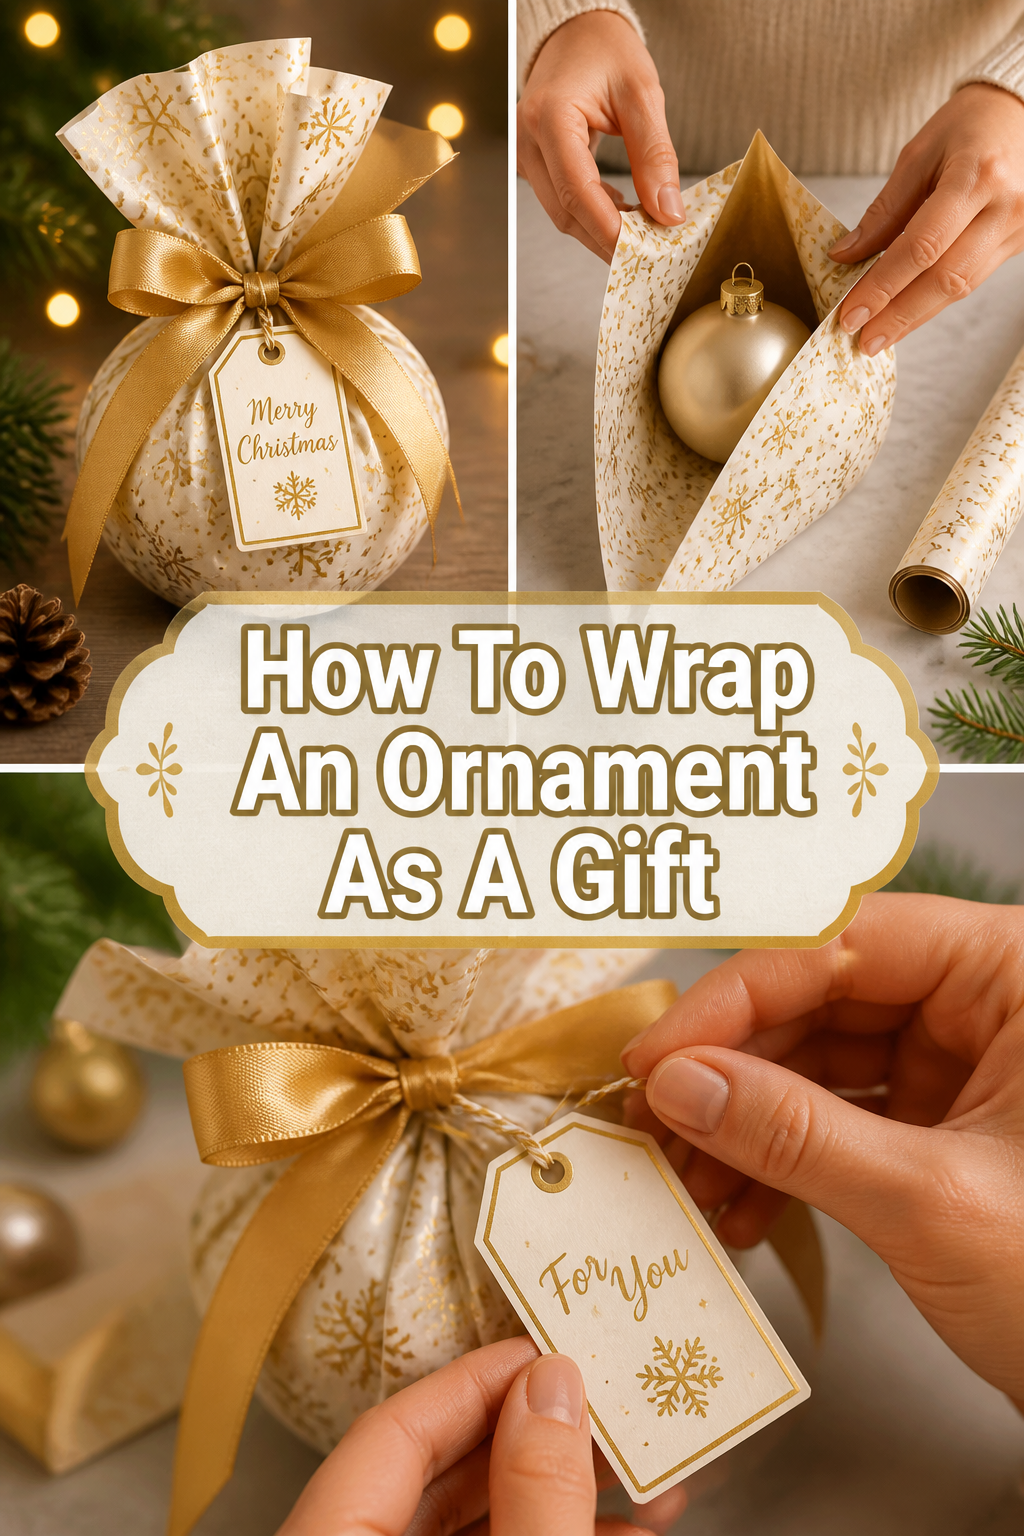
🎁 How To Wrap An Ornament As A Gift
📋 The Event Planner's Essential Toolkit
Whether you're throwing a massive birthday bash or an intimate baby shower, the right tools make execution effortless. These are the 5 essential items that professional event coordinators and DIY party hosts consistently rely on to pull off flawless celebrations without the stress.
🎈 Electric Dual-Nozzle Balloon Pump
The absolute lifeline for creating those trending balloon arches and garlands that everyone loves. This dual-nozzle pump lets you inflate hundreds of balloons in a fraction of the time, saving your lungs and transforming hours of prep work into minutes.
🛡️ Command Clear Party Hooks & Strips
The secret to magazine-worthy venue decorations without losing your security deposit. Professional planners stock up on these clear, damage-free hooks to hang banners, string lights, and paper lanterns securely on walls and ceilings, removing cleanly when the party is over.
🧁 Wilton Tiered Cupcake & Dessert Stand
The easiest way to make a simple dessert table look professionally catered. This customizable, multi-tier display stand gives crucial height and dimension to your treats, effortlessly elevating the presentation of cupcakes, cookies, or appetizers at any gathering.
🚂 Heavy-Duty Collapsible Utility Wagon
The unsung hero of off-site parties, park birthdays, and trunk-or-treats. This rugged folding wagon hauls folding chairs, coolers, and mountains of decor from your car to the venue in one trip, completely eliminating the exhausting pre-party back-and-forth hauling.
📓 Clever Fox Event Planner Organizer
The ultimate command center for keeping your sanity intact while hosting. Dedicated sections for guest lists, budget tracking, vendor contacts, and day-of timelines ensure that not a single crucial detail falls through the cracks before the big day.
Ornaments are the heart of holiday gifting because they capture a single moment in time and hang it on a branch for years to come.
I have spent countless winters at my kitchen table surrounded by rolls of velvet ribbon and scraps of glittered paper, perfecting the art of the “unboxing” experience.
After years of trial and error with fragile glass and awkward shapes, I have developed a foolproof system that makes every ornament look like a designer masterpiece.

Quick Overview
This guide will show you how to transform a simple bauble into a stunning, Pinterest-worthy gift that feels truly special.
- Time needed: 15-20 minutes
- Difficulty: Beginner
- What you’ll need: Tissue paper, a sturdy box or fabric, ribbon, decorative accents, and the ornament itself.
Step-by-Step Instructions
Step 1: Gather Your Aesthetic Essentials
Collect all your materials before you start to ensure a cohesive look across your gifts.
Think about a specific color palette, such as champagne and cream for a sophisticated look or forest green and gold for a classic feel.
You will need high-quality wrapping paper, several sheets of acid-free tissue paper, double-sided tape, and sharp scissors.
Select a variety of ribbons, including velvet, silk, or rustic twine, to add layers of texture to your final design.
Pro Tip: Keep a small bowl of “toppers” nearby, like dried orange slices, cinnamon sticks, or sprigs of fresh cedar, to make the wrapping process feel like a creative studio session.
Step 2: Prepare the Ornament for Safety
Protect the most fragile parts of the ornament, especially if it has delicate protrusions or thin glass stems.
Wrap the ornament loosely in a single layer of white tissue paper to prevent the finish from scratching against other materials.
If the ornament has a hanging loop or a hook, tuck it neatly against the body of the piece so it doesn’t snag during the wrapping process.
Cushion the item further by creating a “nest” of shredded paper or extra tissue inside your chosen container.
Step 3: Choose the Right Foundation
Evaluate the shape of your ornament to decide if it needs a rigid box or can be wrapped in a soft “bonbon” style.
A sturdy cardboard jewelry box is the safest choice for glass baubles, while wooden or metal ornaments can often handle more flexible packaging.
If you are using a box, ensure it is slightly larger than the ornament to allow for plenty of padding on all sides.
Line the bottom of the box with a beautiful fabric scrap or a piece of decorative felt to add an unexpected touch of luxury when the recipient opens it.
Step 4: Execute the Perfect Box Wrap
Measure your wrapping paper by placing the box in the center and ensuring the paper can wrap all the way around with a two-inch overlap.
Use double-sided tape for a seamless finish, hiding the adhesive under the folds so the paper looks like it is floating around the box.
Fold the ends into crisp triangles, pressing the edges with your fingernail to create sharp, professional lines that mimic high-end boutique wrapping.
If your paper has a pattern, try to align the design at the seams for a truly polished and thoughtful appearance.
Pro Tip: If you are wrapping a round ornament without a box, use the “pineapple” method by gathering the paper at the top and securing it with a ribbon to create a festive, ruffled look.
Step 5: Master the Fabric Furoshiki Technique
Try a sustainable approach by using a square of beautiful fabric, like linen or silk, instead of traditional paper.
Place the ornament (or its box) in the center of the fabric square and bring two opposite corners together, tying them in a simple knot.
Bring the remaining two corners up and tie them over the first knot, creating a beautiful, petal-like arrangement on top.
This method is perfect for baby showers or bridal gifts, as the fabric itself becomes a secondary part of the gift that the recipient can reuse.
Step 6: Layer Your Ribbons and Textures
Wrap a wide velvet ribbon around the center of the box, securing it with a small dab of hot glue or a tight knot.
Layer a thinner, shimmering metallic ribbon over the top of the wide ribbon to create depth and visual interest.
Tie a classic bow, ensuring the loops are even and the tails are cut at an elegant angle or a “V” shape.
Don’t be afraid to use multiple types of ribbon in varying widths to give the gift a high-end, curated feel.
Step 7: Add the Pinterest-Worthy Topper
Slide a small sprig of greenery or a dried flower under the ribbon knot to bring a touch of nature to the presentation.
Attach a small, hand-written tag with the recipient’s name in calligraphy or a neat print.
Consider adding a tiny bell or a personalized wooden charm that can also be hung on the tree alongside the ornament.
This final layer is what transforms a simple package into a memorable gift that people will want to photograph before they open it.
Common Mistakes to Avoid
Using Too Much Tape
Visible tape can make a beautiful gift look messy and rushed. Use double-sided tape sparingly or learn the art of “origami wrapping” where the folds hold themselves in place. If you must use regular tape, ensure it is the “invisible” matte variety rather than the shiny, reflective type.
Neglecting the “Rattle” Test
If you can hear the ornament moving inside the box, it is not packed safely enough. A rattling ornament is prone to breaking during transport or when being placed under the tree. Always fill the empty gaps in the box with extra tissue or silk petals until the item stays perfectly still.
Choosing Paper That Is Too Thin
Ornaments often have sharp edges or heavy weights that can easily tear through cheap, thin wrapping paper. Select a high-GSM (grams per square meter) paper or a textured kraft paper that can withstand a bit of tension. If you love a specific thin paper, consider lining it with a plain white sheet first to add strength.
Troubleshooting
The Ornament is an Irregular Shape
When dealing with stars, reindeer, or long icicle shapes, a standard box wrap can feel impossible. Switch to a “cracker” style wrap by rolling the ornament in several layers of tissue paper and then a layer of decorative paper. Tie the ends with ribbon to make it look like a festive party cracker, which accommodates any length or width.
The Box is Too Small
Never force an ornament into a box that is a tight fit, as any pressure on the box could crush the contents. If your box is too small, skip the box entirely and use a decorative tin or a small wooden crate. You can also use a beautiful gift bag filled with plenty of accordion-folded tissue paper to provide a soft, protective environment.
You Ran Out of Ribbon
If you find yourself without ribbon at the last minute, look to your kitchen or craft drawer. Strips of torn cotton fabric, braided yarn, or even a strand of twine can look incredibly chic and “cottage-core.” You can also cut thin strips of a contrasting wrapping paper and curl them to create a paper-based topper.
Key Takeaways
- Always prioritize the safety of the ornament by using acid-free tissue paper and plenty of internal cushioning.
- Double-sided tape is the secret to a professional, seamless look that mimics high-end department store wrapping.
- Texture is your best friend; mix velvet, silk, and natural elements like greenery to create a multi-dimensional gift.
- Consider the “unboxing” experience by adding scents, like a drop of essential oil on the tissue paper, or a hidden message inside the lid.
- Sustainable options like fabric wraps (Furoshiki) are beautiful, eco-friendly, and perfect for special occasions like baby showers.
- Personalize the exterior with a custom tag or a small charm to make the recipient feel truly seen and celebrated.
Frequently Asked Questions
How do I wrap a very heavy ornament?
Heavy ornaments, such as those made of solid brass or stone, require a reinforced base. Use a heavy-duty cardboard box and secure the bottom with extra tape. Instead of just tissue paper, use a piece of bubble wrap hidden inside a layer of silk fabric to provide both strength and beauty.
Can I wrap an ornament without a box?
Yes, you can use the “pouch” method or the “fabric wrap” method. Simply place the ornament in the center of your material, gather it at the top, and tie it securely. This works best for non-fragile ornaments made of wood, felt, or metal.
What is the best way to mail a wrapped ornament?
If you are sending the gift through the mail, wrap it as described, then place the gift box inside a larger shipping box. Fill the space between the two boxes with at least two inches of packing peanuts or crumpled kraft paper. This “double-boxing” technique ensures the decorative wrapping stays pristine while the ornament stays safe.
How can I make the gift look good for a baby shower?
For a baby shower ornament, use soft textures like flannel or muslin instead of paper. Choose a palette of pastels or earthy neutrals and tie the package with a piece of lace or a tiny wooden rattle. This makes the ornament feel like a precious heirloom for the new arrival.
Our Top Recommended Finds
- Double-Sided Adhesive Roller: This tool makes applying tape incredibly fast and keeps your seams completely invisible for that perfect finish.
- Premium Velvet Ribbon: A high-quality spool of velvet ribbon in a rich jewel tone can make even the simplest brown paper wrap look expensive.
- Acid-Free White Tissue Paper: Essential for protecting the paint and glitter on your ornaments without causing chemical reactions or yellowing over time.
Create Your Own Gifting Magic
Now that you have the techniques to wrap any ornament with confidence, it is time to look at your gift list and start creating.
Think about the person who will be receiving each piece and choose a theme that reflects their personality, whether it is modern and sleek or rustic and cozy.
Wrapping a gift is more than just a chore; it is the first part of the celebration and a way to show how much you care.
Grab your scissors, turn on some festive music, and enjoy the process of making something beautiful today.
Your friends and family will surely cherish the effort you put into making their holiday keepsakes feel like true treasures.