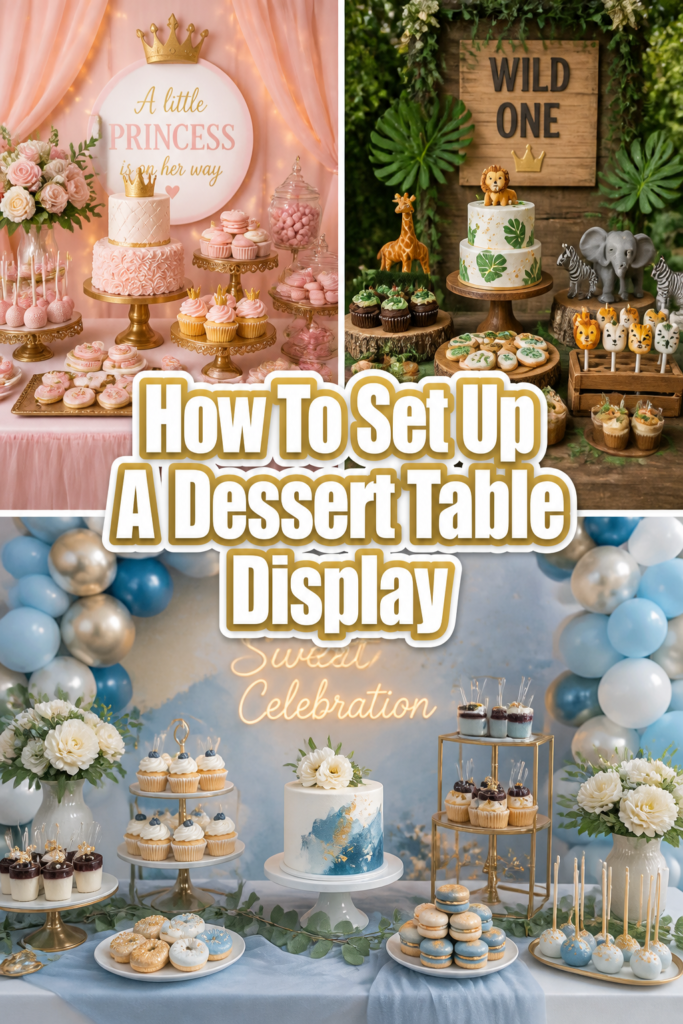
🎉 How To Set Up A Dessert Table Display
📋 The Event Planner's Essential Toolkit
Whether you're throwing a massive birthday bash or an intimate baby shower, the right tools make execution effortless. These are the 5 essential items that professional event coordinators and DIY party hosts consistently rely on to pull off flawless celebrations without the stress.
🎈 Electric Dual-Nozzle Balloon Pump
The absolute lifeline for creating those trending balloon arches and garlands that everyone loves. This dual-nozzle pump lets you inflate hundreds of balloons in a fraction of the time, saving your lungs and transforming hours of prep work into minutes.
🛡️ Command Clear Party Hooks & Strips
The secret to magazine-worthy venue decorations without losing your security deposit. Professional planners stock up on these clear, damage-free hooks to hang banners, string lights, and paper lanterns securely on walls and ceilings, removing cleanly when the party is over.
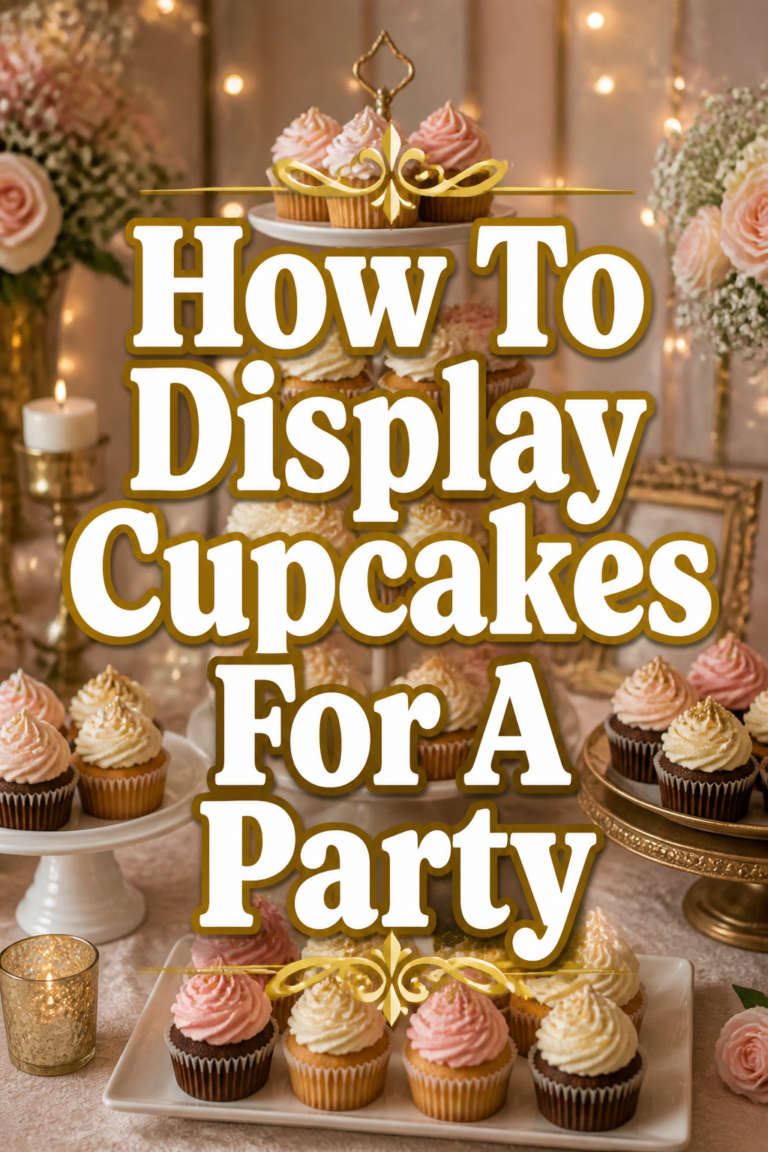
🧁 Wilton Tiered Cupcake & Dessert Stand
The easiest way to make a simple dessert table look professionally catered. This customizable, multi-tier display stand gives crucial height and dimension to your treats, effortlessly elevating the presentation of cupcakes, cookies, or appetizers at any gathering.
🚂 Heavy-Duty Collapsible Utility Wagon
The unsung hero of off-site parties, park birthdays, and trunk-or-treats. This rugged folding wagon hauls folding chairs, coolers, and mountains of decor from your car to the venue in one trip, completely eliminating the exhausting pre-party back-and-forth hauling.
📓 Clever Fox Event Planner Organizer
The ultimate command center for keeping your sanity intact while hosting. Dedicated sections for guest lists, budget tracking, vendor contacts, and day-of timelines ensure that not a single crucial detail falls through the cracks before the big day.
There’s a special magic in gathering loved ones around a beautifully arranged dessert table.
I’ve personally crafted countless displays, from whimsical baby showers to elegant anniversary parties, always finding joy in the delighted faces of guests.
This guide shares all my insider tips to help you create a stunning, memorable centerpiece for your next celebration.
Quick Overview
Transforming a simple spread into a show-stopping dessert table is easier than you think.
You’ll learn how to blend practical planning with creative flair, making your event truly unforgettable.
- Time needed: 2-4 hours (planning to final touches)
- Difficulty: Beginner
- What you’ll need: Table, tablecloth, serving platters, varying height stands, desserts, backdrop materials, decorative elements.
Step-by-Step Instructions
Step 1: Choose Your Theme & Occasion
Every unforgettable dessert table starts with a clear vision. Think about the event you’re celebrating – a joyful birthday, a sweet baby shower, a cozy holiday gathering, or a special anniversary.
Your theme will guide every decision, from the colors you choose to the types of desserts you serve. Browse Pinterest for endless inspiration; create a mood board filled with images that capture the feeling you want to evoke.
For a child’s birthday, consider a “whimsical woodland” or “superhero city” theme. A baby shower might embrace “twinkle twinkle little star” or “oh, boy/girl” with soft pastels. Holidays like Christmas or Halloween offer rich palettes and fun motifs.
Pro Tip: Don’t feel pressured to pick an overly complicated theme. Sometimes, a simple color palette, like “blush pink and gold” or “rustic farmhouse,” can be incredibly elegant and easy to execute.
Step 2: Plan Your Desserts
Variety is the spice of life, and dessert tables are no exception. Aim for a mix of textures, flavors, and forms to keep guests excited.
Think about a show-stopping centerpiece, like a beautiful cake, surrounded by smaller, individual treats. Cupcakes, macarons, cookies, mini tarts, cake pops, and fruit skewers are always popular choices.
Consider dietary needs early in your planning. Offer a gluten-free option or a dairy-free treat to ensure all your guests feel included. You can easily label these items with cute, themed tags.
- Bake some items yourself for a personal touch, especially if they are family favorites.
- Order specialty items like custom cookies or a tiered cake from a local baker.
- Buy pre-made treats from a grocery store or bakery to save time and effort.
- Calculate quantity: generally, 2-3 mini desserts per person is a good starting point, plus slices of a main cake.
Step 3: Select Your Display Pieces
The magic of a stunning dessert table lies in its visual dynamics. You need an assortment of serving pieces to create height and interest.
Gather cake stands of various heights and materials – ceramic, glass, wood, or even metallic. Use tiered platters for smaller treats and bowls for candies or fruit.
Think about how these pieces will complement your chosen theme. A rustic theme might use wooden crates and galvanized metal stands, while a glamorous event would feature mirrored trays and crystal pedestals.
Pro Tip: Look beyond traditional serving ware. Stack books under a tablecloth for hidden height, or use sturdy hat boxes covered in decorative paper. Thrift stores are treasure troves for unique, affordable display items.
Step 4: Design Your Backdrop
A beautiful backdrop anchors your dessert table and frames your display, making it feel complete and professional. It’s a key element for those “Pinterest-worthy” photos.
Simple options include a draped tablecloth, a fabric curtain, or a large poster board. Get creative with garlands, balloons, fairy lights, or even a personalized banner.
For a baby shower, a floral hoop or a “baby” letter balloon garland creates a sweet focal point. For a birthday, a shimmering tinsel curtain or a custom photo booth backdrop adds instant festivity.
- Hang a fabric panel in your theme color.
- Create a balloon arch or garland.
- String fairy lights or paper lanterns.
- Print a large graphic or personalized sign.
Step 5: Create a Layout Sketch
Before you place a single dessert, visualize your setup. A quick sketch helps ensure balance and flow, preventing a chaotic look.
Draw your table and mark where your main focal point (usually the cake) will go. Then, strategically place your various height stands and platters around it.
Aim for a triangular composition, with the tallest elements in the center and shorter ones fanning out. This creates a visually appealing hierarchy and guides the eye across the table.
Pro Tip: Take photos of your practice setup. This allows you to spot imbalances or empty spaces before the actual event, saving time and stress.
Step 6: Set Up Your Table Foundation
Now it’s time to bring your vision to life. Start by positioning your table in its designated spot, ensuring it’s sturdy and easily accessible for guests.
Drape your tablecloth smoothly, making sure it reaches the floor on all visible sides for a polished look. Secure your backdrop firmly behind the table, checking for any wrinkles or unevenness.
Place your empty serving stands and platters according to your sketch. This establishes the structure of your display before any food is introduced, making the final arrangement much simpler.
- Ensure the table is stable and level.
- Smooth out any wrinkles in the tablecloth.
- Secure your backdrop so it won’t shift.
- Arrange all empty serving dishes and stands.
Step 7: Arrange Your Desserts
This is where your table truly comes alive! Start by placing your centerpiece dessert, like a grand cake, in its prime position.
Then, fill your tiered stands and platters with the smaller treats, working from the back to the front. Group similar items together for a clean, organized look.
Don’t be afraid to artfully stack or layer items where appropriate, like cookies in a jar or macarons on a tray. Leave a little breathing room between items so they don’t look squished.
Pro Tip: Use small, decorative tongs or serving spoons for each dessert. This makes it easy for guests to serve themselves and keeps the table hygienic.
Step 8: Add Finishing Touches & Decorations
The final details are what transform a good dessert table into an extraordinary one. These are the “Pinterest-worthy” elements that truly make it shine.
Scatter fresh flowers or edible petals around the base of your cake and platters. Add small, themed props like figurines, framed photos, or whimsical signage.
Consider personalized touches: custom-printed napkins, dessert toppers with the guest of honor’s name, or small, beautifully wrapped dessert boxes as party favors. These also make wonderful, thoughtful gifts for attendees.
- Place fresh flowers or greenery strategically.
- Add candles (if safe and appropriate for the event).
- Scatter confetti or glitter for extra sparkle.
- Include personalized labels or signs for each dessert.
- Arrange small, themed props like toys, books, or decorative elements.
Common Mistakes to Avoid
Overcrowding the Table
A common pitfall is trying to fit too many desserts or decorations onto one table. This can make the display look messy and uninviting, rather than abundant.
Instead, prioritize quality over quantity. Leave some white space between items so each dessert can truly shine and guests can easily access what they want.
Lack of Varying Heights
A flat dessert table lacks visual interest and can look rather dull. Everything at the same level makes it hard for the eye to know where to look.
Always incorporate different heights using cake stands, pedestals, and risers. This creates dynamic layers and a more professional, appealing presentation.
Forgetting a Cohesive Theme
Without a guiding theme or color palette, your dessert table can feel disjointed and random. It won’t tell a story or evoke a specific feeling.
Establish your theme early and let it inform every decision, from the choice of desserts to the color of your tablecloth and decorations. Consistency creates harmony.
Poor Lighting
Even the most beautiful dessert table can fall flat if it’s poorly lit. Dim or harsh lighting can make desserts look unappetizing and hide your hard work.
Ensure your table is well-lit, ideally with soft, warm light. Natural light is best, but if indoors, use strategically placed lamps or fairy lights to highlight your display beautifully.
Troubleshooting
Desserts Wilting or Melting
If your delicate desserts are struggling in the heat, immediate action is needed. Move the table to a cooler, shaded area if possible, or use small fans discreetly placed behind the display.
For items like whipped cream or chocolate, consider placing them on smaller, chilled serving dishes. You can also discreetly place ice packs under platters, hidden by fabric.
Table Looks Sparse
Sometimes, even with all your desserts, the table might feel a bit empty. Don’t panic; there are easy fixes to fill out the space.
Add more decorative elements like fresh flowers, vases, candles, or larger props related to your theme. You can also arrange small bowls of candies, nuts, or colorful fruit to fill gaps and add texture.
Decorations Falling Down
A sagging banner or a toppling balloon arch can be frustrating. Always use strong, reliable adhesives and hanging methods from the start.
For backdrops, use strong tape, command strips, or a dedicated backdrop stand. For balloons, ensure they are properly weighted or securely tied. Double-check everything before guests arrive.
Key Takeaways
- Start with a theme: A cohesive concept guides all your decisions for a harmonious look.
- Vary heights and textures: Use different stands and dessert types to create visual interest and depth.
- Plan your desserts thoughtfully: Consider variety, quantity, and dietary needs for a crowd-pleasing spread.
- Don’t neglect the backdrop: A well-designed backdrop frames your display and enhances its overall impact.
- Embrace finishing touches: Small details like flowers, personalized tags, and props elevate the entire presentation.
Frequently Asked Questions
How many desserts should I plan per person?
A good rule of thumb is 2-3 individual mini desserts per guest, in addition to a main cake if you’re serving one. Adjust this based on the length of your event and if other food is being served.
How far in advance can I set up the dessert table?
The main structure (table, tablecloth, backdrop, empty stands) can be set up a day in advance. Desserts should be added as close to the event start time as possible, especially perishable items, to ensure freshness and prevent melting.
What if I’m on a tight budget?
Creativity is your best friend! Bake some desserts yourself, borrow serving dishes from friends, and use affordable decorative elements like balloons, paper garlands, or fresh greenery from your garden. Thrift stores are great for unique, inexpensive finds.
Should all desserts perfectly match the theme?
Not necessarily! While theme-colored frosting or custom cookies are lovely, you can also use simple, delicious desserts and tie them into the theme with creative presentation. Think about themed labels, cupcake wrappers, or decorative sprinkles.
Our Top Recommended Finds
- White Ceramic Cake Stand Set: Versatile and elegant, these stands instantly elevate any dessert.
- Adjustable Backdrop Stand Kit: Perfect for hanging fabric, banners, or balloon garlands securely and professionally.
- Tiered Serving Platters: Ideal for maximizing space and displaying smaller treats beautifully.
Ready to Create Sweet Memories?
Crafting a dessert table is more than just arranging treats; it’s about curating an experience, celebrating moments, and expressing your love through thoughtful details.
Whether it’s for a milestone birthday, a joyous baby shower, or a cherished holiday, your personalized dessert display will be a talking point and a beautiful backdrop for lasting memories.
So, gather your inspiration, embrace your creativity, and start planning your next sweet celebration today. Imagine the smiles, the photos, and the pure delight!