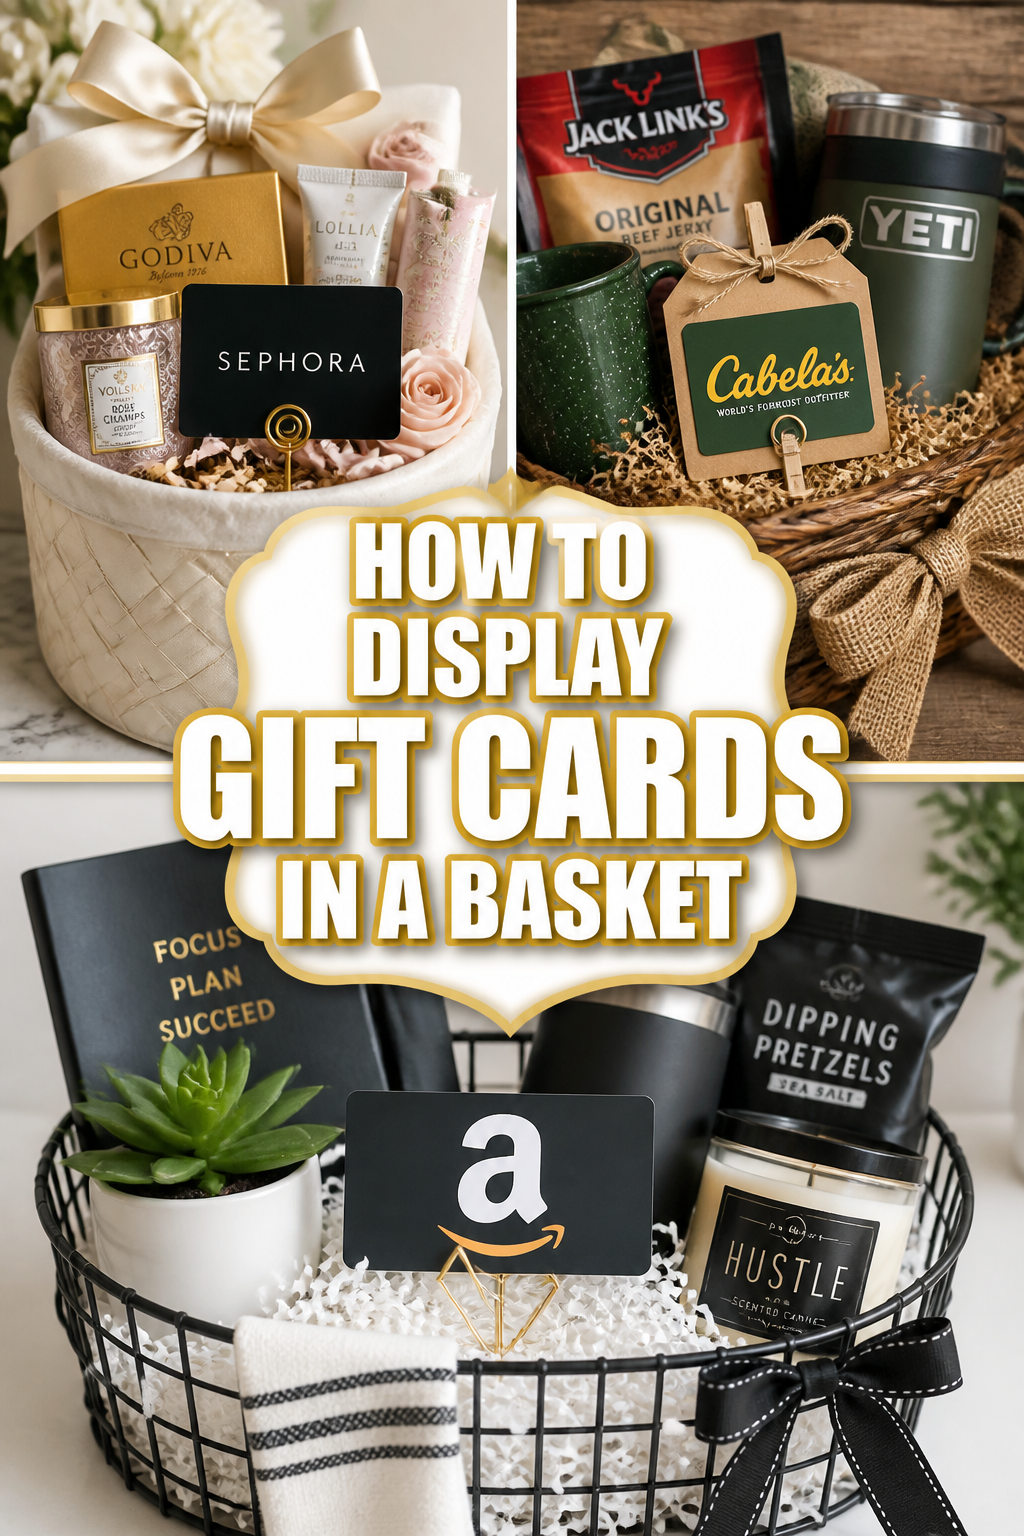
🎁 How To Display Gift Cards In A Basket
📋 The Event Planner's Essential Toolkit
Whether you're throwing a massive birthday bash or an intimate baby shower, the right tools make execution effortless. These are the 5 essential items that professional event coordinators and DIY party hosts consistently rely on to pull off flawless celebrations without the stress.
🎈 Electric Dual-Nozzle Balloon Pump
The absolute lifeline for creating those trending balloon arches and garlands that everyone loves. This dual-nozzle pump lets you inflate hundreds of balloons in a fraction of the time, saving your lungs and transforming hours of prep work into minutes.
🛡️ Command Clear Party Hooks & Strips
The secret to magazine-worthy venue decorations without losing your security deposit. Professional planners stock up on these clear, damage-free hooks to hang banners, string lights, and paper lanterns securely on walls and ceilings, removing cleanly when the party is over.
🧁 Wilton Tiered Cupcake & Dessert Stand
The easiest way to make a simple dessert table look professionally catered. This customizable, multi-tier display stand gives crucial height and dimension to your treats, effortlessly elevating the presentation of cupcakes, cookies, or appetizers at any gathering.
🚂 Heavy-Duty Collapsible Utility Wagon
The unsung hero of off-site parties, park birthdays, and trunk-or-treats. This rugged folding wagon hauls folding chairs, coolers, and mountains of decor from your car to the venue in one trip, completely eliminating the exhausting pre-party back-and-forth hauling.
📓 Clever Fox Event Planner Organizer
The ultimate command center for keeping your sanity intact while hosting. Dedicated sections for guest lists, budget tracking, vendor contacts, and day-of timelines ensure that not a single crucial detail falls through the cracks before the big day.
Have you ever found yourself with a pile of beautiful gift cards, wondering how to make them shine at your next celebration?
After years of hosting everything from intimate baby showers to grand holiday gatherings, I’ve discovered the secret to transforming these small treasures into stunning focal points.
This guide will share my favorite, tried-and-true methods to turn a simple basket into a breathtaking display, perfect for any Pinterest board.

Quick Overview
You’re about to transform a basic collection of gift cards into an enchanting centerpiece, adding a touch of personalized charm to any event. We’ll cover everything from selecting the perfect basket to adding those final, magical details.
- Time needed: 45-90 minutes (depending on complexity and DIY elements)
- Difficulty: Beginner
- What you’ll need: A basket, filler material, gift cards, decorative accents, and a touch of creativity!
Step-by-Step Instructions
Step 1: Choose Your Canvas – The Perfect Basket
The foundation of your stunning display begins with the basket itself. Think of it as the stage for your gift card stars.
Consider the event’s theme and color scheme. For a rustic wedding, a woven wicker basket with natural tones is ideal. A sleek metallic wire basket might suit a modern birthday celebration.
Size matters! Ensure the basket is large enough to comfortably hold all your gift cards without looking cramped, but not so vast that the cards get lost.
Pro Tip: Look beyond traditional baskets! A vintage wooden crate, a decorative hat box, or even a large ceramic bowl can make a unique and memorable “basket” for your display.
Step 2: Select Your Foundation – Elegant Fillers
Fillers serve both a practical and aesthetic purpose. They provide a soft bed for your cards and add a layer of texture and color.
Crinkled Shredded Paper: This is a classic for a reason. It comes in an array of colors and offers excellent support. Choose a color that complements your theme—think soft pastels for a baby shower, vibrant hues for a birthday, or metallic for a holiday party.
Tissue Paper: Layering sheets of tissue paper, crumpled and fluffed, creates a cloud-like effect. You can use multiple shades for an ombre look or stick to one elegant color.
Fabric Scraps or Tulle: For a touch of luxury, use satin, velvet, or silk scraps. Tulle, especially in shimmery tones, adds a whimsical, ethereal feel, perfect for bridal showers or elegant parties.
Natural Elements: Consider dried moss, small pinecones (for winter holidays), or even polished river stones for an earthy, organic vibe. These add wonderful texture and a unique touch.
Step 3: Elevate with Structure – Internal Supports
To prevent your gift cards from sinking into the filler, you need a hidden support system. This is crucial for creating that beautiful, elevated look.
Floral Foam Blocks: These are incredibly versatile. Place one or two at the bottom of your basket, covered by your chosen filler. You can gently push the gift cards into the foam for stability, allowing them to stand upright.
Cardboard Inserts: Cut a piece of cardboard to fit snugly inside the basket, just below the rim. Cover it with your filler. This creates a flat, elevated surface for cards to lean against or be secured to.
Crumpled Newspaper or Packing Paper: For a budget-friendly option, tightly crumple newspaper and place it at the bottom. Cover it completely with your decorative filler. This adds volume and raises the base.
The goal is to create a firm, slightly raised platform that your gift cards can rest upon or be anchored into, ensuring they remain visible and upright.
Step 4: Arrange Your Treasures – The Gift Cards Themselves
Now for the stars of the show! How you arrange the gift cards can transform the entire display.
Fan Them Out: For a striking visual, fan the cards out in a semi-circle, allowing the brand logos or designs to peek out. This works beautifully when you have a good number of cards.
Stand Them Tall: If using floral foam, gently push the bottom edge of each card into the foam, allowing them to stand upright. Vary the heights slightly for added interest.
Miniature Easels or Clips: Small decorative easels or tiny bulldog clips can hold individual cards, adding an elegant touch. These are especially charming for a few special gift cards.
Layer and Overlap: Arrange cards in layers, slightly overlapping each other, ensuring each one is still identifiable. This creates depth and a sense of abundance.
Pro Tip: If you have many cards from similar stores, consider grouping them together. Alternatively, mix and match brands to create a vibrant, diverse display. For a personal touch, attach small, handwritten tags to each card, perhaps with a tiny message or a memory associated with the gift.
Step 5: Adorn with Accents – Decorative Touches
This is where your display truly comes to life, capturing that coveted “Pinterest-worthy” aesthetic. These small details elevate your basket from functional to fabulous.
Ribbons and Bows: Weave satin, grosgrain, or sheer organza ribbons through the basket handles or tie them into elegant bows. Choose colors that complement your filler and theme.
Fairy Lights: Battery-operated LED fairy lights, especially those with warm white glow, can be nestled among the filler. They add a magical twinkle, perfect for evening events or a festive holiday feel.
Small Ornaments: For a Christmas display, mini baubles or themed ornaments are perfect. For a baby shower, tiny baby booties or pacifiers can be scattered around. Think about small, meaningful items.
Fresh or Faux Flowers: Tuck a few sprigs of baby’s breath, delicate roses, or lush greenery into the filler. Faux flowers offer a long-lasting, allergen-free alternative and come in endless varieties.
Personalized Tags or Charms: Create custom tags with the recipient’s name, event date, or a sweet message. Hang them from the basket handle or attach them to individual gift cards.
Step 6: Personalize & Theme It – Make It Uniquely Yours
Tailoring your gift card basket to the specific event makes it feel incredibly special and cohesive with your party decor.
Birthday Bash: Use bright, celebratory colors. Incorporate mini balloons, confetti sprinkles, or even small party hats. A “Happy Birthday” banner draped across the basket adds a festive touch.
Baby Shower Bliss: Think soft pastels—blues, pinks, yellows, and mint greens. Include tiny clothespins holding miniature baby socks, small wooden blocks, or plush animal figurines. A delicate banner that says “Oh Baby!” would be adorable.
Holiday Cheer: For Christmas, use rich reds, greens, and golds. Add pinecones, sprigs of holly, faux cranberries, and twinkling lights. A dusting of faux snow can create a winter wonderland. For Halloween, think spooky spiders or miniature pumpkins.
Wedding Wonders: Elegant whites, ivories, and metallics are perfect. Incorporate lace, pearls, small “Mr. & Mrs.” signs, or even miniature wedding bells. A delicate floral arrangement can complete the look.
Graduation Gala: Use the school’s colors! Add mini graduation caps, rolled-up “diplomas” (scrolls), or small academic symbols. A “Congrats Grad!” banner is a must.
Step 7: Create Visual Interest – Varying Heights & Textures
A truly captivating display isn’t flat; it has depth and dimension. This step is about making your basket dynamic and engaging to the eye.
Layering is Key: Don’t just place everything on one level. Use your internal supports and filler to create different heights for your gift cards and decorative elements. Some cards can stand tall, while others lean gently.
Mix Textures: Combine smooth ribbons with rough twine, soft fabric with crisp paper, and glossy ornaments with matte greenery. This tactile variety makes the display more inviting.
Play with Scale: Incorporate elements of different sizes. A large, beautiful bow on the handle, medium-sized flowers, and tiny fairy lights all contribute to a balanced and interesting composition.
Use Negative Space: Don’t feel the need to fill every single gap. Allowing a little breathing room around certain elements can make them stand out more effectively.
Step 8: Consider the Surroundings – Placement & Background
The basket doesn’t exist in a vacuum. Its placement and the surrounding decor are just as important for that perfect photo opportunity.
Prime Location: Choose a spot where the basket will be easily visible but not in the way of foot traffic. An entrance table, a dedicated gift table, or a prominent spot on a dessert buffet are excellent choices.
Table Dressing: Place your basket on a beautiful table runner or a themed tablecloth. A contrasting color or complementary pattern can really make the basket pop.
Backdrop Brilliance: If possible, position the basket against a pretty backdrop. This could be a decorated wall, a sheer curtain, or even a simple, elegant fabric drape. Avoid busy or distracting backgrounds.
Lighting Magic: Natural light is always best for photography. If your event is indoors or in the evening, ensure there’s soft, flattering light on the display. Those fairy lights you added will truly glow!
Common Mistakes to Avoid
Overcrowding the Basket
Attempting to cram too many gift cards or decorative elements into a small basket can quickly turn a potential showstopper into a cluttered mess. The beauty of a display lies in its ability to highlight each element, not hide it.
Instead, if you have a large number of gift cards, consider using a larger basket, or even two smaller, complementary baskets. This allows each card to breathe and contributes to an airy, elegant aesthetic.
Ignoring the Theme
A beautifully curated gift card basket should seamlessly integrate with your overall party theme and decor. Using conflicting colors, mismatched styles, or out-of-place embellishments can disrupt the visual harmony of your event.
Always keep your event’s theme in mind when selecting your basket, filler, and decorative accents. Coordinate colors, textures, and motifs to ensure the basket feels like an intentional and cherished part of the celebration.
Lack of Stability
There’s nothing more disheartening than a gift card display that constantly collapses, with cards slipping and falling into the filler. A flimsy setup not only looks untidy but also makes it difficult for guests to appreciate the gifts.
Prioritize stability by using appropriate internal supports like floral foam or cardboard inserts. Ensure gift cards are securely placed, whether gently pushed into foam or held by small clips, preventing any accidental tumbles.
Poor Lighting
Even the most stunning gift card display can look dull and uninviting if it’s placed in a poorly lit area. Shadows can obscure details, and a lack of illumination can diminish the sparkle of your carefully chosen accents.
Position your basket in an area with ample, flattering light. Natural light is ideal, but if unavailable, supplement with soft accent lighting, such as strategically placed fairy lights within the basket or a nearby lamp with a warm glow.
Troubleshooting
Gift Cards Keep Falling Down
This is a common frustration, especially with slick gift cards or soft fillers. The key is to provide a solid anchor for them. Try pushing the bottom edge of the card into a floral foam block hidden beneath your filler.
Small, discreet gift card stands or even tiny pieces of double-sided tape (applied to the back of the card, then lightly pressed against another card or the basket’s side) can also work wonders for stability.
Basket Looks Empty or Sparse
If your display feels a bit underwhelming, it likely needs more volume and visual richness. Don’t be shy with your filler material; fluff it up generously to create a plush base.
Add more decorative elements like larger bows, a few extra flowers, or more clusters of fairy lights. You can also incorporate a larger, themed focal point, such as a small plush toy for a baby shower or a decorative sign for a birthday.
Doesn’t Look “Pinterest-Worthy”
Achieving that polished, magazine-ready look often comes down to cohesion and attention to detail. First, ensure your color palette is consistent and harmonious. Overly disparate colors can make a display look chaotic.
Next, focus on textures: mix smooth, shiny, and matte elements. Finally, consider adding a touch of whimsy like delicate fairy lights or a personalized banner. Sometimes, a simple, elegant bow tied around the basket’s handle is all it takes to elevate the look.
Key Takeaways
- Start with a Cohesive Theme: Select a basket, filler, and decorations that perfectly align with your event’s aesthetic and color scheme.
- Prioritize Stability and Height: Use internal supports like floral foam to ensure gift cards stand tall and proud, creating visual interest.
- Layer with Purpose: Arrange gift cards and decorative accents at varying heights and depths to create a dynamic and engaging display.
- Embrace Personalized Details: Incorporate themed elements, ribbons, and custom tags to make the basket feel truly unique and special.
- Mind the Environment: Choose a prime location with good lighting and a complementary background to make your basket shine brightest.
- Don’t Overcrowd: Less can often be more. Allow elements space to breathe for an elegant, uncluttered appearance.
Frequently Asked Questions
How do I keep the gift cards from getting lost in the filler?
The best way is to use internal supports like floral foam or a cardboard base underneath your decorative filler. This creates a firmer surface to push the cards into or lean them against. You can also use small, clear gift card stands or attach small clips to the cards to secure them to the basket’s edge.
Can I use a non-traditional container instead of a basket?
Absolutely! Get creative with your container choice to match your theme. A vintage wooden crate, an antique watering can for a garden party, a decorative hat box, or even a sleek ceramic planter can all serve as charming and unique alternatives to a traditional basket.
What if I only have a few gift cards to display?
If you have a limited number of gift cards, focus on quality over quantity. Choose a smaller, more exquisite basket and elevate the few cards you have with luxurious fillers and impactful decorative elements. A single, perfectly placed bloom or a string of delicate fairy lights can make a small display feel grand.
How can I make my gift card display eco-friendly?
Embrace sustainability by using recycled shredded paper, natural fillers like dried leaves or ethically sourced moss, or reusable fabric scraps. Consider borrowing decorative items from friends or repurposing existing decor. You can also choose a durable basket that can be reused for future events or as home storage.
Our Top Recommended Finds
- Versatile Wicker Basket Set: A set of varying sizes ensures you have the perfect “canvas” for any event, from small gatherings to large celebrations.
- Assorted Crinkled Paper Shred Filler: Available in a rainbow of colors, this provides excellent volume and a pop of color for your gift card bed.
- Battery-Operated LED Fairy Lights: These tiny, flexible lights add an enchanting glow to any display, making it sparkle and feel truly magical.
Your Celebration Awaits: Crafting Memories, One Basket at a Time
Creating a beautiful gift card display is more than just arranging items; it’s about infusing your celebration with personal flair and thoughtful design. Each carefully chosen detail contributes to an atmosphere of joy and appreciation.
You now have all the tools and inspiration to transform a simple basket into a dazzling focal point that will delight your guests and honor your gift-givers. Imagine the smiles as everyone admires your handiwork!
Don’t wait for your next big event. Start experimenting with these ideas today, perhaps for a small “just because” gift or a cozy family gathering. Let your creativity bloom and watch as your celebrations become even more memorable, one beautifully displayed gift card at a time!