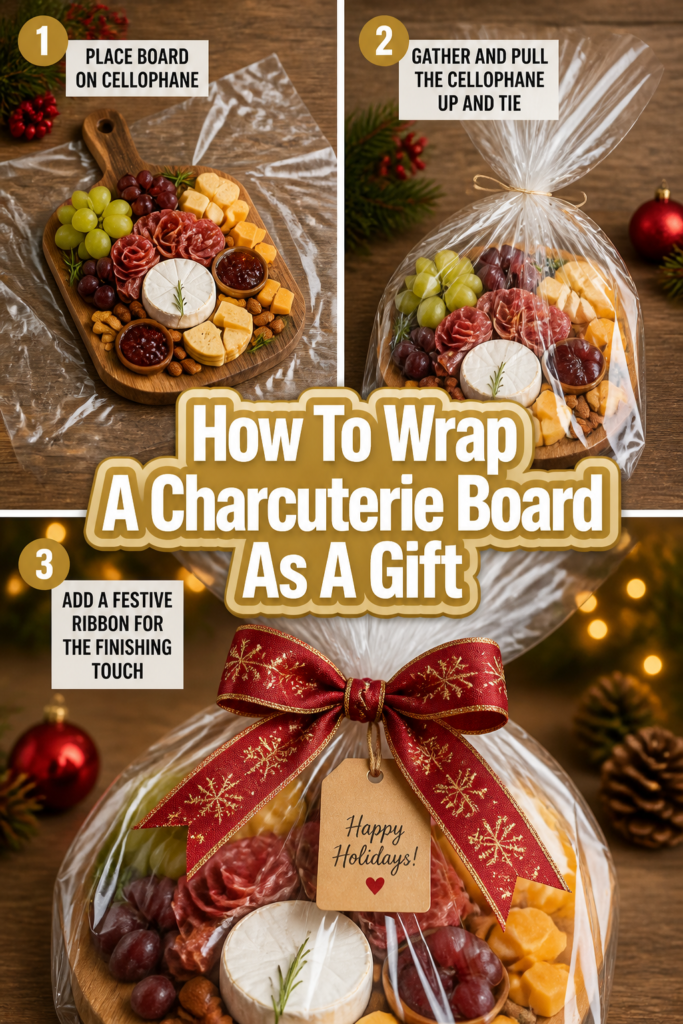
🎁 How To Wrap A Charcuterie Board As A Gift
📋 The Event Planner's Essential Toolkit
Whether you're throwing a massive birthday bash or an intimate baby shower, the right tools make execution effortless. These are the 5 essential items that professional event coordinators and DIY party hosts consistently rely on to pull off flawless celebrations without the stress.
🎈 Electric Dual-Nozzle Balloon Pump
The absolute lifeline for creating those trending balloon arches and garlands that everyone loves. This dual-nozzle pump lets you inflate hundreds of balloons in a fraction of the time, saving your lungs and transforming hours of prep work into minutes.
🛡️ Command Clear Party Hooks & Strips
The secret to magazine-worthy venue decorations without losing your security deposit. Professional planners stock up on these clear, damage-free hooks to hang banners, string lights, and paper lanterns securely on walls and ceilings, removing cleanly when the party is over.
🧁 Wilton Tiered Cupcake & Dessert Stand
The easiest way to make a simple dessert table look professionally catered. This customizable, multi-tier display stand gives crucial height and dimension to your treats, effortlessly elevating the presentation of cupcakes, cookies, or appetizers at any gathering.
🚂 Heavy-Duty Collapsible Utility Wagon
The unsung hero of off-site parties, park birthdays, and trunk-or-treats. This rugged folding wagon hauls folding chairs, coolers, and mountains of decor from your car to the venue in one trip, completely eliminating the exhausting pre-party back-and-forth hauling.
📓 Clever Fox Event Planner Organizer
The ultimate command center for keeping your sanity intact while hosting. Dedicated sections for guest lists, budget tracking, vendor contacts, and day-of timelines ensure that not a single crucial detail falls through the cracks before the big day.
I remember the first time I gifted a homemade charcuterie board – the look on my friend’s face was absolutely priceless!
It felt like I was sharing a piece of edible art, a delicious expression of love and thoughtfulness.
This guide comes from countless hours spent perfecting the art of presenting these edible masterpieces, ensuring they travel beautifully and arrive ready to dazzle any celebration.
Quick Overview
Transforming a beautiful charcuterie board into a stunning, transportable gift is easier than you think. You’ll create a memorable presentation that truly wows your recipient.
- Time needed: 1-2 hours (including thoughtful board assembly, depending on complexity)
- Difficulty: Intermediate (requires a bit of care and attention to detail)
- What you’ll need: Sturdy board, fresh ingredients, heavy-duty cellophane, decorative ribbon, gift tag, scissors, tape, a suitable transport box, and cushioning material.
Step-by-Step Instructions
Step 1: Design Your Dream Board with Purpose
Before you even think about wrapping, consider the journey your board will take. Think about the recipient’s favorite flavors and the occasion.
Are you crafting a birthday brunch board with mini pancakes and berries, or a sophisticated holiday spread with artisan cheeses and festive garnishes?
Select a sturdy board that can handle the weight and travel. Wooden, slate, or even thick ceramic boards work wonderfully as a gift base.
Pro Tip: For a truly Pinterest-worthy touch, choose a board that matches your gift’s theme. A rustic wooden board for a fall harvest gift, or a sleek marble one for a chic anniversary celebration.
Step 2: Assemble with Stability in Mind
Arrange your charcuterie components beautifully, but also strategically. Each item should feel nestled and secure, not precarious.
Place heavier, more stable items like cheeses and small bowls of olives or dips first. Use these as anchors for lighter elements.
Fill gaps with items that can withstand a little movement, like grapes, crackers, or small clusters of nuts. Avoid stacking too high.
Step 3: Chill Thoroughly for Food Safety and Firmness
This step is absolutely crucial for both food safety and presentation. A cold board is a stable board.
Refrigerate your fully assembled board for at least 30-60 minutes before wrapping. This allows cheeses to firm up and meats to settle.
A chilled board will also help prevent condensation from forming inside your wrapping, keeping everything looking fresh and appealing.
Step 4: Prepare Your Wrapping Foundation
Heavy-duty clear cellophane is your best friend here. It offers protection while still showcasing your beautiful creation.
Unroll a generous amount of cellophane – you’ll need enough to cover the entire board with plenty of excess to gather at the top.
Lay the cellophane flat on a clean surface, like a large table or countertop. Ensure it’s wide enough to easily wrap around the board’s dimensions.
Step 5: The Gentle Lift and First Wrap
This is where care is key. You want to lift the board without disturbing your artful arrangement.
Carefully slide the assembled, chilled board onto the center of your laid-out cellophane. If your board is heavy, enlist a helper.
Bring one side of the cellophane up and over the board, meeting the other side. Overlap them generously in the middle, creating a protective “tent.”
Pro Tip: For extra security, you can use a few small pieces of clear tape to lightly secure the overlapping cellophane underneath the board, ensuring it doesn’t slip during the next steps. This is especially helpful for larger boards.
Step 6: Gather and Secure the Top
Now, we’ll create that classic gift-wrap look at the top.
Gently gather all the excess cellophane from the sides and ends upwards, above the board. Imagine pulling it together into a single “ponytail.”
Twist the gathered cellophane tightly right above the board, creating a secure seal. This prevents air from getting in and items from shifting.
Step 7: Tie with a Flourish
This is where the magic of gifting truly begins to shine!
Secure the twisted cellophane tightly with a long piece of decorative ribbon. Use a double knot to ensure it won’t unravel.
Tie a beautiful bow – think wide satin ribbons for elegance, or rustic twine for a farmhouse-chic vibe. Consider the occasion for your ribbon choice; a sparkly ribbon for New Year’s, or soft pastels for a baby shower.
Step 8: Add Personalized Details and Embellishments
Make this gift uniquely yours with thoughtful, Pinterest-worthy touches.
Attach a handwritten gift tag to the ribbon. Share a sweet message, a “happy birthday” wish, or a “congratulations” for a new home.
Consider adding small, themed decorations. A sprig of fresh rosemary for a holiday board, a tiny plastic baby rattle for a baby shower gift, or a miniature party hat for a birthday celebration.
Pro Tip: For a truly memorable presentation, tuck a small, themed cookie cutter or a bottle opener into the ribbon. It’s a delightful extra that keeps the celebration going.
Step 9: Prepare for Safe and Stylish Transport
The final step ensures your beautiful creation arrives intact and ready to impress.
Place the wrapped charcuterie board into a sturdy, flat-bottomed box or a shallow basket. The box should be just slightly larger than the board itself.
Cushion any empty spaces around the board with crinkled tissue paper, bubble wrap, or even soft kitchen towels. This prevents sliding during travel.
Add a “handle with care” note to the box, and if it’s a longer journey, include a small, flat ice pack tucked discreetly into the cushioning for temperature control.
Common Mistakes to Avoid
Overpacking the Board
Trying to fit too many items onto a board is a common pitfall. It leads to a cluttered look and, more importantly, makes the board unstable during transport.
When items are piled too high or packed too densely, they are more likely to shift, fall off, or become squashed. Focus on quality and arrangement over quantity for a truly elegant presentation.
Using Flimsy Wrapping Materials
Thin plastic wrap or low-quality cellophane might seem like an easy solution, but they offer little protection. They can tear easily, exposing your delicious gift to air and potential damage.
Always invest in heavy-duty cellophane or a robust clear gift box. This ensures your beautiful arrangement stays protected and arrives looking pristine.
Forgetting Temperature Control
A charcuterie board often contains perishable items like cheeses and meats. Forgetting to chill the board thoroughly or neglecting temperature control during transport can compromise food safety and freshness.
Always chill your board before wrapping and, for longer journeys, consider a discreetly placed ice pack within the transport box. Inform the recipient to refrigerate upon arrival.
Neglecting the Base or Transport Box
Even the most beautifully wrapped board can be ruined if its journey isn’t properly planned. Placing a heavy, wrapped board directly into a flimsy shopping bag is a recipe for disaster.
Always use a sturdy, flat-bottomed box or a strong shallow basket for transport. Cushioning around the board inside the box is essential to prevent shifting and potential damage.
Troubleshooting
Board Shifting During Transport
If your board still seems to shift despite your best efforts, don’t worry. This is a common concern, especially with heavier boards or longer trips.
The solution often lies in more robust cushioning. Try adding more crinkled tissue paper, small towels, or even non-slip mats beneath the board within its transport box. Secure the entire box in your car so it can’t slide around.
Cellophane Tearing
Cellophane can be a bit delicate, and tears can happen, especially if you’re using a thinner gauge or handling it roughly. This can expose your food and ruin the aesthetic.
To fix a small tear, you can often patch it with clear packing tape, applied carefully from the outside. For larger tears, it’s best to re-wrap the board with a fresh piece of heavy-duty cellophane, ensuring gentle handling.
Condensation Inside Wrapping
Condensation can occur if the board isn’t sufficiently chilled before wrapping or if there’s a significant temperature difference during transport. This can make items look damp and less appealing.
Ensure your board is thoroughly cold before wrapping. If condensation is still an issue, you can carefully poke a few tiny, almost imperceptible ventilation holes in the cellophane at the top, away from the food, after it’s securely tied. This allows a little air circulation without compromising protection.
Key Takeaways
- Preparation is paramount; always chill your charcuterie board thoroughly before wrapping to ensure food safety and stability.
- Invest in quality, heavy-duty cellophane and sturdy transport boxes to provide robust protection for your edible masterpiece.
- Personal touches, like handwritten tags and themed embellishments, elevate your gift from good to truly unforgettable.
- Prioritize food safety by considering temperature control throughout the entire gifting process, from assembly to delivery.
- A secure, cushioned base and a well-tied wrap are essential for preventing shifts and ensuring your board arrives beautifully intact.
- Think beyond just the food; the presentation itself becomes part of the cherished gift and memory.
Frequently Asked Questions
How far in advance can I make the charcuterie board?
For optimal freshness and food safety, it’s best to assemble your charcuterie board no more than 2-4 hours before it’s meant to be gifted or served. You can prep individual components (slice cheeses, wash fruits) a day in advance, but final assembly should be closer to the event time.
What if I don’t have a large enough transport box?
If a dedicated transport box isn’t available, get creative! A sturdy laundry basket lined with a clean towel, a large gift bag with a rigid bottom, or even a cooler (without ice, just for structure) can work. Just be sure to cushion well around the board to prevent any movement.
Can I use regular plastic wrap instead of cellophane?
While regular plastic wrap can offer a basic barrier, it’s generally not recommended for a gift presentation. It’s thinner, more prone to tearing, and doesn’t offer the same structural integrity or clear, crisp presentation as heavy-duty cellophane. For a truly special gift, opt for the proper materials.
How do I keep smaller items like nuts or olives from sliding around?
Small ramekins or mini bowls are your best friends here. Nestling these directly onto the board keeps olives, nuts, and dips contained and secure. For very small items, you can also create “walls” with larger, more stable components like cheese blocks or folded salami to hold them in place.
Our Top Recommended Finds
These items will make your charcuterie gifting experience even smoother and more stylish:
- Heavy-duty Clear Cellophane Rolls: Essential for a professional, secure, and beautiful wrap that showcases your creation.
- Assorted Satin Ribbon Set: Offers a variety of colors and widths to match any celebration theme, adding that perfect touch of elegance.
- Gourmet Cheese Knife Set: A thoughtful accompanying gift that complements the charcuterie board beautifully and enhances the recipient’s enjoyment.
Crafting Joy: Your Next Charcuterie Masterpiece Awaits!
There’s a unique joy in giving a gift that’s not just beautiful, but also delicious and made with love. Wrapping a charcuterie board is more than just packaging; it’s the final flourish on a thoughtful gesture, transforming a simple offering into an unforgettable experience.
Imagine the delight on a friend’s face receiving a beautifully wrapped birthday board, or the appreciative smiles at a baby shower when your themed creation arrives. These are the moments that truly make celebrations special and memorable.
So, gather your ingredients, unleash your creativity, and let this guide inspire you to craft and wrap your next charcuterie masterpiece. Don’t wait for a special occasion – create one today!
Consider pairing your beautifully wrapped board with a themed picnic basket for an outdoor adventure, or perhaps a DIY mimosa bar for a festive brunch. The possibilities for celebration are endless when you start with such a delicious foundation.