🎀 How To Tie A Bow With Ribbon For Bouquet
📋 The Event Planner's Essential Toolkit
Whether you're throwing a massive birthday bash or an intimate baby shower, the right tools make execution effortless. These are the 5 essential items that professional event coordinators and DIY party hosts consistently rely on to pull off flawless celebrations without the stress.
🎈 Electric Dual-Nozzle Balloon Pump
The absolute lifeline for creating those trending balloon arches and garlands that everyone loves. This dual-nozzle pump lets you inflate hundreds of balloons in a fraction of the time, saving your lungs and transforming hours of prep work into minutes.
🛡️ Command Clear Party Hooks & Strips
The secret to magazine-worthy venue decorations without losing your security deposit. Professional planners stock up on these clear, damage-free hooks to hang banners, string lights, and paper lanterns securely on walls and ceilings, removing cleanly when the party is over.
🧁 Wilton Tiered Cupcake & Dessert Stand
The easiest way to make a simple dessert table look professionally catered. This customizable, multi-tier display stand gives crucial height and dimension to your treats, effortlessly elevating the presentation of cupcakes, cookies, or appetizers at any gathering.
🚂 Heavy-Duty Collapsible Utility Wagon
The unsung hero of off-site parties, park birthdays, and trunk-or-treats. This rugged folding wagon hauls folding chairs, coolers, and mountains of decor from your car to the venue in one trip, completely eliminating the exhausting pre-party back-and-forth hauling.
📓 Clever Fox Event Planner Organizer
The ultimate command center for keeping your sanity intact while hosting. Dedicated sections for guest lists, budget tracking, vendor contacts, and day-of timelines ensure that not a single crucial detail falls through the cracks before the big day.
I spent years as an event stylist helping brides and party hosts perfect their floral arrangements for their most precious moments.
A perfectly tied bow is the finishing touch that turns a simple bunch of flowers into a professional, Pinterest-worthy masterpiece.
Through trial and error at hundreds of celebrations, I have discovered the secrets to a bow that stays secure and looks breathtaking from every angle.

Quick Overview
This guide will teach you how to create a classic, elegant bow that elevates any floral arrangement for weddings, birthdays, or home decor.
- Time needed: 10-15 minutes
- Difficulty: Beginner
- What you’ll need: Ribbon, sharp scissors, floral wire or twine, and your favorite bouquet.
Step-by-Step Instructions
Step 1: Select Your Signature Ribbon
Choose a ribbon that complements the mood of your event and the texture of your blooms.
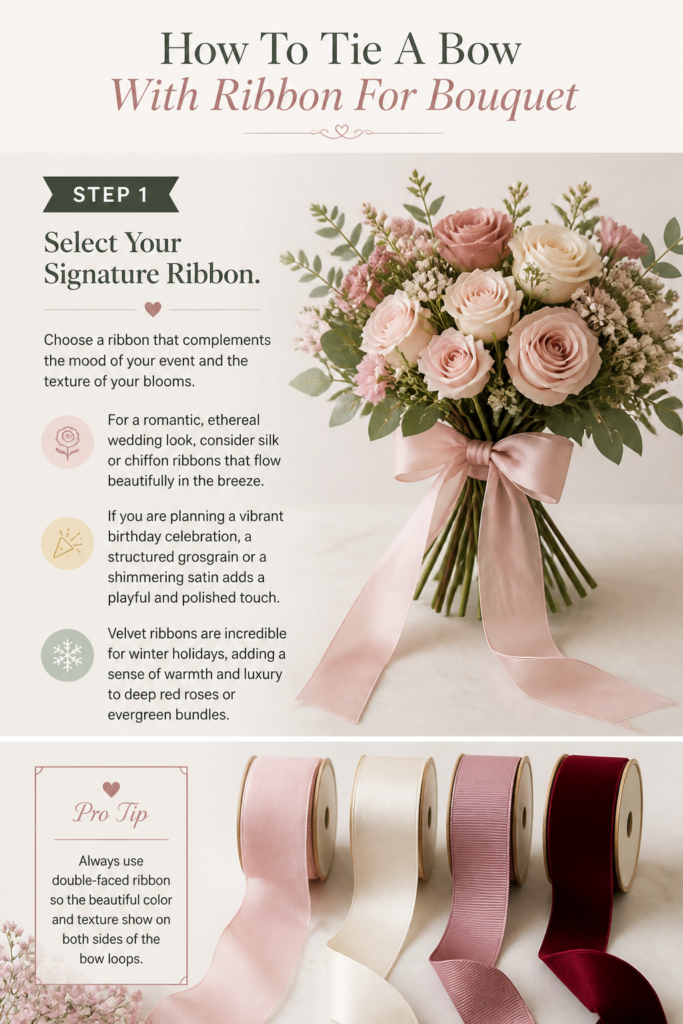
For a romantic, ethereal wedding look, consider silk or chiffon ribbons that flow beautifully in the breeze.
If you are planning a vibrant birthday celebration, a structured grosgrain or a shimmering satin adds a playful and polished touch.
Velvet ribbons are incredible for winter holidays, adding a sense of warmth and luxury to deep red roses or evergreen bundles.
Pro Tip: Always use double-faced ribbon so the beautiful color and texture show on both sides of the bow loops.
Step 2: Prepare Your Bouquet Stems
Clean the stems of your flowers by removing any leaves or thorns that sit where you plan to place the ribbon.
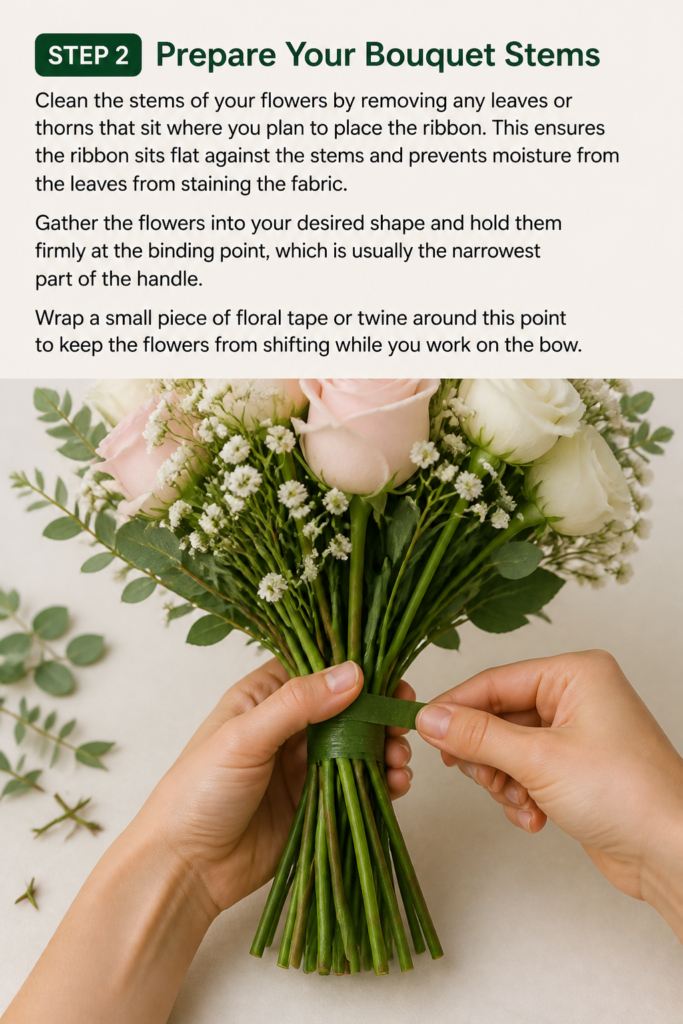
This ensures the ribbon sits flat against the stems and prevents moisture from the leaves from staining the fabric.
Gather the flowers into your desired shape and hold them firmly at the “binding point,” which is usually the narrowest part of the handle.
Wrap a small piece of floral tape or twine around this point to keep the flowers from shifting while you work on the bow.
Step 3: Measure and Cut Your Length
Estimate the amount of ribbon you need by wrapping it loosely around the bouquet three times and adding extra for the tails.

It is always better to have too much ribbon than too little, as you can easily trim the excess at the end.
For a standard handheld bouquet, a length of about three to four feet is usually sufficient for a full, lush bow.
Use very sharp fabric scissors to ensure a clean cut, as dull blades can cause the edges of the ribbon to pull or fray.
Step 4: Create the Foundation Wrap
Place the center of your ribbon length against the back of the bouquet stems where you secured them with twine.
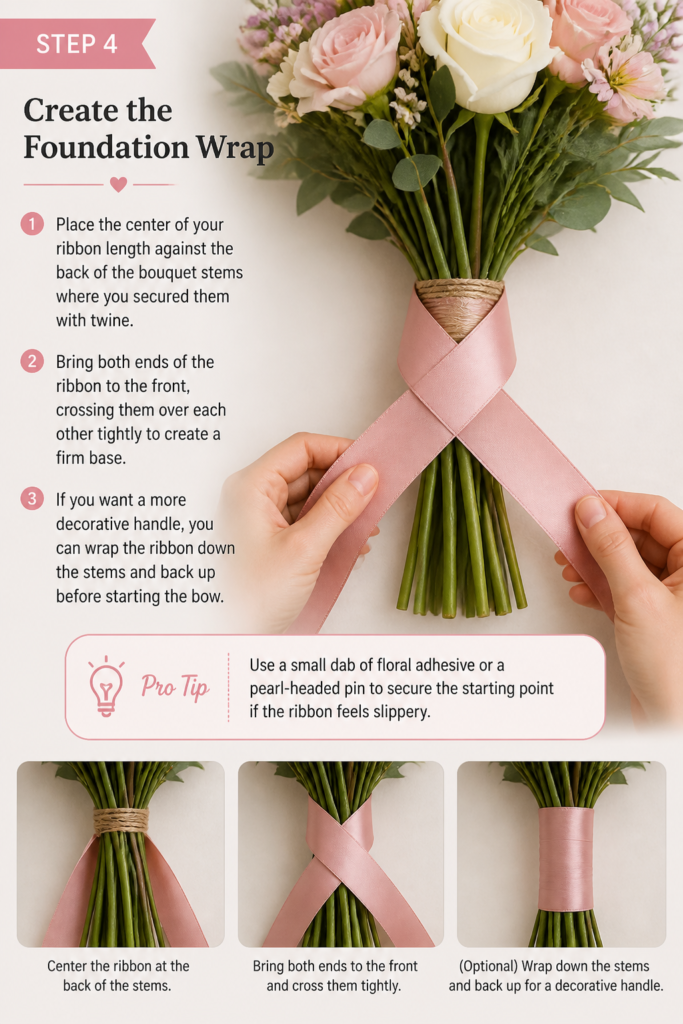
Bring both ends of the ribbon to the front, crossing them over each other tightly to create a firm base.
If you want a more decorative handle, you can wrap the ribbon down the stems and back up before starting the bow.
Ensure the ribbon is snug but not so tight that it crushes the delicate flower stems or restricts water flow if they are in a vase.
Pro Tip: Use a small dab of floral adhesive or a pearl-headed pin to secure the starting point if the ribbon feels slippery.
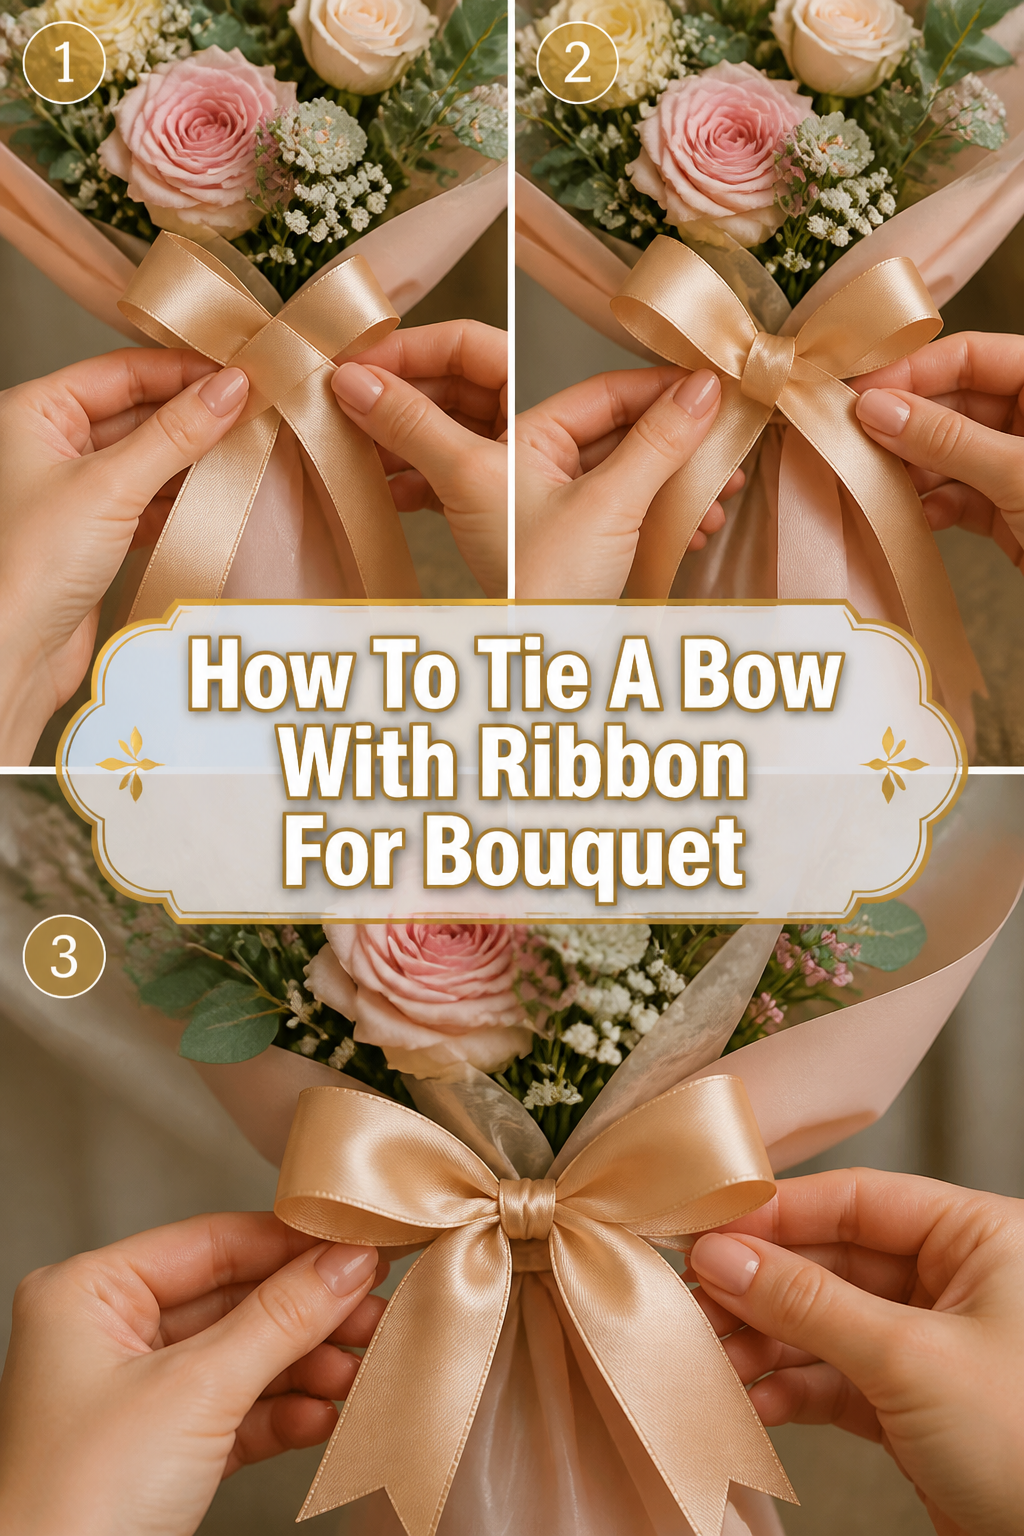
Step 5: Form the Primary Loops
Make two even loops with the ends of the ribbon, often referred to as “bunny ears” in traditional bow making.
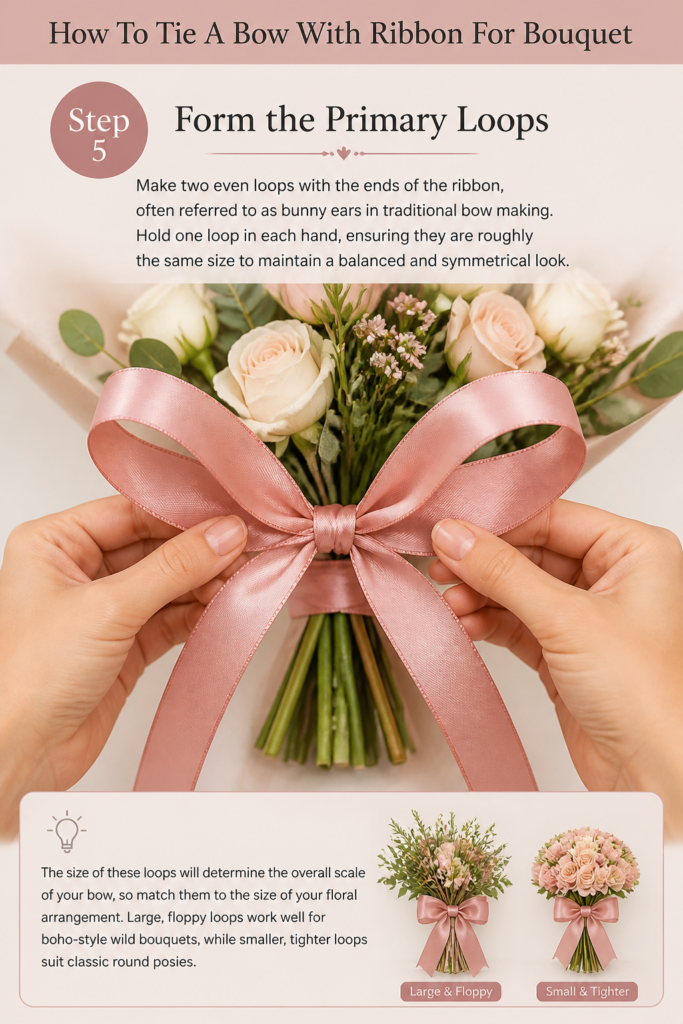
Hold one loop in each hand, ensuring they are roughly the same size to maintain a balanced and symmetrical look.
The size of these loops will determine the overall scale of your bow, so match them to the size of your floral arrangement.
Large, floppy loops work well for boho-style wild bouquets, while smaller, tighter loops suit classic round posies.
Step 6: Execute the Knot and Secure
Cross the right loop over the left loop, then tuck it under and through the center hole you have created.
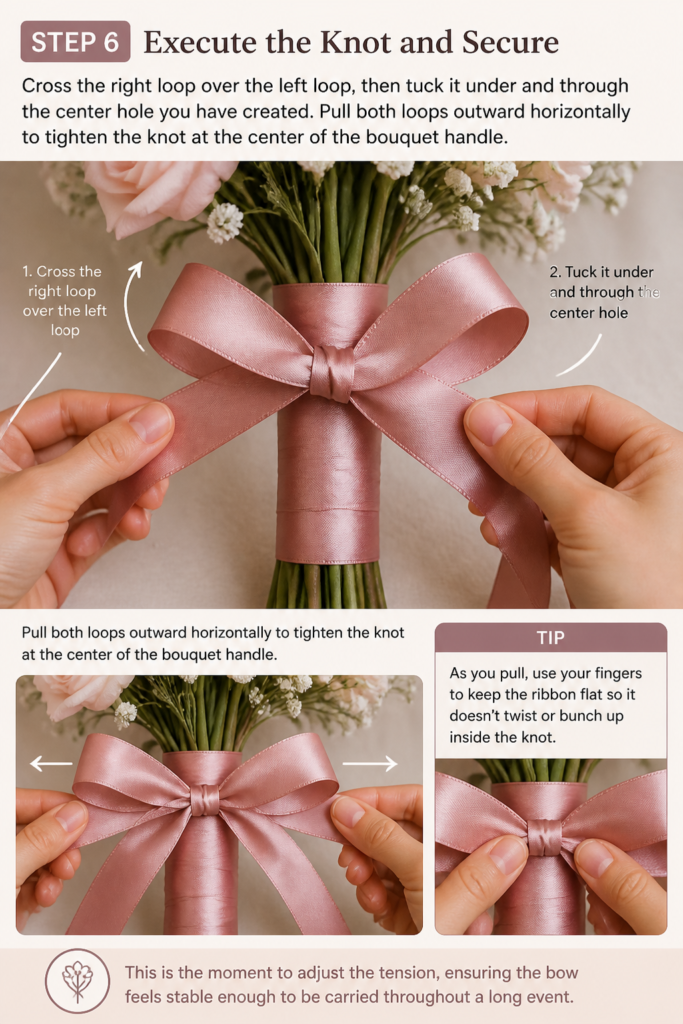
Pull both loops outward horizontally to tighten the knot at the center of the bouquet handle.
As you pull, use your fingers to keep the ribbon flat so it doesn’t twist or bunch up inside the knot.
This is the moment to adjust the tension, ensuring the bow feels stable enough to be carried throughout a long event.
Step 7: Adjust the Ears and Tails
Slide your fingers inside the loops to puff them out and give the bow a three-dimensional, high-end appearance.
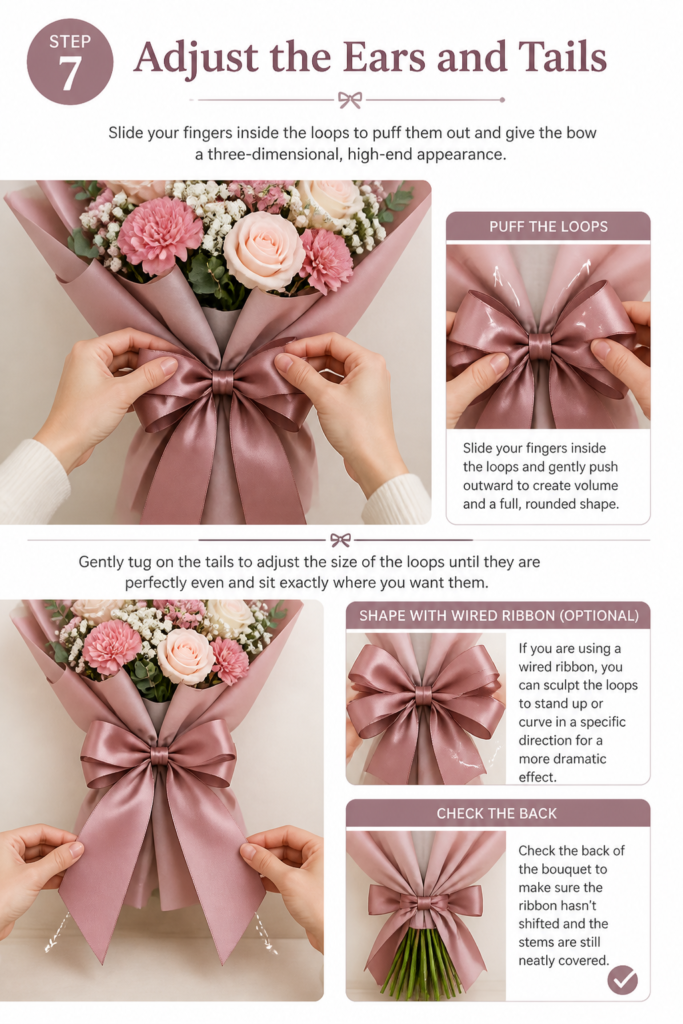
Gently tug on the tails to adjust the size of the loops until they are perfectly even and sit exactly where you want them.
If you are using a wired ribbon, you can sculpt the loops to stand up or curve in a specific direction for a more dramatic effect.
Check the back of the bouquet to make sure the ribbon hasn’t shifted and the stems are still neatly covered.
Step 8: Finish the Ends with Style
Trim the ends of the ribbon tails at an angle or into a “V” shape for a professional, boutique finish.
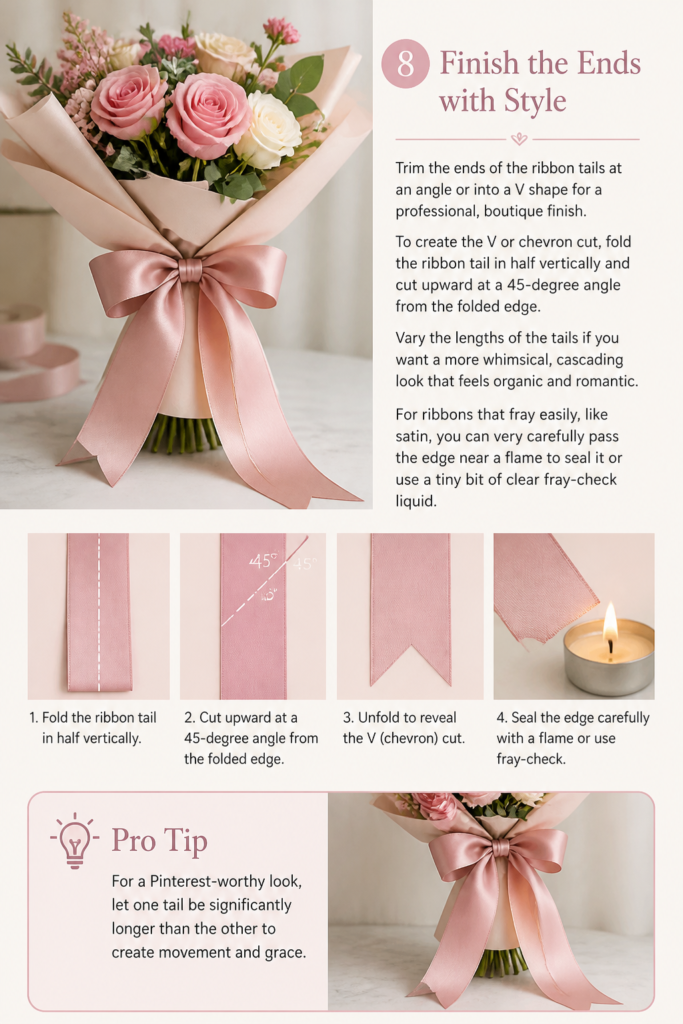
To create the “V” or chevron cut, fold the ribbon tail in half vertically and cut upward at a 45-degree angle from the folded edge.
Vary the lengths of the tails if you want a more whimsical, cascading look that feels organic and romantic.
For ribbons that fray easily, like satin, you can very carefully pass the edge near a flame to seal it or use a tiny bit of clear fray-check liquid.
Pro Tip: For a “Pinterest-worthy” look, let one tail be significantly longer than the other to create movement and grace.
Common Mistakes to Avoid
Using Ribbon That Is Too Narrow
When you use a very thin ribbon on a large, heavy bouquet, the bow can look lost or out of proportion.
Narrow ribbons also tend to cut into the stems rather than supporting them, which can lead to the flowers drooping over time.
Choose a width of at least one inch for most standard bouquets to ensure the bow has enough visual impact and structural integrity.
Forgetting to Secure the Stems First
Many people try to use the decorative ribbon to hold the entire weight of the flowers together from the start.
This often results in a loose, messy bouquet because ribbon can stretch or slip against the smooth surfaces of the stems.
Always use a hidden layer of floral tape or sturdy twine to do the heavy lifting before you ever bring the ribbon into the picture.
Cutting the Tails Before the Bow is Finished
It is tempting to cut the ribbon to what looks like the right size before you start tying, but this often leads to tails that are too short.
The process of looping and knotting consumes more ribbon than you might realize, leaving you with tiny stubs instead of elegant streamers.
Keep your ribbon on the spool or cut a much longer piece than you think you need, then do your final trimming only once the bow is perfect.
Troubleshooting
The Bow Keeps Sliding Down the Stems
This usually happens when the ribbon is too silky or the stems are particularly smooth and waxy.
To fix this, you can wrap a small piece of double-sided tape around the stems where the bow will sit to provide extra grip.
Alternatively, thread a floral pin through the knot of the bow and directly into the stems to anchor it firmly in place.
The Loops Are Floppy and Lifeless
If your loops won’t hold their shape, the ribbon might be too soft or thin for the style of bow you are trying to create.
You can solve this by using a wired-edge ribbon which allows you to “pose” the loops and keep them full of volume.
If you must use a soft ribbon, try making the loops smaller or doubling up the ribbon to give the fabric more body and resistance.
Key Takeaways
- Prep is Essential: Always clean and secure your stems with tape or twine before adding the ribbon.
- Choose Quality: Double-faced ribbon ensures your bow looks beautiful from every angle and photo.
- Scale Matters: Match the width of your ribbon and the size of your loops to the overall volume of the bouquet.
- The Finish Counts: Professional “V” cuts on the tails elevate the entire look from DIY to designer.
- Secure the Knot: A firm central knot is the secret to a bow that lasts through an entire ceremony or party.
Frequently Asked Questions
What is the best ribbon for a bridal bouquet?
Silk or velvet are the most popular choices for weddings because they look luxurious and photograph beautifully without a harsh glare. They also feel soft in the hand, which is important for a bride who will be holding the bouquet for several hours throughout the day.
How do I keep the ribbon from getting wet?
Dry the stems thoroughly with a paper towel before wrapping the ribbon, especially if the flowers have been sitting in a vase of water. You can also leave the very bottom of the stems exposed so they can stay in water without the ribbon touching the surface of the liquid.
Can I use multiple ribbons on one bouquet?
Yes, layering ribbons is a fantastic way to add texture and depth to your floral design. Try a wide, solid-colored satin ribbon as the base and tie a thinner, sheer organza or lace ribbon over the top for a romantic, multi-dimensional effect.
How long should the tails of the bow be?
The length of the tails depends on the style of the event, but a general rule is to have them extend at least three to five inches past the bottom of the stems. For a dramatic, boho-inspired look, tails that reach all the way to the floor can create a stunning visual impact as the person walks.
Our Top Recommended Finds
- Double-Faced Satin Ribbon: This is a versatile staple for any craft kit, offering a smooth finish and rich color on both sides of the fabric.
- Professional Fabric Scissors: Investing in a pair of dedicated fabric shears will prevent frayed edges and make your DIY projects much faster and easier.
- Waterproof Floral Tape: This is the secret tool professionals use to keep stems perfectly in place before adding the decorative final touches.
Bring Your Floral Vision To Life
Now that you have mastered the art of the perfect bouquet bow, you can approach your next celebration with total confidence.
Whether you are preparing a gift for a dear friend or styling the centerpieces for a milestone birthday, these small details make all the difference.
Try experimenting with different textures like rustic twine paired with delicate lace or bold neon ribbons for a modern summer party.
The more you practice, the more you will develop your own unique style that leaves your guests wondering which high-end florist you hired.
Gather your favorite blooms today and start practicing—your next event is the perfect canvas for your new creative skills.