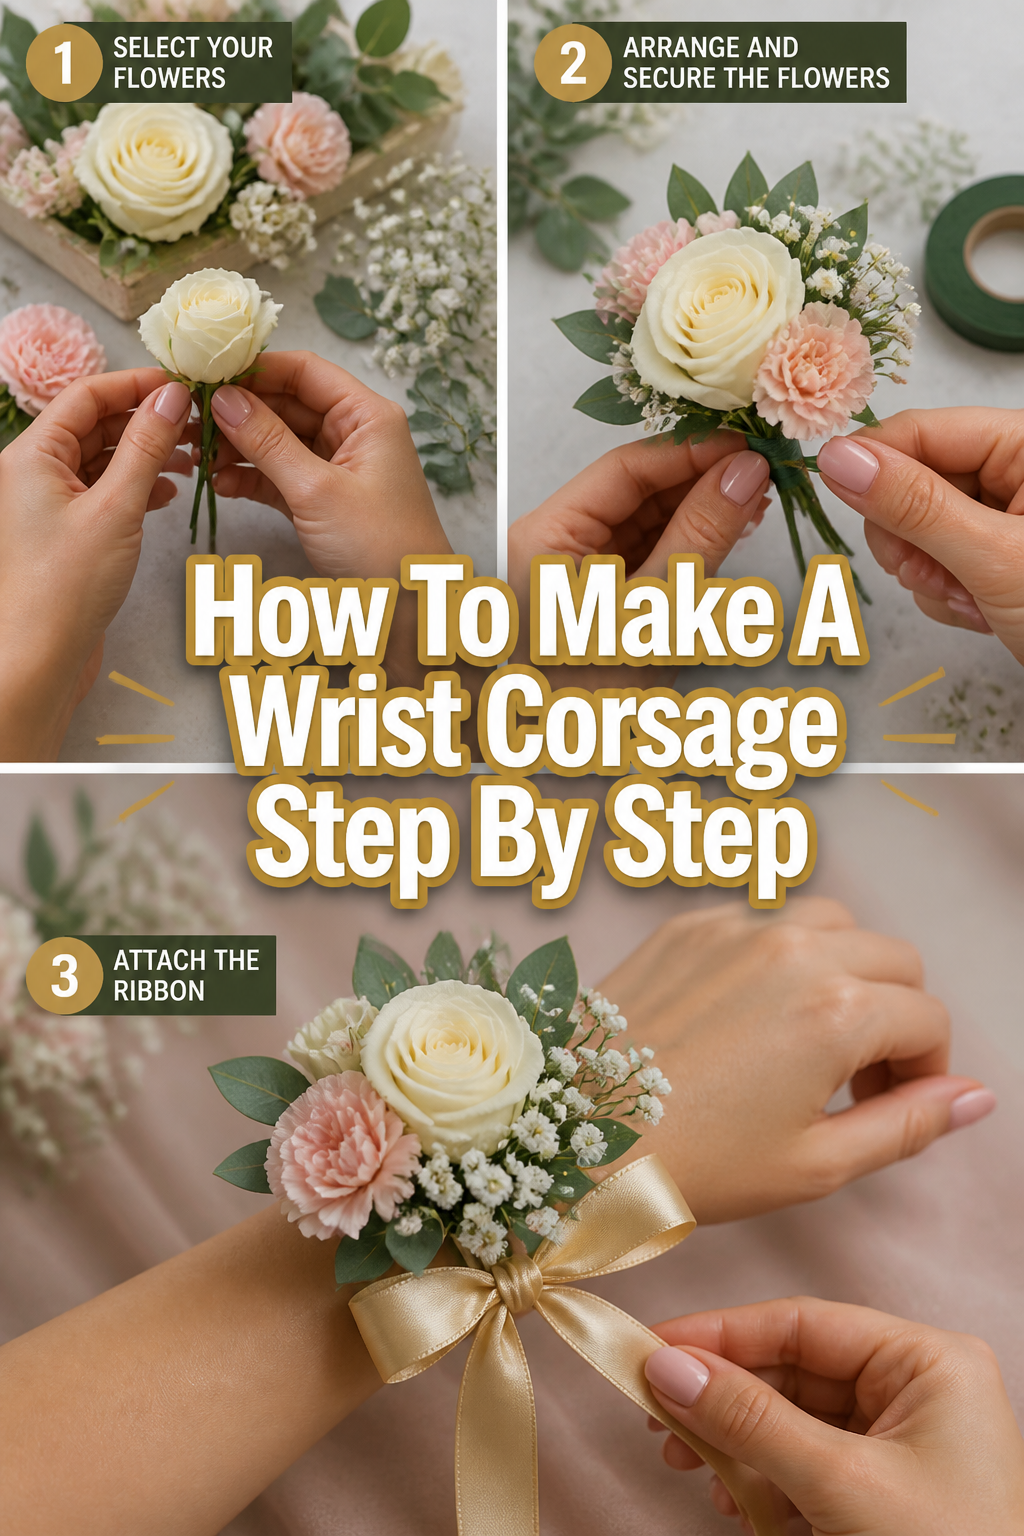
💐 How To Make A Wrist Corsage Step By Step
📋 The Event Planner's Essential Toolkit
Whether you're throwing a massive birthday bash or an intimate baby shower, the right tools make execution effortless. These are the 5 essential items that professional event coordinators and DIY party hosts consistently rely on to pull off flawless celebrations without the stress.
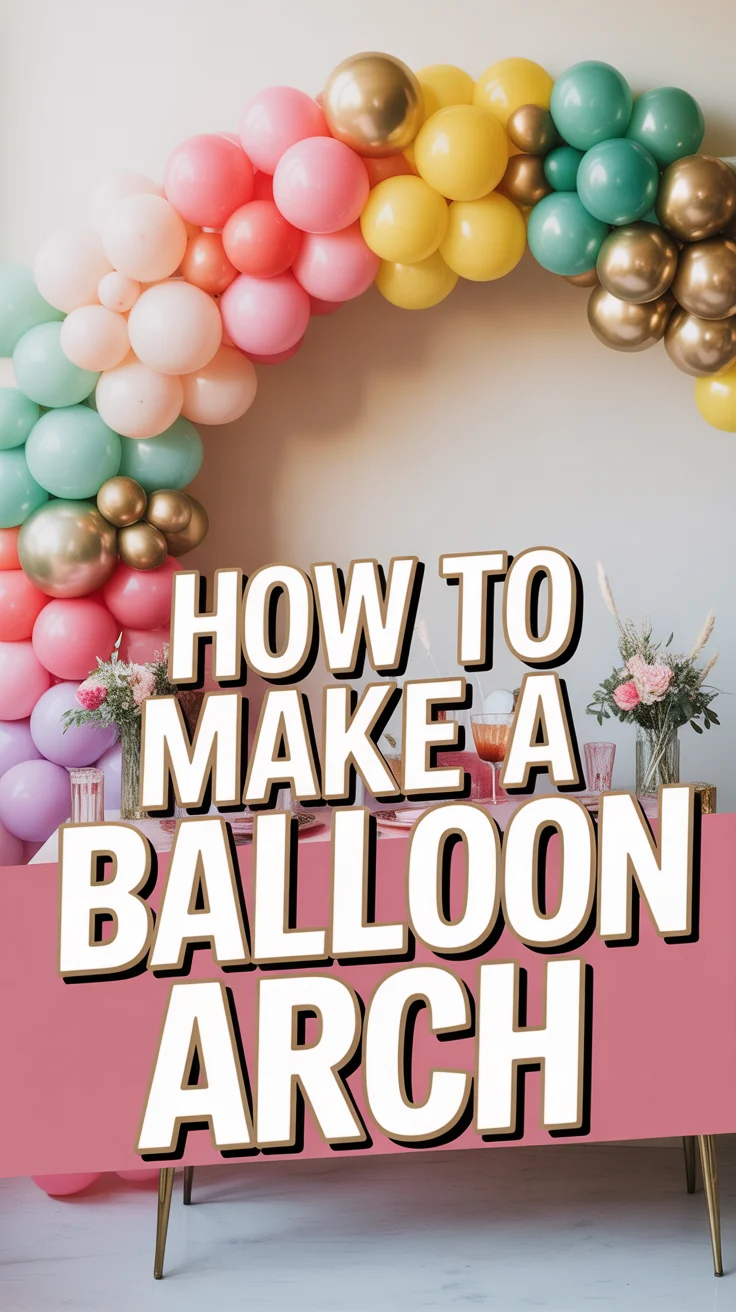
🎈 Electric Dual-Nozzle Balloon Pump
The absolute lifeline for creating those trending balloon arches and garlands that everyone loves. This dual-nozzle pump lets you inflate hundreds of balloons in a fraction of the time, saving your lungs and transforming hours of prep work into minutes.
🛡️ Command Clear Party Hooks & Strips
The secret to magazine-worthy venue decorations without losing your security deposit. Professional planners stock up on these clear, damage-free hooks to hang banners, string lights, and paper lanterns securely on walls and ceilings, removing cleanly when the party is over.
🧁 Wilton Tiered Cupcake & Dessert Stand
The easiest way to make a simple dessert table look professionally catered. This customizable, multi-tier display stand gives crucial height and dimension to your treats, effortlessly elevating the presentation of cupcakes, cookies, or appetizers at any gathering.
🚂 Heavy-Duty Collapsible Utility Wagon
The unsung hero of off-site parties, park birthdays, and trunk-or-treats. This rugged folding wagon hauls folding chairs, coolers, and mountains of decor from your car to the venue in one trip, completely eliminating the exhausting pre-party back-and-forth hauling.
📓 Clever Fox Event Planner Organizer
The ultimate command center for keeping your sanity intact while hosting. Dedicated sections for guest lists, budget tracking, vendor contacts, and day-of timelines ensure that not a single crucial detail falls through the cracks before the big day.
Imagine the joy of gifting a handmade treasure, crafted with love for a special moment. You can absolutely create a stunning wrist corsage, a beautiful accessory that celebrates life’s milestones. I’ve personally made these for countless family gatherings and friend’s parties, seeing the smiles they bring. This guide shares all my favorite tips and tricks, ensuring your creation is a true showstopper.

Quick Overview
Crafting a wrist corsage is a delightful way to add a personal, elegant touch to any celebration. You’ll learn to transform fresh flowers into a wearable work of art.
- Time needed: 45-75 minutes (including flower prep)
- Difficulty: Beginner
- What you’ll need: Fresh flowers, greenery, floral wire, floral tape, ribbon, scissors, wire cutters, corsage bracelet base.
Step-by-Step Instructions
Step 1: Gather Your Lovely Materials
Start by collecting all your chosen flowers, greenery, and tools. Having everything neatly laid out makes the crafting process so much smoother and more enjoyable. Think of this as setting the stage for your floral masterpiece.
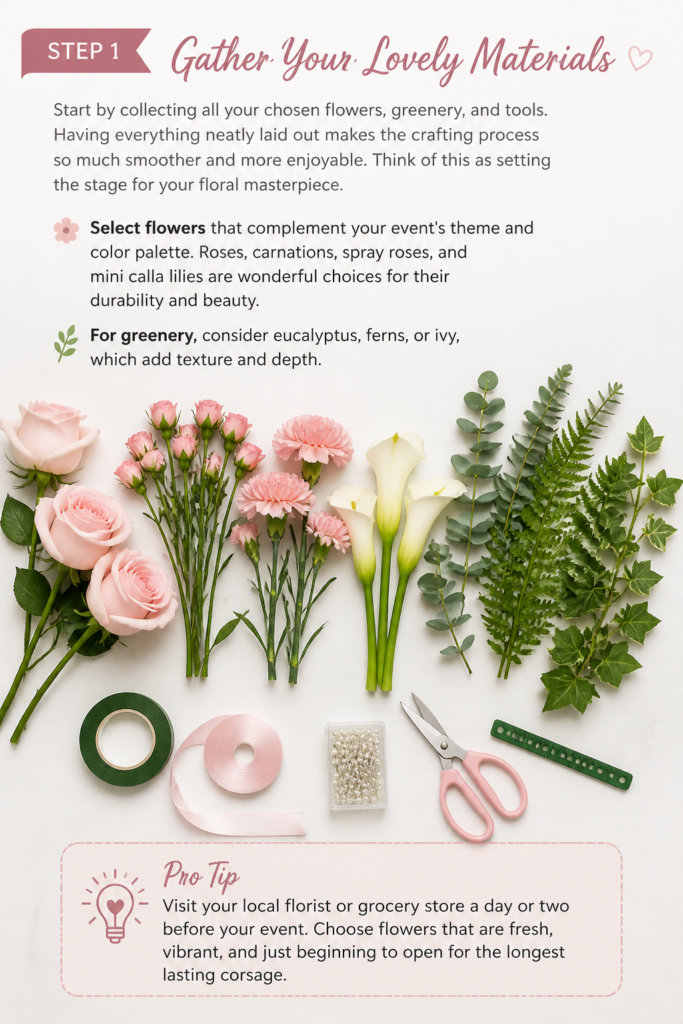
Select flowers that complement your event’s theme and color palette. Roses, carnations, spray roses, and mini calla lilies are wonderful choices for their durability and beauty. For greenery, consider eucalyptus, ferns, or ivy, which add texture and depth.
Pro Tip: Visit your local florist or grocery store a day or two before your event. Choose flowers that are fresh, vibrant, and just beginning to open for the longest lasting corsage.
Step 2: Prepare Your Blooms with Care
Trim your fresh flower stems to about 1-2 inches, removing any leaves or thorns below the bloom. This ensures a clean workspace and prepares the flowers for wiring. Gently mist your flowers with water and keep them cool if you’re not using them immediately.
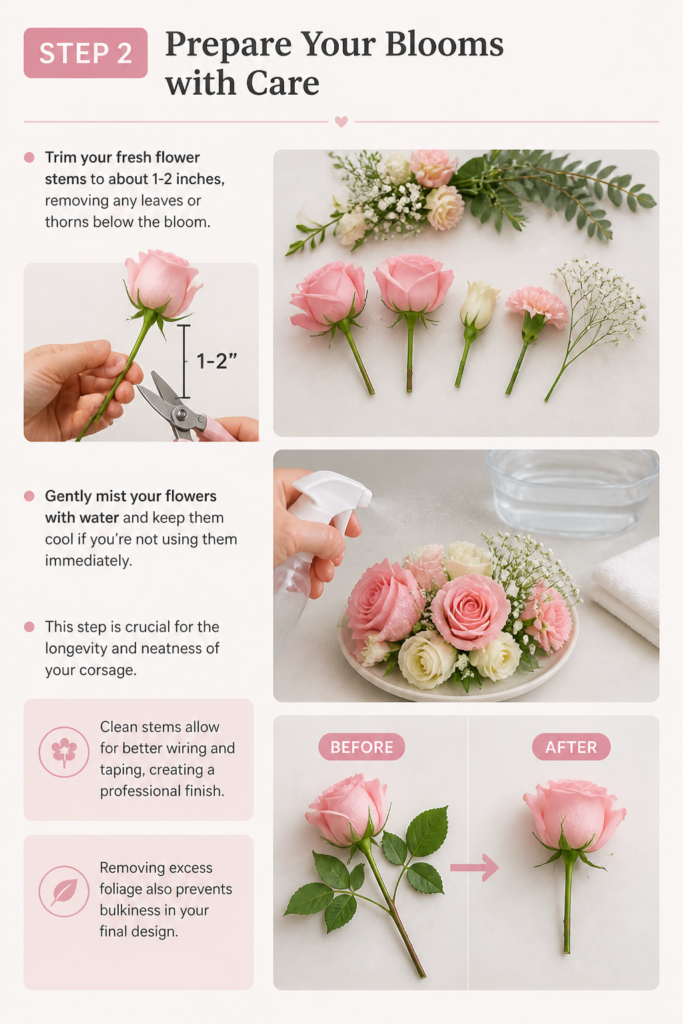
This step is crucial for the longevity and neatness of your corsage. Clean stems allow for better wiring and taping, creating a professional finish. Removing excess foliage also prevents bulkiness in your final design.
Step 3: Wire Each Delicate Flower
Cut a piece of floral wire (around 20-22 gauge) to about 6-8 inches long. Carefully push the wire through the base of the flower calyx, just beneath the bloom, creating a U-shape. Bend the two wire ends down parallel to the stem.
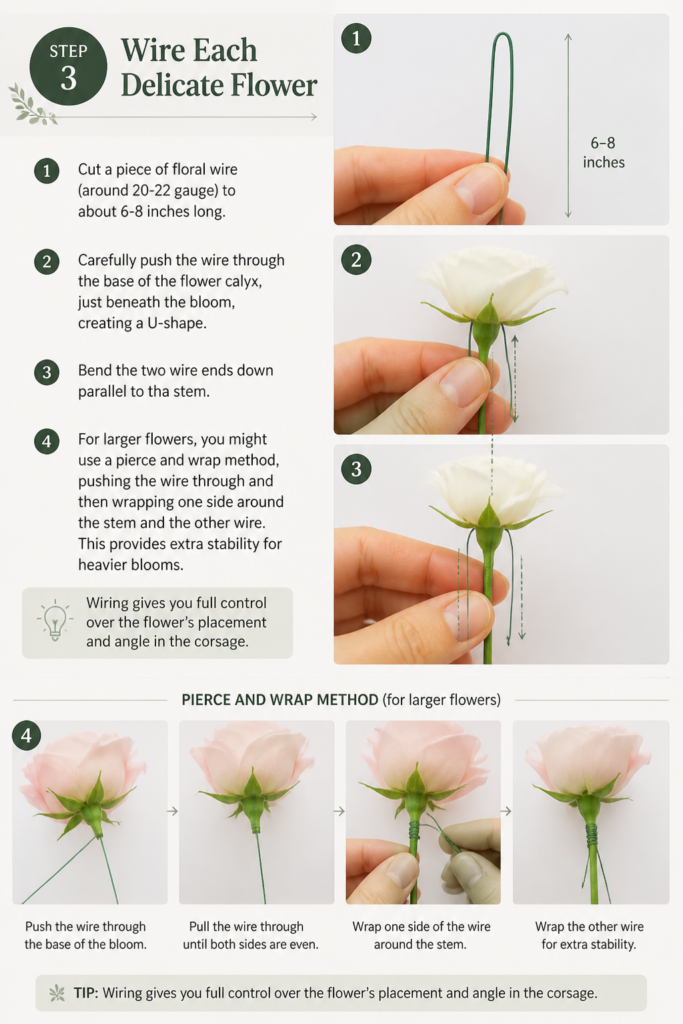
For larger flowers, you might use a “pierce and wrap” method, pushing the wire through and then wrapping one side around the stem and the other wire. This provides extra stability for heavier blooms. Wiring gives you full control over the flower’s placement and angle in the corsage.
Step 4: Tape the Wired Stems Neatly
Starting at the base of the flower, just below the calyx, begin wrapping the floral tape firmly around the wired stem. Stretch the tape slightly as you wrap, working your way down the entire length of the wire. The tape adheres to itself when stretched.
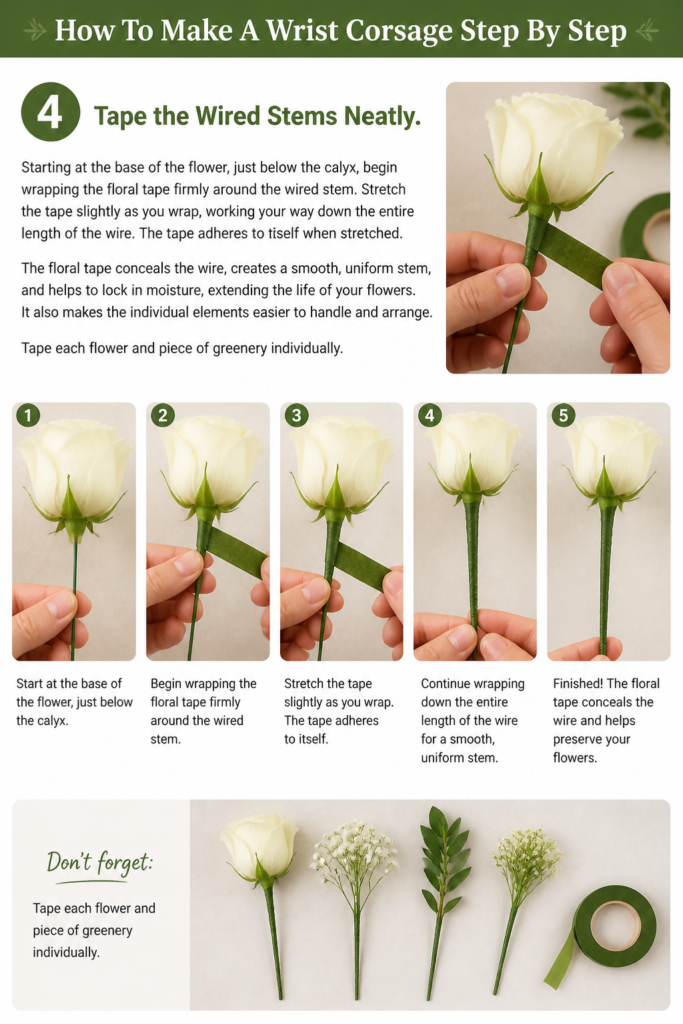
The floral tape conceals the wire, creates a smooth, uniform stem, and helps to lock in moisture, extending the life of your flowers. It also makes the individual elements easier to handle and arrange. Tape each flower and piece of greenery individually.
Step 5: Assemble Your Floral Cluster
Begin to cluster your main flowers together, holding them firmly in your hand. Start with your largest or focal bloom, then add smaller flowers around it, considering their height and angle. This forms the heart of your corsage design.
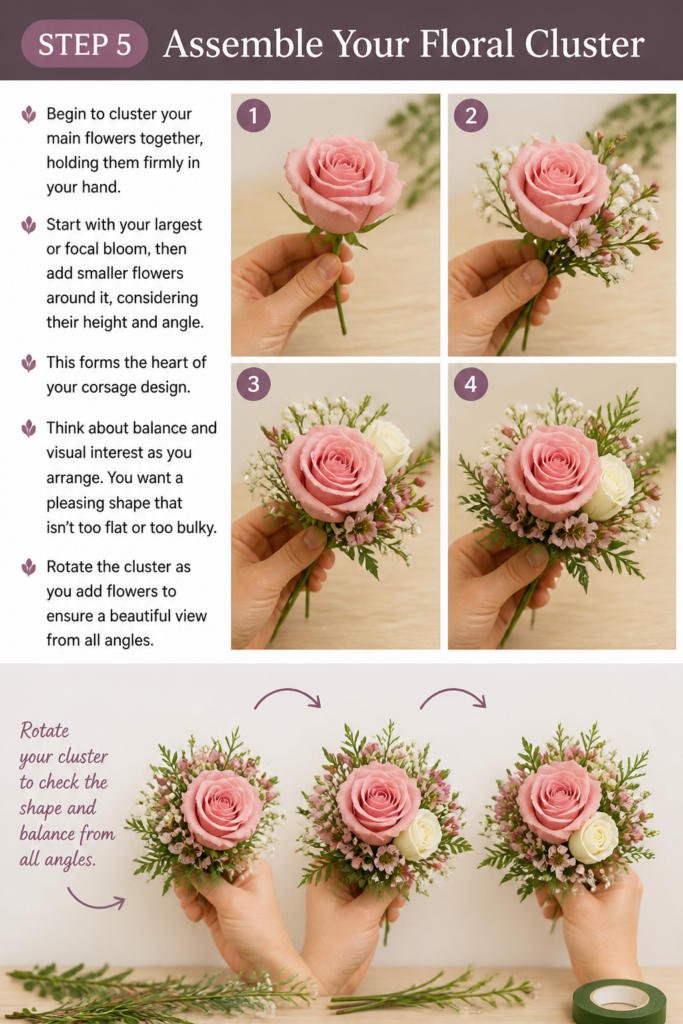
Think about balance and visual interest as you arrange. You want a pleasing shape that isn’t too flat or too bulky. Rotate the cluster as you add flowers to ensure a beautiful view from all angles.
Step 6: Integrate Greenery and Fillers
Once your main flower cluster is established, gently tuck in pieces of greenery and filler flowers like baby’s breath or limonium. Use the taped wires of these elements to secure them within the cluster. Greenery provides a lovely backdrop and frames the blooms.
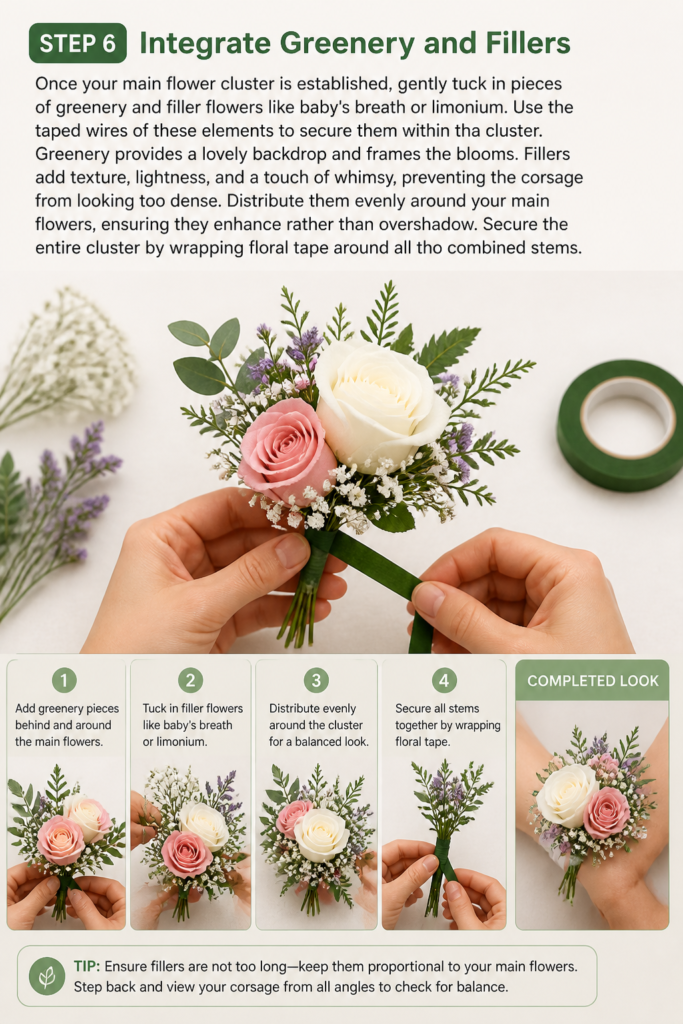
Fillers add texture, lightness, and a touch of whimsy, preventing the corsage from looking too dense. Distribute them evenly around your main flowers, ensuring they enhance rather than overshadow. Secure the entire cluster by wrapping floral tape around all the combined stems.
Step 7: Attach to the Corsage Bracelet Base
Take your finished floral cluster and carefully position it onto your chosen corsage bracelet base. Many bases have small loops or a flat pad designed for attachment. Use a small piece of floral wire to securely fasten the taped stems of your cluster to the bracelet.
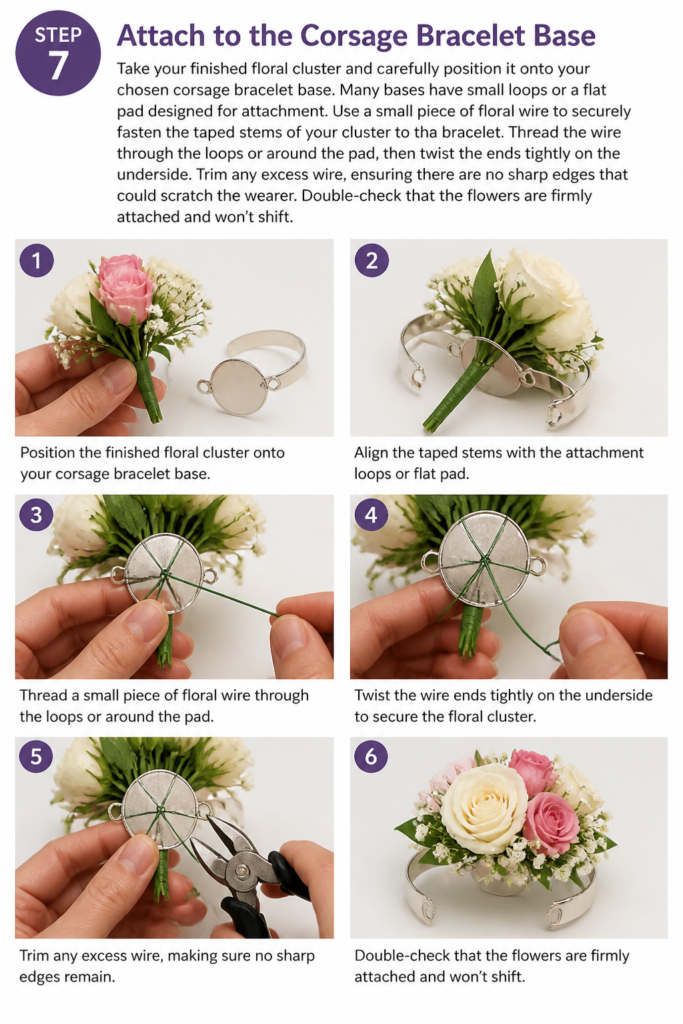
Thread the wire through the loops or around the pad, then twist the ends tightly on the underside. Trim any excess wire, ensuring there are no sharp edges that could scratch the wearer. Double-check that the flowers are firmly attached and won’t shift.
Step 8: Add the Finishing Ribbon Touches
Select a beautiful ribbon that complements your flowers and event theme. Cut several lengths of ribbon, perhaps 12-18 inches each. Create loops or small bows and attach them to the base of your floral cluster, near where it meets the bracelet.
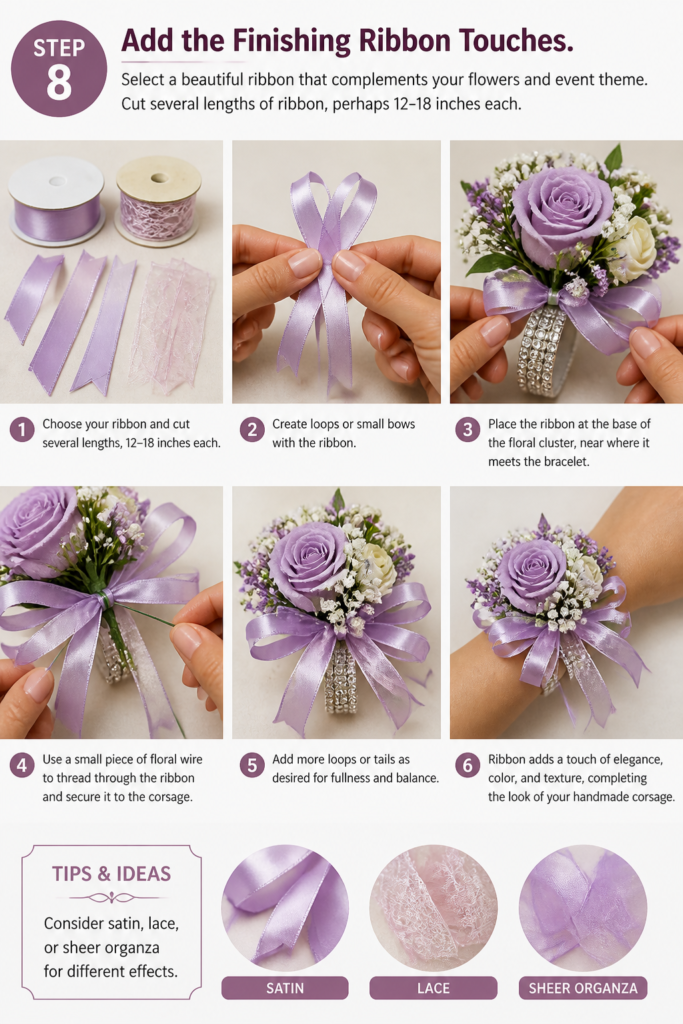
You can use a small piece of floral wire to thread through the ribbon and secure it to the corsage. Ribbon adds a touch of elegance, color, and texture, completing the look of your handmade corsage. Consider satin, lace, or sheer organza for different effects.
Common Mistakes to Avoid
Over-stuffing the Corsage
Trying to fit too many flowers and greens into one corsage can make it appear bulky and heavy. This often results in a corsage that is uncomfortable to wear and loses its delicate charm. Focus on a few key blooms and elegant accents instead. Aim for a balanced, airy design that highlights each individual flower’s beauty.
Leaving Wires Exposed
Failing to fully tape all wires leaves sharp edges that can scratch the wearer or snag clothing. Exposed wires also detract from the professional finish of your corsage. Always ensure every piece of floral wire is completely covered with floral tape for safety and aesthetics. Take your time during the taping step to be thorough.
Using Wilted or Old Flowers
Starting with flowers that are past their prime will result in a corsage that wilts quickly and looks tired. The beauty of a corsage lies in its freshness and vibrancy. Always choose the freshest possible blooms and condition them properly before you begin crafting. Hydrate them in water for several hours beforehand.
Skipping the Wiring Step
Some beginners might try to simply tape stems together without wiring. This leads to a flimsy corsage where flowers can easily break off or shift out of place. Wiring provides the essential structural integrity needed for a durable and beautifully shaped corsage. Each bloom needs its own wired support.
Troubleshooting
Flowers Wilting Too Quickly
If your corsage looks droopy shortly after completion, it’s likely due to lack of hydration or poor flower selection. Ensure you start with fresh, well-hydrated flowers. After assembly, lightly mist the corsage with water and store it in a cool, humid environment, like a refrigerator (away from fruits that release ethylene gas). You can also use a floral sealant spray for extra protection.
Corsage Feels Too Heavy or Uncomfortable
A heavy corsage suggests you’ve used too many large blooms or too much material. Next time, opt for smaller, lighter flowers and more delicate greenery. You might also consider using a wider, more comfortable bracelet base. Balance is key; fewer, carefully chosen elements often create a more impactful and wearable design.
Flowers Keep Falling Out
This usually indicates that your wiring or taping wasn’t secure enough. Make sure each flower and piece of greenery is firmly wired and taped individually before combining them. When assembling the cluster, wrap the floral tape tightly around all the combined stems. Double-check the attachment to the bracelet base, ensuring the wire is twisted securely.
Key Takeaways
- Always begin with the freshest, most vibrant flowers to ensure a long-lasting and beautiful corsage.
- Wiring each individual bloom and piece of greenery provides essential structure and control over your design.
- Thoroughly taping all wires not only protects the wearer but also creates a clean, professional finish.
- Focus on balance and thoughtful arrangement to create a cohesive and elegant floral cluster.
- Securely attach your floral design to the corsage bracelet base to prevent any shifting or falling flowers.
- Ribbon is the perfect final touch, adding elegance and personality to your handmade creation.
Frequently Asked Questions
How far in advance can I make a wrist corsage?
You can typically make a wrist corsage 1-2 days before the event. Store it in a cool, dark place, like a refrigerator, inside a box or plastic container to maintain humidity. Avoid placing it near fruits, as they release gases that can cause flowers to age rapidly.
What flowers are best for a wrist corsage?
Durable flowers that hold up well out of water are ideal. Popular choices include spray roses, mini carnations, orchids, freesia, and baby’s breath. Eucalyptus and leather leaf are excellent greenery options. Consider the event’s color scheme and theme when choosing.
Do I need a special corsage bracelet?
While you can attach a corsage to a simple elastic band, a dedicated corsage bracelet base offers more stability and a polished look. These often come with a flat pad or small loops designed for easy and secure attachment of your floral cluster. They are readily available at craft stores.
How do I make the corsage last longer?
Start with fresh, well-hydrated flowers. Mist the finished corsage lightly with water or a floral sealant spray. Store it in a refrigerator in a sealed container or plastic bag to keep it cool and humid until just before the event. Avoid direct sunlight or heat.
Our Top Recommended Finds
- Floral Wire (22-gauge): Essential for providing structure and flexibility to individual blooms.
- Floral Tape (Green): Self-adhesive when stretched, perfect for covering wires and creating neat stems.
- Corsage Bracelet Bases: A comfortable and secure foundation for your beautiful floral design.
Ready to Craft Your Own Celebrations?
Isn’t it wonderful to think about the personal touch a handmade corsage adds to any celebration? This little floral accessory isn’t just for proms; it’s perfect for birthdays, baby showers, holiday gatherings, or as a thoughtful gift. Imagine a pastel corsage for a spring baby shower, or vibrant blooms for a milestone birthday.
Now that you have the steps, you’re ready to create something truly special. Let your creativity bloom and inspire your next party theme. Perhaps a “Secret Garden” birthday with everyone wearing a unique floral accent, or a “Winter Wonderland” holiday party featuring frosty white and silver corsages. The possibilities are endless, and the joy of creating is all yours. Go on, make someone’s day a little more beautiful!