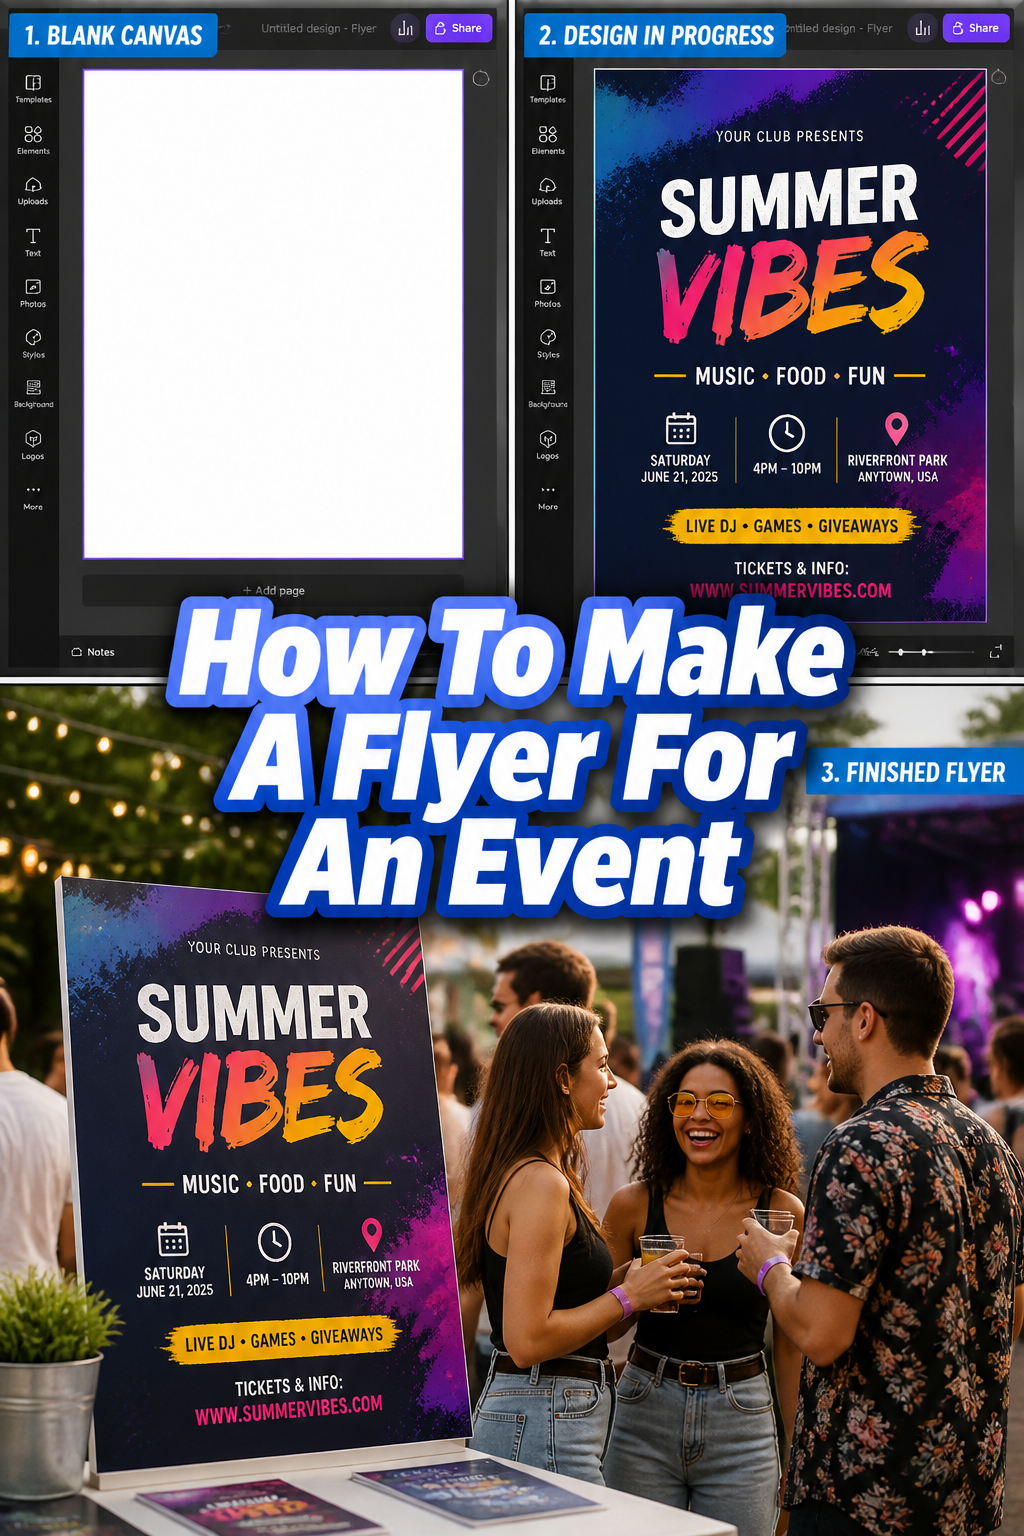
How To Make A Flyer For An Event
📋 The Event Planner's Essential Toolkit
Whether you're throwing a massive birthday bash or an intimate baby shower, the right tools make execution effortless. These are the 5 essential items that professional event coordinators and DIY party hosts consistently rely on to pull off flawless celebrations without the stress.
🎈 Electric Dual-Nozzle Balloon Pump
The absolute lifeline for creating those trending balloon arches and garlands that everyone loves. This dual-nozzle pump lets you inflate hundreds of balloons in a fraction of the time, saving your lungs and transforming hours of prep work into minutes.
🛡️ Command Clear Party Hooks & Strips
The secret to magazine-worthy venue decorations without losing your security deposit. Professional planners stock up on these clear, damage-free hooks to hang banners, string lights, and paper lanterns securely on walls and ceilings, removing cleanly when the party is over.
🧁 Wilton Tiered Cupcake & Dessert Stand
The easiest way to make a simple dessert table look professionally catered. This customizable, multi-tier display stand gives crucial height and dimension to your treats, effortlessly elevating the presentation of cupcakes, cookies, or appetizers at any gathering.
🚂 Heavy-Duty Collapsible Utility Wagon
The unsung hero of off-site parties, park birthdays, and trunk-or-treats. This rugged folding wagon hauls folding chairs, coolers, and mountains of decor from your car to the venue in one trip, completely eliminating the exhausting pre-party back-and-forth hauling.
📓 Clever Fox Event Planner Organizer
The ultimate command center for keeping your sanity intact while hosting. Dedicated sections for guest lists, budget tracking, vendor contacts, and day-of timelines ensure that not a single crucial detail falls through the cracks before the big day.
Planning a special event is such a joy, isn’t it? It’s about creating memories, celebrating milestones, and bringing people together for moments of pure happiness. I’ve personally found that the journey often begins with a spark of excitement, and that spark needs to be shared.
That’s where a fantastic flyer comes in. It’s your event’s first impression, a little paper invitation that promises fun and festivity. Let’s make one that truly shines, perfectly setting the stage for your unforgettable gathering.

Quick Overview
Crafting a beautiful flyer is easier than you think. You’ll soon have a stunning piece ready to announce your big day. Get ready to sprinkle some magic!
- Time needed: 1-3 hours (depending on design complexity)
- Difficulty: Beginner
- What you’ll need: Computer or tablet, internet access, design software (free or paid), event details, inspiring images
Step-by-Step Instructions
Step 1: Envision Your Celebration’s Spirit
Before you even open a design program, close your eyes and picture your event. Is it a whimsical baby shower filled with pastel balloons and tiny treats? Perhaps it’s a vibrant birthday bash with a tropical theme, or a cozy holiday gathering with warm, inviting vibes.
Think about the feeling you want to evoke. This initial vision will guide every design choice you make, from colors to fonts. A clear picture helps ensure your flyer perfectly matches the celebration itself.
Pro Tip: Create a Pinterest board for your event! Pin colors, fonts, decorations, and even gift ideas that match your desired aesthetic. This visual mood board will be your secret weapon for a cohesive flyer design.
Step 2: Gather All the Essential Details
A flyer’s main job is to inform. Make a clear list of everything your guests absolutely need to know. This prevents confusion and ensures everyone arrives ready to celebrate.
Start with the basics: what is the event, when is it, and where will it be held? Don’t forget who is hosting and how to RSVP.
Consider adding any special instructions, like a dress code or a gift registry link for a baby shower or wedding shower. For a birthday party, you might mention if it’s a surprise or a specific theme.
Step 3: Choose Your Design Playground
Now it’s time to pick your digital canvas. There are many fantastic tools available, catering to all skill levels. Explore options like Canva, Adobe Express, or even more advanced tools like Adobe Illustrator if you’re feeling adventurous.
Canva is incredibly user-friendly, offering thousands of templates perfect for beginners. Adobe Express provides similar ease of use with professional results. Pick a tool that feels comfortable and inspiring.
Step 4: Select a Template or Start Fresh
If you’re using a design platform, browsing templates is a wonderful starting point. Look for designs that resonate with your event’s spirit you envisioned earlier. A template can save you a lot of time and effort.
Don’t be afraid to customize a template to make it uniquely yours. Change colors, fonts, and images to perfectly reflect your theme. If you’re feeling artistic, starting from a blank canvas allows for complete creative freedom.
Step 5: Craft Your Compelling Headline and Body Copy
Your headline is the first thing people read, so make it exciting! “Join Us for a Twinkle, Twinkle Little Star Baby Shower” is far more inviting than just “Baby Shower.” Make it celebratory and specific.
The body copy should then provide all the details you gathered in Step 2. Keep sentences short and clear, using bullet points for readability. Remember, this isn’t a novel, it’s an invitation to fun!
Infuse your text with warmth and enthusiasm. Instead of “RSVP by Date,” try “Kindly RSVP by [Date] so we can prepare for your arrival!” It adds a personal touch.
Step 6: Pick Your Palette and Fonts
Colors set the mood. For a vibrant birthday, think bright yellows and oranges. A sophisticated holiday dinner might call for deep greens, golds, and rich reds. Use colors that align with your Pinterest mood board.
Choose two to three fonts that complement each other. One elegant script for the headline, a clean sans-serif for details, and perhaps a playful accent font. Make sure they are legible and reflect your theme.
Avoid using too many different fonts, as this can make your flyer look cluttered. Consistency is key to a polished, professional appearance.
Step 7: Incorporate Inspiring Visuals
This is where your flyer truly comes alive! High-quality images or graphics are essential. For a baby shower, think adorable illustrations of storks or tiny booties. For a birthday, perhaps a festive cake or confetti.
If you don’t have your own photos, use stock photography sites (many design tools offer free libraries) or find charming illustrations. Ensure the visuals are high-resolution and fit your overall aesthetic.
You can also include a small map or QR code for directions, especially if your event location is new to guests. This adds a practical, helpful touch to your beautiful design.
Step 8: Arrange with Intention
Think about how your eyes move across the flyer. Important information should be easy to spot. Use a clear hierarchy, with the main event name prominent, followed by date, time, and location.
Leave some white space around elements; it helps the design breathe and prevents it from looking too busy. A well-organized flyer is a joy to behold and easy to understand.
Consider the “flow” of information. Does it guide the reader naturally from excitement to action (RSVP)? A thoughtful layout makes all the difference.
Step 9: Review, Refine, and Get Feedback
Before you print or share, scrutinize every detail. Check for typos, incorrect dates, or wrong addresses. It’s incredibly easy to miss a small error when you’ve been looking at it for a while.
Ask a friend or family member to review it. A fresh pair of eyes can catch mistakes you overlooked. They can also offer valuable feedback on clarity and appeal.
Make any necessary adjustments. This final polish ensures your flyer is perfect and ready to announce your wonderful event.
Step 10: Share Your Masterpiece!
Once your flyer is flawless, it’s time to share it with the world! You can print physical copies to hand out, or save it as a high-resolution image (PNG or JPG) or PDF to share digitally.
Email it to your guest list, post it on social media, or send it via messaging apps. Your beautiful flyer is now out there, building excitement for your special celebration!
Common Mistakes to Avoid
Overcrowding Your Flyer
Many people try to cram too much information onto one small flyer. This makes it look cluttered and overwhelming. Guests will struggle to find the key details amidst a sea of text and images, often leading to them ignoring the flyer altogether.
Instead, prioritize information. Only include what is absolutely essential. Use white space generously, and direct guests to a website or social media page for extra details if necessary. Keep it clean and inviting.
Inconsistent Branding or Theme
Imagine a flyer with mismatched fonts, clashing colors, and images that don’t quite fit the event’s theme. This inconsistency creates confusion and looks unprofessional. It fails to convey a clear message about the celebration.
Always stick to your chosen color palette and font pairing. Ensure all graphics and images align with your event’s specific theme, whether it’s a rustic birthday or a glamorous baby shower. Cohesion builds anticipation.
Neglecting a Clear Call to Action
A beautiful flyer is lovely, but if guests don’t know what to do next, it hasn’t fully served its purpose. Forgetting to include an RSVP date or contact information means missed attendees and planning headaches.
Clearly state what action you want guests to take. This could be “RSVP by [Date] to [Email/Phone],” “Visit [Website] for details,” or “Bring a dish to share!” Make it easy for them to respond.
Troubleshooting
My Flyer Looks Too Busy
If your flyer feels overwhelming, it’s time for a declutter. Step back and identify the absolute core message and essential details. Everything else might be distracting.
Try removing one or two non-essential graphic elements or shortening lengthy sentences. Increase the spacing between text blocks and images. More white space always helps a design feel cleaner and more inviting.
The Colors Don’t Match My Vision
Sometimes what looks good in your head doesn’t quite translate to the screen. If your colors feel off, revisit your mood board and color theory basics. Consider the emotions different colors evoke.
Experiment with different shades and tints within your chosen palette. Use online color palette generators for inspiration. Sometimes a slight adjustment in saturation or brightness can make all the difference.
Information Isn’t Easy to Read
If your text is hard to decipher, it defeats the purpose of the flyer. This often happens with overly decorative fonts for body text or insufficient contrast between text and background.
Ensure your main body text is in a clear, readable font. Use a strong contrast, like dark text on a light background or vice-versa. Increase font size for important details and avoid cramming lines too close together.
Key Takeaways
- Visualize First: Begin by envisioning your event’s unique spirit to guide all design choices.
- Detail-Oriented: Compile all necessary event information upfront to ensure nothing is missed.
- Design Smart: Utilize user-friendly design tools and templates to simplify the creation process.
- Cohesive Theme: Maintain consistent colors, fonts, and visuals that reflect your celebration’s theme.
- Clear Communication: Craft compelling headlines and provide all essential details clearly and concisely.
- Review Thoroughly: Always proofread and get feedback to catch any errors before sharing.
Frequently Asked Questions
What’s the best size for a flyer?
The most common flyer size is a standard letter (8.5 x 11 inches) or A4, which is great for printing. However, digital flyers can be any size, often optimized for social media feeds, like square (1080×1080 pixels) or story formats (1080×1920 pixels). Choose a size that suits where it will be displayed.
How can I make my flyer look professional without design experience?
Start with a high-quality template from platforms like Canva or Adobe Express. These templates are professionally designed and easy to customize. Focus on clear typography, a consistent color scheme, and using good-quality images. Less is often more when it comes to design, so avoid clutter.
Should I include an RSVP date?
Absolutely! Including an RSVP date is crucial for planning. It helps you get an accurate headcount for catering, seating, and party favors, especially for events like baby showers, milestone birthdays, or holiday dinners. It allows you to prepare adequately and ensures a smooth celebration.
What if my event details change after I’ve sent out the flyer?
If details change, act quickly to inform your guests. If possible, update the digital version of your flyer and resend it with a clear note highlighting the changes. For printed flyers, send out an announcement via email or social media, clearly stating the updated information and apologizing for any inconvenience.
Our Top Recommended Finds
- Canva Pro Subscription: Access to premium templates, fonts, and stock photos, making your designs truly stand out.
- High-Quality Card Stock: For physical flyers, printing on sturdy card stock (65-80 lb) gives a professional, luxurious feel.
- Color Palette Generator (e.g., Coolors): A fantastic online tool to help you discover beautiful and harmonious color schemes for your event.
Your Event’s Story Begins Now
Creating a flyer isn’t just about sharing information; it’s about igniting excitement. It’s the first hint of the joy, laughter, and beautiful memories yet to come. Think of it as crafting the opening chapter of your event’s story.
You now have all the tools and inspiration to design a flyer that truly captures the magic of your celebration. Don’t wait for “someday” to bring your vision to life. Start designing your unforgettable event’s flyer today, and watch the anticipation bloom!