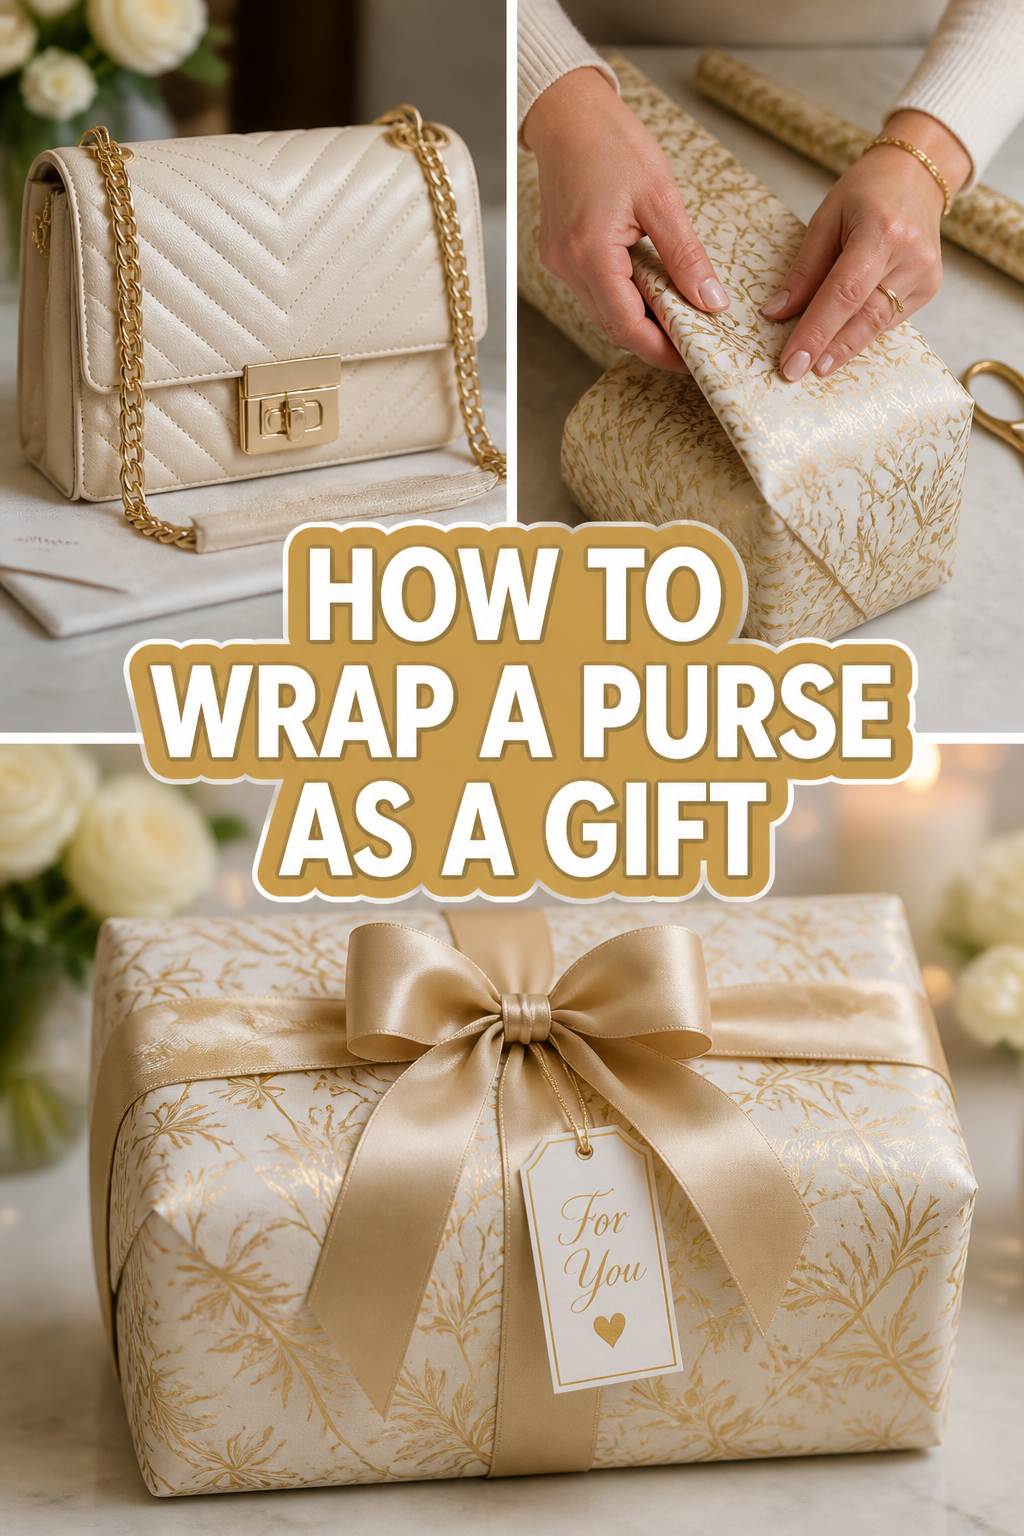
🎁 How To Wrap A Purse As A Gift
📋 The Event Planner's Essential Toolkit
Whether you're throwing a massive birthday bash or an intimate baby shower, the right tools make execution effortless. These are the 5 essential items that professional event coordinators and DIY party hosts consistently rely on to pull off flawless celebrations without the stress.
🎈 Electric Dual-Nozzle Balloon Pump
The absolute lifeline for creating those trending balloon arches and garlands that everyone loves. This dual-nozzle pump lets you inflate hundreds of balloons in a fraction of the time, saving your lungs and transforming hours of prep work into minutes.
🛡️ Command Clear Party Hooks & Strips
The secret to magazine-worthy venue decorations without losing your security deposit. Professional planners stock up on these clear, damage-free hooks to hang banners, string lights, and paper lanterns securely on walls and ceilings, removing cleanly when the party is over.
🧁 Wilton Tiered Cupcake & Dessert Stand
The easiest way to make a simple dessert table look professionally catered. This customizable, multi-tier display stand gives crucial height and dimension to your treats, effortlessly elevating the presentation of cupcakes, cookies, or appetizers at any gathering.
🚂 Heavy-Duty Collapsible Utility Wagon
The unsung hero of off-site parties, park birthdays, and trunk-or-treats. This rugged folding wagon hauls folding chairs, coolers, and mountains of decor from your car to the venue in one trip, completely eliminating the exhausting pre-party back-and-forth hauling.
📓 Clever Fox Event Planner Organizer
The ultimate command center for keeping your sanity intact while hosting. Dedicated sections for guest lists, budget tracking, vendor contacts, and day-of timelines ensure that not a single crucial detail falls through the cracks before the big day.
There’s a unique thrill in giving a gift, especially when it’s something as cherished as a beautiful purse.
I’ve personally wrapped dozens of these treasures, from sleek clutches for a friend’s milestone birthday to playful totes for a baby shower, and I know the secret to making the presentation as exciting as the gift itself.
This guide will share all my best tips, ensuring your wrapped purse becomes a stunning, Pinterest-worthy moment that truly celebrates the recipient.

Quick Overview
Get ready to transform a simple gift into an unforgettable unveiling experience! You’ll learn how to elegantly wrap a purse, no matter its shape or size, creating a presentation that speaks volumes.
- Time needed: 20-45 minutes (depending on embellishments)
- Difficulty: Beginner to Intermediate
- What you’ll need: Wrapping paper, tissue paper, gift box (optional), ribbon, tape, scissors, decorative elements.
Step-by-Step Instructions
Step 1: Choose Your Canvas – The Perfect Box or Bag
Select the right container for your purse. While you might be tempted to wrap the purse directly, using a sturdy gift box or a high-quality gift bag elevates the presentation significantly and protects the item.
Consider the purse’s size and shape. A structured box works wonders for maintaining the purse’s form, preventing creases or damage during transit or handling.
Opt for a box that’s slightly larger than the purse itself. This allows for ample cushioning with tissue paper and creates a more luxurious “reveal” when opened.
Pro Tip: For designer purses, often they come with a dust bag and their own presentation box. If so, you’re already halfway there! Just ensure the original box is in pristine condition. If not, a new, elegant box is your best friend.
Step 2: Create a Cloud of Cushion – Tissue Paper Magic
Line the bottom of your chosen gift box or bag with a generous layer of crumpled tissue paper. This forms a soft, protective nest for the purse.
Choose tissue paper colors that complement your wrapping paper or event theme. Think soft pastels for a baby shower, shimmering metallics for a holiday, or vibrant hues for a birthday celebration.
Fluff the tissue paper gently to create volume. This isn’t just about protection; it adds to the anticipation and visual appeal when the lid is lifted.
Step 3: Nest Your Treasure – Positioning the Purse
Place the purse carefully into its tissue paper bed. Ensure it’s centered and sitting comfortably, not squashed or tilted.
Stuff the purse itself with a little extra tissue paper, if needed, to help it maintain its shape. This is especially important for soft, unstructured bags that might otherwise collapse.
Arrange any straps or handles neatly within the box. You want the purse to look perfectly presented the moment it’s seen.
Step 4: The Grand Concealment – More Tissue Paper
Cover the purse completely with more layers of tissue paper. Create a beautiful, billowy effect by gently folding and tucking the edges around the purse.
Ensure no part of the purse is visible, building excitement for the reveal. This also provides an extra layer of protection against minor bumps.
Smooth the top layer of tissue paper to create a neat surface for the box lid or the next step of your wrapping journey.
Step 5: Master the Art of Wrapping – Paper Perfection
Measure your wrapping paper carefully. You want just enough to cover the box with minimal overlap, preventing bulky edges.
Cut the paper to size, allowing enough to wrap around the box’s length and about an inch or two overlap on the sides.
Position the box in the center of your paper. Fold one long edge over the box and secure it with double-sided tape for a seamless finish.
Fold the other long edge over, ensuring a tight, crisp wrap. Secure this seam with tape underneath for a truly polished look.
Tuck in the sides of the box like you’re wrapping a present. Create neat triangles on each side, folding them inwards, and secure with tape.
Pro Tip: For an extra elegant touch, use a heavy-duty, high-quality wrapping paper. Think textured papers, subtle patterns, or even metallic finishes that catch the light. This instantly elevates the gift.
Step 6: The Flourish – Ribbon and Bows
Choose a ribbon that complements your wrapping paper and the occasion. Silk, satin, velvet, or even rustic twine can create vastly different looks.
Wrap the ribbon around the box, either lengthwise, widthwise, or both, creating a crisscross pattern. Secure it on the bottom with a small piece of double-sided tape to prevent slipping.
Tie a beautiful bow on top. A classic four-loop bow, a simple knot, or even a cascading waterfall of multiple ribbons can add dramatic flair.
Curl the ends of the ribbon with scissors for a playful, celebratory touch, especially for birthdays or baby showers.
Step 7: The Personal Touch – Embellishments and Tags
Add a personalized gift tag. Hand-lettered tags, custom-printed labels, or even a small, decorative ornament can make the gift feel incredibly special.
Attach small, themed embellishments. Think a sprig of fresh eucalyptus for a minimalist look, a tiny baby rattle for a shower, or a delicate flower for a spring birthday.
Consider a wax seal on the ribbon for an old-world charm that speaks of luxury and thoughtfulness. This is pure Pinterest magic!
Present your beautifully wrapped purse with a warm smile and watch the excitement unfold. This isn’t just a gift; it’s an experience.
Common Mistakes to Avoid
Using the Wrong-Sized Box
Trying to squeeze a large purse into a small box, or letting a tiny clutch rattle around in an oversized one, detracts from the presentation. A poorly fitted box can damage the purse’s shape or make the gift look less luxurious. Always measure your purse and choose a box that offers just enough room for cushioning and a comfortable fit.
Skimping on Tissue Paper
Insufficient tissue paper means the purse isn’t properly protected and the “reveal” lacks that delightful fluffiness. It can also make the gift feel less substantial. Be generous with your tissue layers, both inside the box and wrapped around the purse itself, to create a plush, exciting presentation.
Messy Wrapping Paper Seams
Visible tape, uneven edges, or bulky overlaps can make even the most expensive wrapping paper look amateurish. Precision is key for a polished look. Use double-sided tape for invisible seams and take your time to fold edges cleanly and crisply, creating sharp lines and a professional finish.
Over-Decorating
While embellishments are wonderful, too many can make the gift look cluttered and overwhelming. The goal is elegance, not chaos. Choose one or two focal points – a beautiful ribbon, a unique tag, or a small, tasteful ornament – and let them shine without competing for attention.
Troubleshooting
The Purse Keeps Shifting in the Box
If your purse isn’t staying put, it likely needs more internal support or cushioning. Try adding extra crumpled tissue paper inside the purse itself to fill it out, preventing it from collapsing or sliding around. Then, add more tissue paper around all sides of the purse within the box to create a snug, secure fit.
My Ribbon Keeps Slipping Off
A slippery ribbon can be frustrating! The trick is to secure it discreetly. Before tying your bow, use a small piece of double-sided tape on the underside of the box where the ribbon crosses. This will anchor the ribbon in place, ensuring your beautiful bow stays perfectly positioned on top.
The Wrapping Paper Tears Easily
Thin or low-quality wrapping paper is prone to tearing, especially with corners and edges. Invest in thicker, higher-quality paper for purses, as they often have more defined shapes. If you’re stuck with thin paper, try doubling it up or handling it with extra care, using gentle, firm folds rather than sharp tugs.
Key Takeaways
- Prioritize Protection: Always use a sturdy box and ample tissue paper to safeguard the purse’s shape and material.
- Elevate with Layers: Thoughtful layering of tissue paper creates anticipation and a luxurious unboxing experience.
- Precision is Polish: Neat seams, crisp folds, and securely placed tape make all the difference in a professional-looking wrap.
- Choose Quality Materials: High-quality wrapping paper, ribbons, and embellishments instantly elevate the gift’s perceived value and aesthetic.
- Personalize Thoughtfully: A unique tag or small, themed adornment adds a heartfelt touch that makes the gift truly memorable.
- Embrace the Occasion: Tailor your wrapping style to the event, whether it’s a vibrant birthday, elegant anniversary, or joyful baby shower.
Frequently Asked Questions
Can I wrap a purse without a box?
While a box offers the best protection and a more structured presentation, you can wrap a purse directly. For soft, unstructured bags, consider wrapping them tightly in multiple layers of tissue paper first to provide some form, then proceed with wrapping paper. However, be aware it might not look as crisp or offer as much protection.
What’s the best way to wrap an unusually shaped purse?
For unique shapes, a gift bag is often the easiest and most elegant solution. Choose a bag that comfortably accommodates the purse, then fill it generously with coordinating tissue paper. If you’re set on wrapping, consider using fabric gift wrap (furoshiki style) which drapes beautifully around irregular forms, or create a custom-sized box from sturdy cardstock.
How can I make my gift wrap eco-friendly?
Embrace sustainable options! Use recycled or recyclable wrapping paper, or opt for reusable fabric wraps like scarves (which become part of the gift!). Decorate with natural elements like dried flowers or twine, and choose reusable ribbons. Encourage the recipient to repurpose the box and tissue paper, extending their lifecycle.
Should I remove the price tag?
Absolutely! Always remove all price tags, barcodes, and any store security devices before wrapping. This ensures the focus remains entirely on the thoughtful gift and avoids any awkward moments. Double-check inside pockets and hidden compartments too.
Our Top Recommended Finds
- Heavy-Duty Double-Sided Tape: Essential for seamless, professional-looking wraps without visible tape lines.
- Assorted High-Quality Tissue Paper Packs: Offers a variety of colors and textures to match any theme and provide luxurious cushioning.
- Satin or Velvet Ribbon Spools: Elevate any gift with their elegant drape and luxurious feel, perfect for creating stunning bows.
Your Journey to Unforgettable Gifting Begins Now!
See how simple it is to transform a beautiful purse into an extraordinary gift? The magic truly lies in the details, in the layers of tissue, the crispness of the wrap, and the thoughtful embellishments that whisper celebration.
This isn’t just about wrapping; it’s about crafting an experience, building anticipation, and making your loved ones feel incredibly cherished. Imagine the delight as they unwrap a gift that looks as exquisite as the treasure within!
Now that you’ve mastered the art of purse wrapping, why not explore creative ways to present other challenging gifts, like delicate jewelry or unique home decor? Each gift is an opportunity to express your creativity and spread joy.
Don’t wait for the next special occasion to practice your new skills. Grab some paper and ribbon today, and start dreaming up your next Pinterest-worthy gifting moment. Your next celebration is waiting for your touch of magic!