👕 How To Wrap A T Shirt For A Gift
📋 The Event Planner's Essential Toolkit
Whether you're throwing a massive birthday bash or an intimate baby shower, the right tools make execution effortless. These are the 5 essential items that professional event coordinators and DIY party hosts consistently rely on to pull off flawless celebrations without the stress.
🎈 Electric Dual-Nozzle Balloon Pump
The absolute lifeline for creating those trending balloon arches and garlands that everyone loves. This dual-nozzle pump lets you inflate hundreds of balloons in a fraction of the time, saving your lungs and transforming hours of prep work into minutes.
🛡️ Command Clear Party Hooks & Strips
The secret to magazine-worthy venue decorations without losing your security deposit. Professional planners stock up on these clear, damage-free hooks to hang banners, string lights, and paper lanterns securely on walls and ceilings, removing cleanly when the party is over.
🧁 Wilton Tiered Cupcake & Dessert Stand
The easiest way to make a simple dessert table look professionally catered. This customizable, multi-tier display stand gives crucial height and dimension to your treats, effortlessly elevating the presentation of cupcakes, cookies, or appetizers at any gathering.
🚂 Heavy-Duty Collapsible Utility Wagon
The unsung hero of off-site parties, park birthdays, and trunk-or-treats. This rugged folding wagon hauls folding chairs, coolers, and mountains of decor from your car to the venue in one trip, completely eliminating the exhausting pre-party back-and-forth hauling.
📓 Clever Fox Event Planner Organizer
The ultimate command center for keeping your sanity intact while hosting. Dedicated sections for guest lists, budget tracking, vendor contacts, and day-of timelines ensure that not a single crucial detail falls through the cracks before the big day.
There’s a special magic in presenting a gift that truly reflects your care and thoughtfulness. I’ve always believed that the wrapping is just as important as what’s inside, setting the stage for that exciting moment of discovery.
A beautifully wrapped T-shirt transforms a simple present into a cherished memory, making any occasion feel extraordinary. This guide will help you create stunning, Pinterest-worthy gift presentations every single time.

Quick Overview
You’re about to transform a simple T-shirt into a show-stopping gift, ready to delight your loved ones. We’ll cover everything from crisp folds to elegant embellishments.
- Time needed: 15-30 minutes (depending on desired embellishments)
- Difficulty: Beginner
- What you’ll need: T-shirt, wrapping paper, tape, scissors, ribbon, optional decorative elements
Step-by-Step Instructions
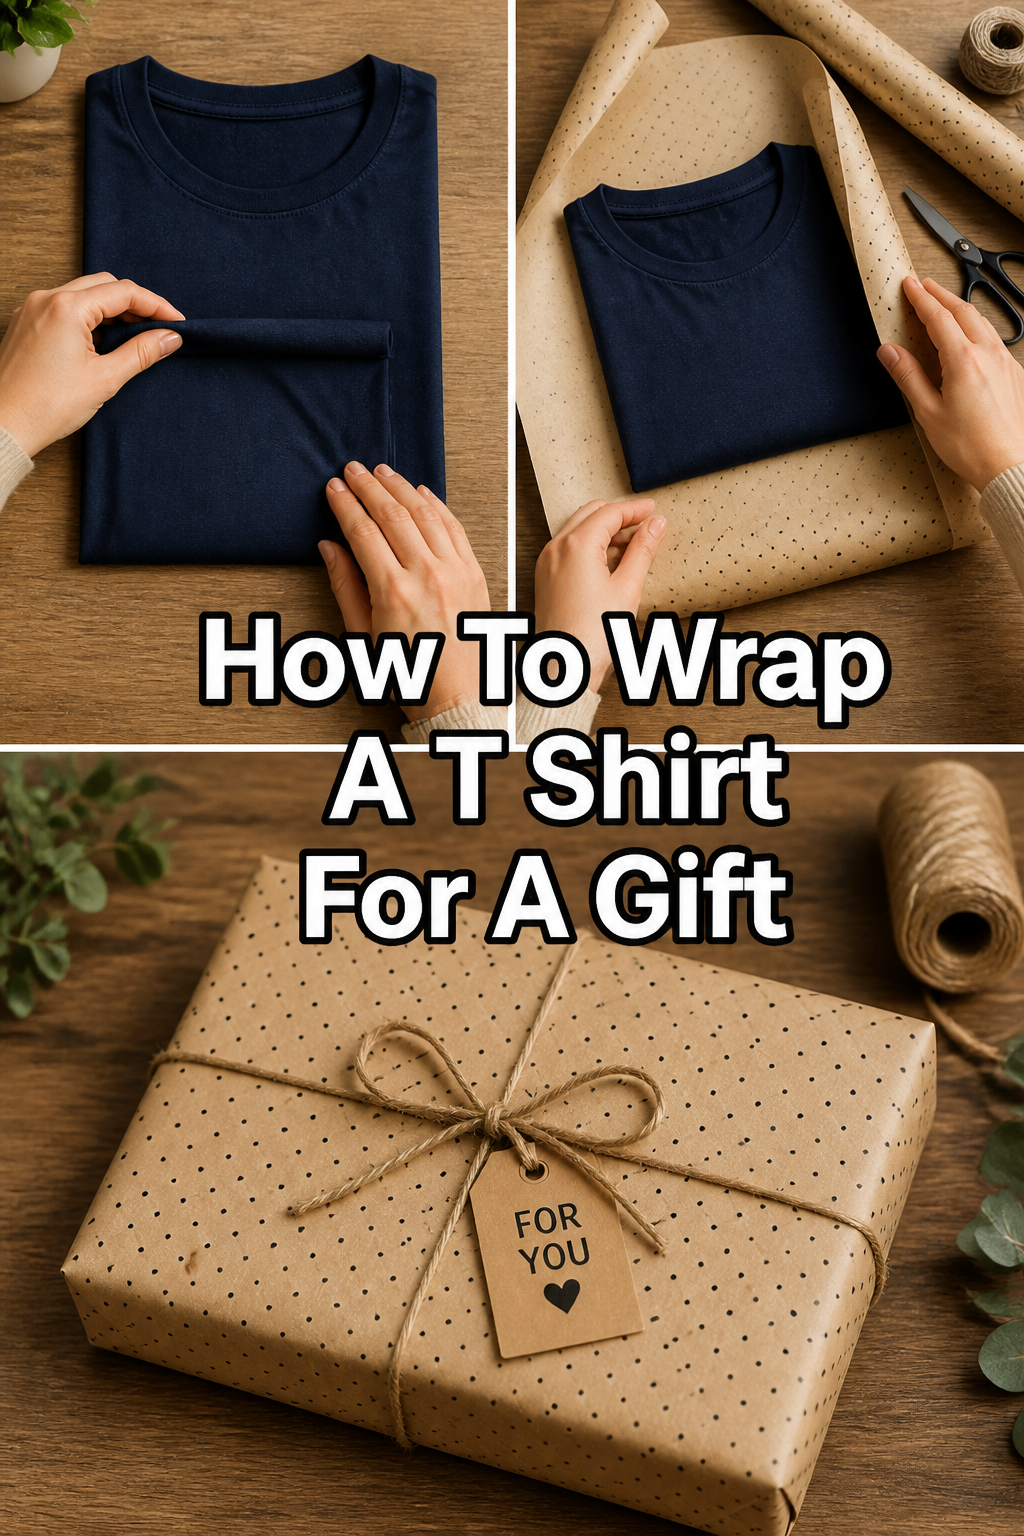
Step 1: Prepare Your T-Shirt for Perfection
Begin by ensuring your T-shirt is clean, freshly laundered, and completely wrinkle-free. A quick iron can make all the difference, creating a smooth canvas for your wrapping artistry.
Neatly fold the T-shirt into a compact, rectangular shape. Aim for a fold that is roughly the size you want your final gift package to be, usually aligning with the width of your wrapping paper. This neat foundation is crucial for a professional look.
Pro Tip: For an extra crisp fold, use a folding board or a magazine as a guide. This ensures symmetry and a perfectly flat surface, ideal for a sleek presentation.
Step 2: Measure and Cut Your Wrapping Paper
Roll out your chosen wrapping paper on a clean, flat surface, design side down. Place your neatly folded T-shirt in the center of the paper, ensuring there’s enough room on all sides.
Measure the paper so that it can comfortably wrap around the T-shirt with about 1-2 inches of overlap on the long sides. For the short sides, allow enough paper to fold down and cover the ends completely, typically twice the height of your folded T-shirt. Using sharp scissors, cut the paper precisely.
Step 3: Position the T-Shirt for Wrapping
Carefully center your folded T-shirt on the cut piece of wrapping paper. Make sure it’s equidistant from the top and bottom edges, and that the long sides have enough paper to meet in the middle.
This precise positioning prevents awkward overlaps or shortages, ensuring a smooth and even wrap. Think of it as setting the stage for a flawless performance.
Step 4: Secure the Long Sides
Bring one long edge of the wrapping paper over the T-shirt and towards the center. Then, bring the opposite long edge over, overlapping the first edge by about 1-2 inches.
Secure this seam with a strip of tape. For an invisible finish, you can use double-sided tape placed underneath the overlapping edge. This creates a clean, seamless look, perfect for a high-end feel.
Step 5: Master the Ends (The Envelope Fold)
Now, let’s create those elegant ends! Fold in the two short sides of the wrapping paper, creating crisp triangular flaps on each side of the T-shirt.
Then, fold the top and bottom edges of these triangles inward, meeting in the center. This creates a neat, envelope-style closure that looks incredibly polished.
Pro Tip: Use your fingernail or a ruler to create sharp creases on all folds. The sharper the crease, the more professional and tailored your gift will appear.
Step 6: Tape the Ends Securely
Once your envelope folds are perfectly aligned, secure them with tape. Place a piece of tape along the seam where the two folded edges meet.
You can also add a small piece of tape on the outer corners to ensure everything stays perfectly flat. This step seals your gift beautifully, ready for the next layer of charm.
Step 7: Add a Touch of Ribbon Elegance
A beautiful ribbon elevates any wrapped gift, adding a festive and luxurious touch. Choose a ribbon that complements your wrapping paper and the occasion.
Wrap the ribbon around the center of your package, either once or twice, and tie a classic bow on top. You can experiment with different ribbon textures, from satin for sophistication to twine for a rustic, handmade feel. This is where your creative vision truly shines!
Step 8: Embellish with Personal Flair
This is where you infuse your personality and the spirit of the celebration! Attach a handwritten gift tag with a heartfelt message.
Consider adding small decorative elements like dried flowers for a baby shower, a miniature ornament for a holiday gift, or a small toy car for a child’s birthday. These thoughtful touches make the gift uniquely yours and incredibly memorable.
Pro Tip: For a birthday bash, attach a small balloon or confetti-filled clear ornament. For a festive holiday gift, tuck in a sprig of evergreen or a cinnamon stick for a delightful scent. These details make your gift truly Pinterest-worthy!
Common Mistakes to Avoid
Wrinkled T-Shirt
Presenting a T-shirt that is visibly wrinkled before wrapping can diminish the overall impact of your thoughtful gesture. No matter how beautiful your wrapping paper, a crumpled item inside suggests a lack of care. Always take the extra few minutes to iron or steam the T-shirt, ensuring it’s pristine and perfectly smooth.
Too Much or Too Little Paper
Using too much wrapping paper results in bulky, messy folds and an unrefined appearance. Conversely, too little paper leads to exposed edges or an inability to properly secure the gift, making it look rushed. Measure carefully, ensuring just enough overlap for a clean, tight wrap without excess bulk.
Messy Folds and Edges
Sloppy folds and uneven edges scream amateur, detracting from the elegance you’re aiming for. The key to a polished look lies in sharp, precise creases. Take your time, use a flat surface, and press down firmly on each fold to create crisp lines that define a professional finish.
Over-Decorating
While embellishments add charm, going overboard can make your gift look cluttered and overwhelming. A cluttered gift loses its sophisticated appeal, distracting from the main presentation. Aim for one or two well-chosen decorative elements that enhance, rather than overshadow, the wrapping. Simplicity often speaks volumes.
Troubleshooting
Paper Tears Easily
If your wrapping paper is thin or delicate and prone to tearing during the process, try a gentler approach. Instead of pulling tightly, use light pressure when folding and taping. You can also reinforce delicate areas, like corners, with a small piece of clear tape on the inside before wrapping.
Ribbon Slips Off
A slipping ribbon can be frustrating and make your beautiful presentation look untidy. To prevent this, secure the ribbon to the wrapping paper with a tiny piece of double-sided tape underneath where it crosses the back of the gift. Alternatively, tie a tighter knot before forming your decorative bow, ensuring a snug fit.
Gift Looks Bulky
Sometimes, despite your best folding efforts, the T-shirt gift can still appear a bit bulky. To minimize this, ensure your T-shirt is folded as flat and compact as possible in Step 1. When wrapping, pull the paper taut (but not so tight it tears) to create a firm, streamlined package. Consider using a slightly thicker paper that holds its shape better.
Key Takeaways
- Always start with a freshly ironed and neatly folded T-shirt for a professional base.
- Measure your wrapping paper precisely to avoid excess bulk or shortages.
- Master crisp, sharp folds, especially on the ends, for an elegant finish.
- Use quality tape and consider double-sided tape for a seamless look.
- Elevate your gift with a beautiful ribbon and thoughtful, personalized embellishments.
- Remember, the wrapping is an extension of your care and makes the gift feel extra special.
Frequently Asked Questions
Can I use fabric to wrap a T-shirt?
Absolutely! Using fabric, a technique known as Furoshiki, is a beautiful and eco-friendly alternative to paper. Choose a scarf or a piece of fabric that complements the T-shirt’s style, creating a reusable and charming wrap that becomes part of the gift itself.
How can I wrap a T-shirt without a box?
This entire guide focuses on wrapping a T-shirt without a box! The key is to fold the T-shirt into a neat, compact rectangle, which provides enough structure for the wrapping paper to form a clean, box-like shape around it. The tight folds create the necessary support.
What are some eco-friendly wrapping ideas?
Beyond fabric wraps, consider using recycled paper, brown kraft paper decorated with natural elements like dried leaves or twine, or even repurposing old maps or newspaper comics for a unique touch. These options are kind to the planet and show creative thought.
How do I make the T-shirt look crisp inside?
The secret to a crisp T-shirt inside lies in the initial folding. After ironing, use a folding board or even a sturdy piece of cardboard to achieve perfectly uniform and flat folds. You can even place a thin piece of tissue paper between the folds to maintain its pristine condition until unwrapped.
Our Top Recommended Finds
- High-Quality Double-Sided Tape: Essential for invisible seams and a truly professional finish.
- Sharp Craft Scissors: Clean, precise cuts are non-negotiable for polished wrapping.
- Assorted Ribbon Collection: A variety of colors and textures allows for endless creative expression and personalization.
Unwrap the Joy: Crafting Moments to Cherish
You now possess the simple yet powerful skills to transform any T-shirt gift into a work of art. Imagine the delighted smiles and gasps of joy as your beautifully wrapped creation is received. This isn’t just about wrapping; it’s about making every celebration, every birthday, every holiday, and every “just because” moment feel incredibly special.
So, gather your supplies, let your creativity flow, and start crafting those unforgettable moments today. Your thoughtful touch will turn a simple T-shirt into a cherished keepsake, long before it’s even worn. Go forth and make some magic!